> ## Documentation Index
> Fetch the complete documentation index at: https://docs.levelblue.com/llms.txt
> Use this file to discover all available pages before exploring further.
# Configuring a Custom BlueApp for Use with Your USM Anywhere
LevelBlue provides the opportunity to configure your own custom BlueApps to better monitor activity in your USM Anywhere environment. You can use custom BlueApps to extend the threat detection and response capabilities of the USM Anywhere platform according to your needs. Import data from products and services that use a Representational State Transfer (REST) API by configuring your custom BlueApp using basic authentication, an API key, or OAuth2.
**Important:** Custom BlueApps connect using dynamic IP addresses. LevelBlue recommends that you allow BlueApps outbound access across all IP addresses.
**To configure a custom BlueApp**
1. Go to **Data Sources > BlueApps > Custom Apps**.
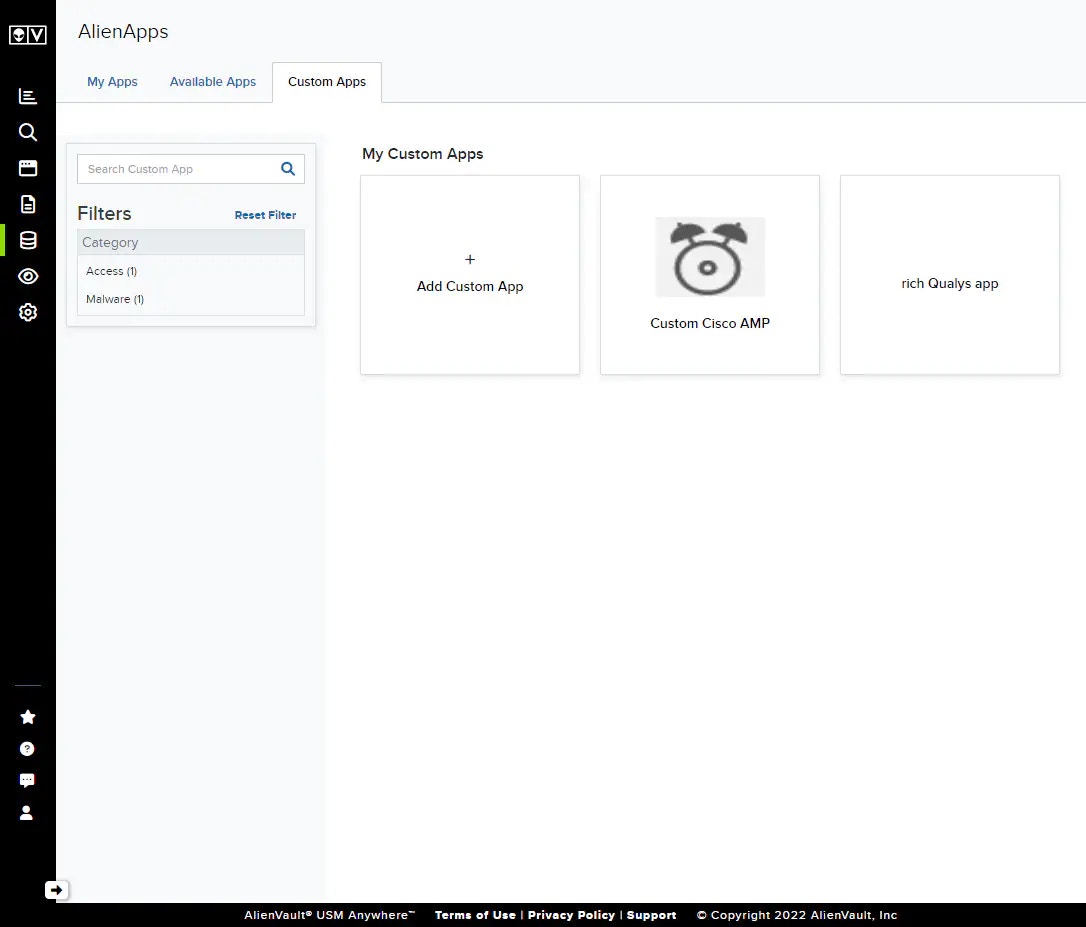 2. Click **Add Custom App** to begin creating your new BlueApp.
3. On the App Information and Mapping page, give your BlueApp a name and some identifying information.
2. Click **Add Custom App** to begin creating your new BlueApp.
3. On the App Information and Mapping page, give your BlueApp a name and some identifying information.
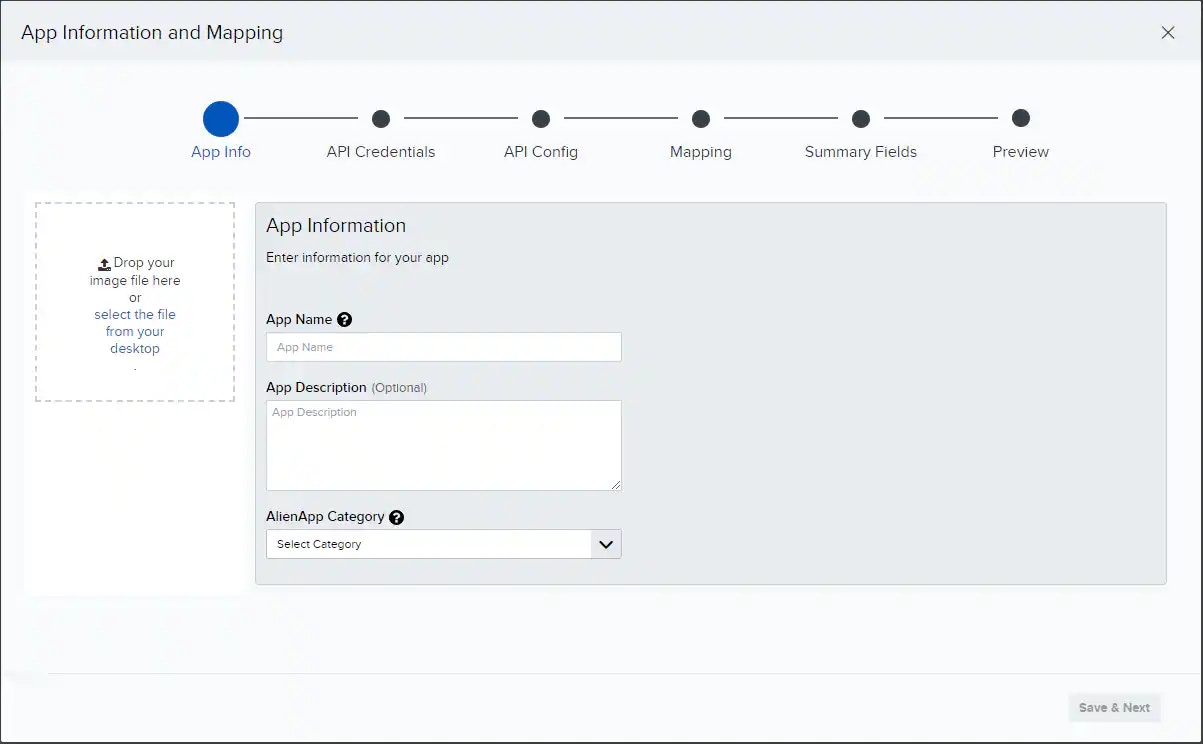 * **App Name**: Provide a unique name for your BlueApp.
* **(Optional) App Description**: Describe the new BlueApp's intent or functionality.
* **AlienApp Category**: Tag your app with a category, which will help you organize your BlueApps. You can search for BlueApps by category in the Custom App main page.
* **(Optional) Logo**: You may import a logo for this BlueApp.
4. Click **Save & Next** to save your new BlueApp and begin configuring it.
5. Configure the authentication credentials your BlueApp will use to connect to the third-party application. When you have finished entering your credentials, confirm them by clicking **Test Connection**.
Important: This is entirely dependent upon your third-party application. Be sure to make selections in line with the authentication method required by your third-party application.
* **App Name**: Provide a unique name for your BlueApp.
* **(Optional) App Description**: Describe the new BlueApp's intent or functionality.
* **AlienApp Category**: Tag your app with a category, which will help you organize your BlueApps. You can search for BlueApps by category in the Custom App main page.
* **(Optional) Logo**: You may import a logo for this BlueApp.
4. Click **Save & Next** to save your new BlueApp and begin configuring it.
5. Configure the authentication credentials your BlueApp will use to connect to the third-party application. When you have finished entering your credentials, confirm them by clicking **Test Connection**.
Important: This is entirely dependent upon your third-party application. Be sure to make selections in line with the authentication method required by your third-party application.
 1. In the Auth Type drop-down list, select **API Key**.
2. Enter the necessary connection information for your BlueApp to connect to the API:
* **Event URL**: The destination address for the API connection.
* **Header Name and Header Value**: The API authentication key-value pair for your BlueApp to use when connecting to the third-party API.
* **Request Method**: Select **GET**, **POST**, or **PUT**.
3. Click **Test Connection** to verify the connection information you have just entered.
1. In the Auth Type drop-down list, select **Basic Auth**.
2. Enter the necessary connection information for your BlueApp to connect to the API:
* **Event URL**: The destination address for the authenticated connection.
* **Username and Password**: The authentication credentials for your BlueApp to use when connecting to the third-party API.
* **Request Method**: Select **GET**, **POST**, or **PUT**.
3. Click **Test Connection** to verify the connection information you have just entered.
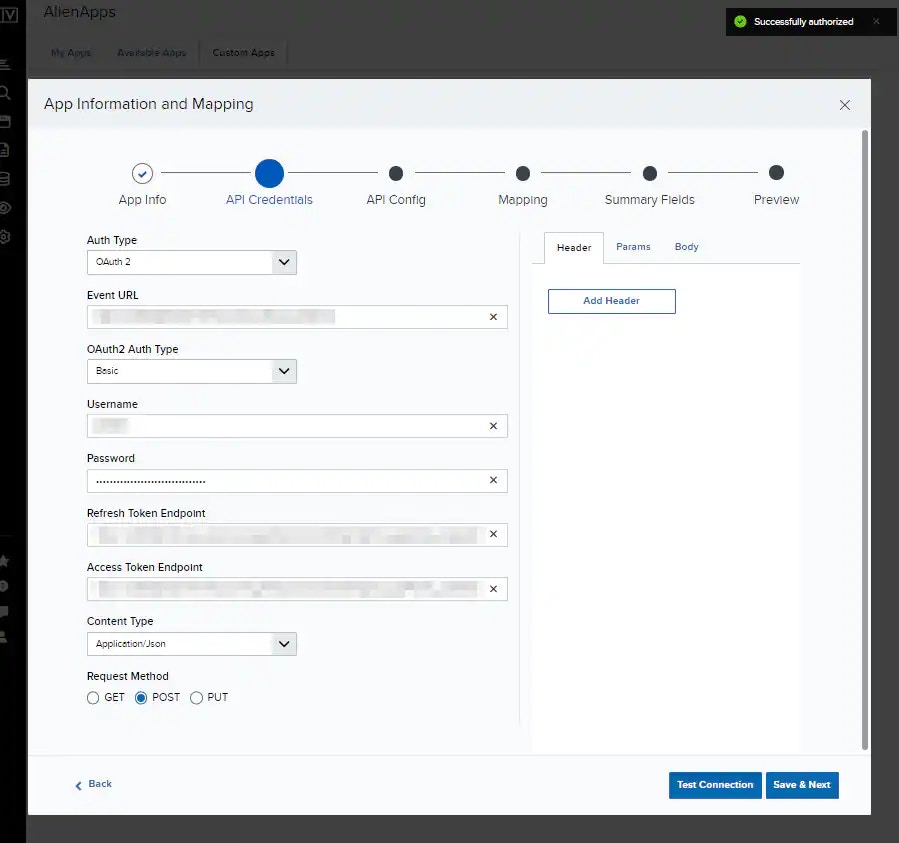
1. In the Auth Type drop-down list, select **OAuth2**.
2. Enter your Event URL.
3. Use the OAuth2 Auth Type drop-down to select your authentication type, and then enter the information required by that authentication type:
* **Basic**: Configure the app to authenticate with a username and password.
* **Client ID and Client Secret**: Configure the app to authenticate with a client ID and secret.
4. Enter the necessary connection information for your BlueApp to connect to the API:
* **Client ID and Client Secret**: The authentication credentials for your BlueApp to use when connecting to the third-party API if using client ID and client secret authentication.
* **Username and Password**: The authentication credentials for your BlueApp to use when connecting to the third-party API if using basic authentication.
* **Access Token Endpoint**: The access token endpoint for your OAuth2 connection.
* **Refresh Token Endpoint**: The refresh token endpoint for your OAuth2 connection.
* **Content Type**: The appropriate content type for your connection.
* **Request Method**: Select **GET**, **POST**, or **PUT**.
5. Click **Test Connection** to verify the connection information you have just entered.
6. Once your credentials have been verified, click Save & Next.
**Important:** The credentials you have entered will be validated when you click Test Connection. If they cannot be verified at this step, you must correct them and ensure they are validated before moving on to the next step.
7. Represent the API configuration your custom AlienApp should expect from your third-party resource.
1. In the Auth Type drop-down list, select **API Key**.
2. Enter the necessary connection information for your BlueApp to connect to the API:
* **Event URL**: The destination address for the API connection.
* **Header Name and Header Value**: The API authentication key-value pair for your BlueApp to use when connecting to the third-party API.
* **Request Method**: Select **GET**, **POST**, or **PUT**.
3. Click **Test Connection** to verify the connection information you have just entered.
1. In the Auth Type drop-down list, select **Basic Auth**.
2. Enter the necessary connection information for your BlueApp to connect to the API:
* **Event URL**: The destination address for the authenticated connection.
* **Username and Password**: The authentication credentials for your BlueApp to use when connecting to the third-party API.
* **Request Method**: Select **GET**, **POST**, or **PUT**.
3. Click **Test Connection** to verify the connection information you have just entered.
1. In the Auth Type drop-down list, select **OAuth2**.
2. Enter your Event URL.
3. Use the OAuth2 Auth Type drop-down to select your authentication type, and then enter the information required by that authentication type:
* **Basic**: Configure the app to authenticate with a username and password.
* **Client ID and Client Secret**: Configure the app to authenticate with a client ID and secret.
4. Enter the necessary connection information for your BlueApp to connect to the API:
* **Client ID and Client Secret**: The authentication credentials for your BlueApp to use when connecting to the third-party API if using client ID and client secret authentication.
* **Username and Password**: The authentication credentials for your BlueApp to use when connecting to the third-party API if using basic authentication.
* **Access Token Endpoint**: The access token endpoint for your OAuth2 connection.
* **Refresh Token Endpoint**: The refresh token endpoint for your OAuth2 connection.
* **Content Type**: The appropriate content type for your connection.
* **Request Method**: Select **GET**, **POST**, or **PUT**.
5. Click **Test Connection** to verify the connection information you have just entered.
6. Once your credentials have been verified, click Save & Next.
**Important:** The credentials you have entered will be validated when you click Test Connection. If they cannot be verified at this step, you must correct them and ensure they are validated before moving on to the next step.
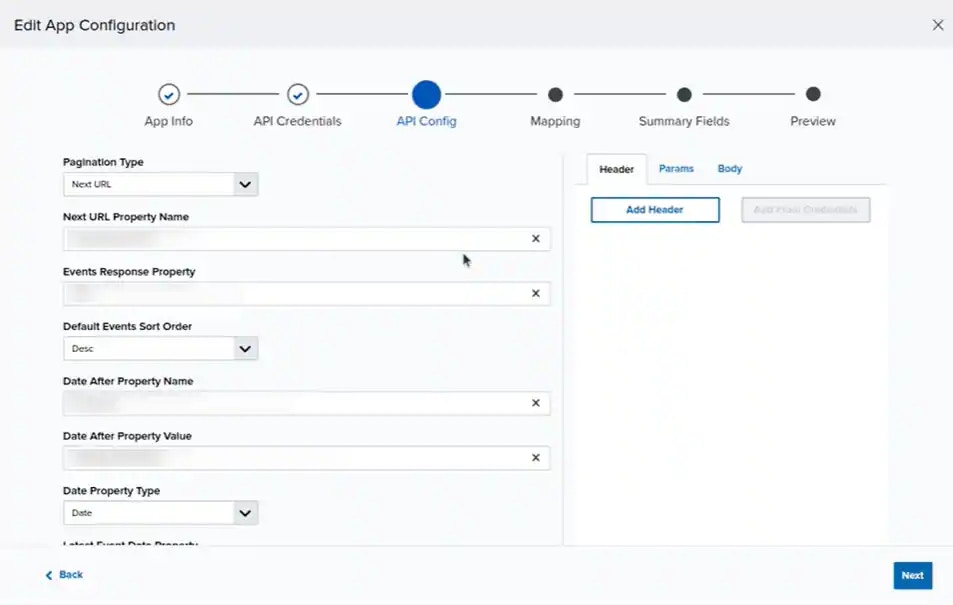
7. Represent the API configuration your custom AlienApp should expect from your third-party resource.
 **Warning:** This is entirely dependent upon your third-party application. Be sure to make selections in line with the authentication method required by your third-party application.
1. Specify the return format, pagination methods, date format, and output format (JSON, XML, or CEF).
2. Configure the required values your API call may require. When the field is nested in the return under parent fields, use a period to separate parent and child fields.
3. Configure Headers, Params, and Body as required by the third-party application's API.
**Note:** If there are any fields you want to be able to filter against, you must configure them under Params.
Click **Next** to continue.
8. USM Anywhere uses the configuration details from the previous two steps to connect with your third party and extract data fields found in the logs they send. Use this page to configure the mapping details between the third-party application's data fields and fields in USM Anywhere by dragging and dropping from the detected fields to their matching fields in USM Anywhere.
**Warning:** This is entirely dependent upon your third-party application. Be sure to make selections in line with the authentication method required by your third-party application.
1. Specify the return format, pagination methods, date format, and output format (JSON, XML, or CEF).
2. Configure the required values your API call may require. When the field is nested in the return under parent fields, use a period to separate parent and child fields.
3. Configure Headers, Params, and Body as required by the third-party application's API.
**Note:** If there are any fields you want to be able to filter against, you must configure them under Params.
Click **Next** to continue.
8. USM Anywhere uses the configuration details from the previous two steps to connect with your third party and extract data fields found in the logs they send. Use this page to configure the mapping details between the third-party application's data fields and fields in USM Anywhere by dragging and dropping from the detected fields to their matching fields in USM Anywhere.
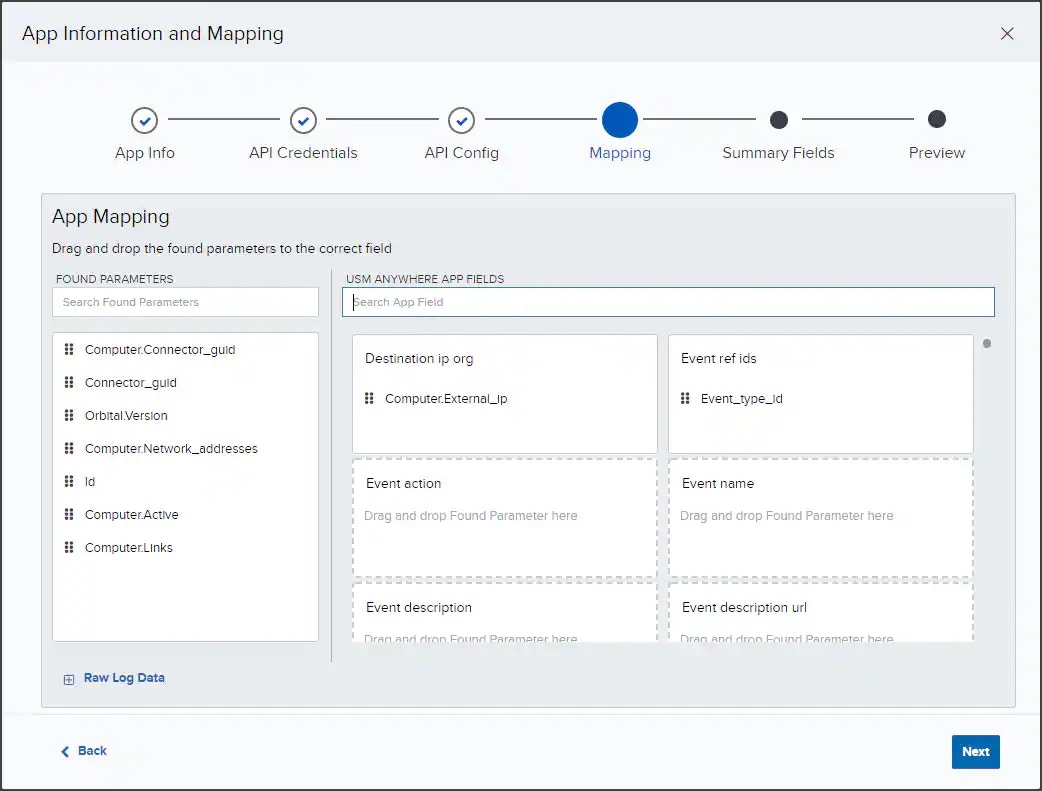 * **Found Parameters:** Fields on the left are extracted from logs fetched from your third-party application.
* **USM Anywhere App Fields:** Fields on the right are the standard USM Anywhere data labels. Users can map multiple found parameters to the same USM Anywhere app field.
**Important:** See [**Event Keys**](../../user-guide/events/event-keys) descriptions to help you match extracted fields with standard USM Anywhere data fields.
Click **Next** to continue.
9. Select which log fields to include in the Event Details for events your new BlueApp will generate.
* **Found Parameters:** Fields on the left are extracted from logs fetched from your third-party application.
* **USM Anywhere App Fields:** Fields on the right are the standard USM Anywhere data labels. Users can map multiple found parameters to the same USM Anywhere app field.
**Important:** See [**Event Keys**](../../user-guide/events/event-keys) descriptions to help you match extracted fields with standard USM Anywhere data fields.
Click **Next** to continue.
9. Select which log fields to include in the Event Details for events your new BlueApp will generate.
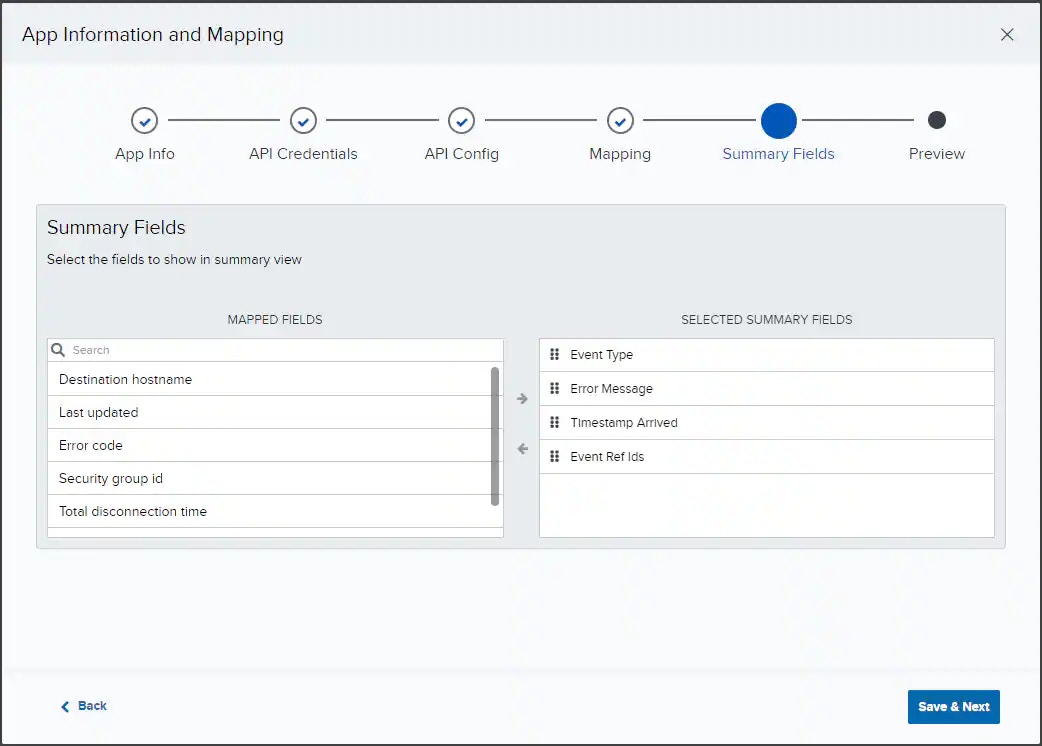 Click **Save & Next** to continue.
10. Use the Preview screen to review your custom BlueApp's configuration.
Click **Save & Next** to continue.
10. Use the Preview screen to review your custom BlueApp's configuration.
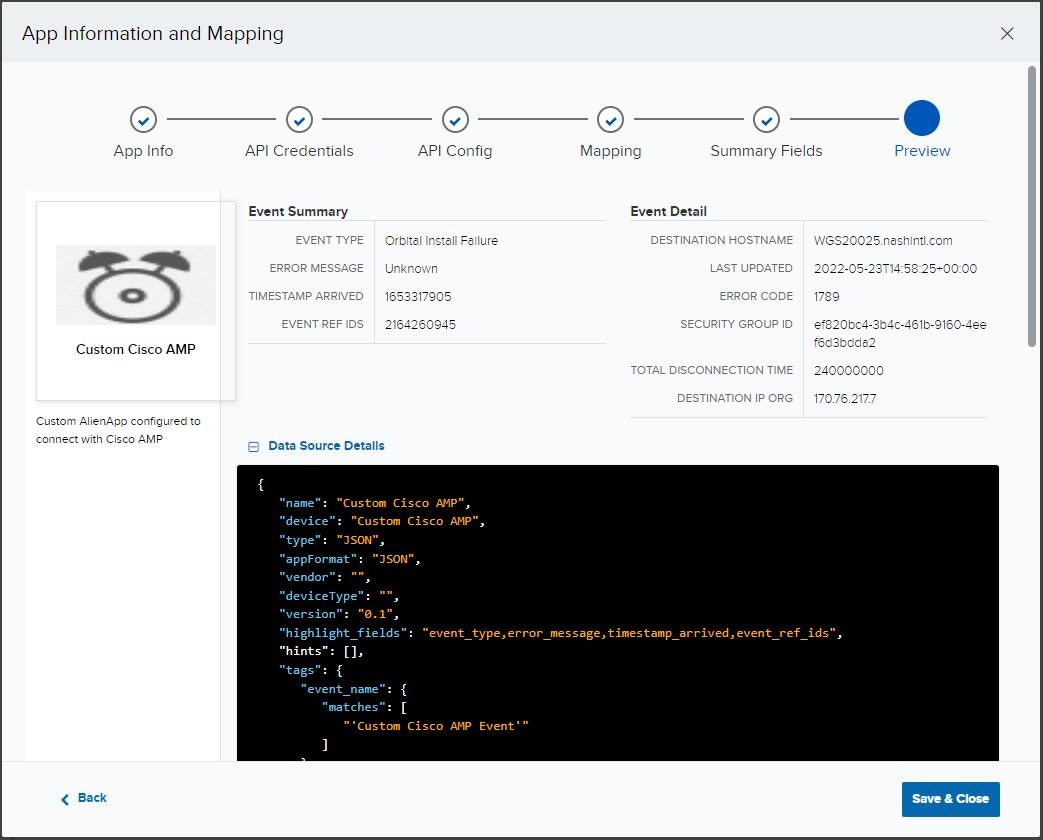 You can use the Back button to navigate to any previous page and make changes.
11. Once you have finalized your BlueApp details and configuration, click **Save & Close** to finish creating your new BlueApp.
After you have finalized and created your custom BlueApp, you can continue to make changes or refine its configuration by returning to the Custom Apps page and opening your BlueApp for editing.
You can use the Back button to navigate to any previous page and make changes.
11. Once you have finalized your BlueApp details and configuration, click **Save & Close** to finish creating your new BlueApp.
After you have finalized and created your custom BlueApp, you can continue to make changes or refine its configuration by returning to the Custom Apps page and opening your BlueApp for editing.