> ## Documentation Index
> Fetch the complete documentation index at: https://docs.levelblue.com/llms.txt
> Use this file to discover all available pages before exploring further.
# BlueApp for Office 365 Requirements
Before you can [configure](/documentation/usm-anywhere/alienapps-guide/office-365/config-alienapp-office365) and use the BlueApp for Office 365, you must make sure that your network and your Microsoft Office 365 environment are set up to support the API calls through Microsoft Azure Active Directory (AD) and audit log search.
## Firewall Permissions
This integration requires connectivity between your USM Anywhere Sensor and the Microsoft APIs. If you have an Azure Sensor deployed in your Azure subscription, you should use this sensor to configure the BlueApp because you don't need to configure additional permissions.
If you use a *non-Azure Sensor*, you must set your firewall permissions based on the following table to allow inbound and outbound connections for the sensor.
**Firewall Permissions for the USM Anywhere Sensor**
| Type | Port | Endpoint | Purpose |
| ---- | ---- | ---------------------------------------------------------- | ---------------------------------------------------------------- |
| TCP | 443 | [https://login.windows.net](https://login.windows.net) | Authentication for your Office 365 account |
| TCP | 443 | [https://graph.microsoft.com](https://graph.microsoft.com) | Queries to retrieve log data from the Microsoft Graph APIs |
| TCP | 443 | [https://manage.office.com](https://manage.office.com) | Queries to retrieve log data from the Office 365 Management APIs |
To access Office 365 US Government, allow connections to `graph.microsoft.us` instead of graph.microsoft.com and `manage.office365.us` instead of manage.office.com.
## Office 365 Account Privileges
To access Office 365 Management APIs (such as mail, contacts, calendar, and files), you must have an Office 365 Business account with global administrator privileges. See the [Microsoft Support article](https://support.office.com/en-us/article/What-Office-365-business-product-or-license-do-I-have-f8ab5e25-bf3f-4a47-b264-174b1ee925fd) to determine which Office 365 Business products you have.
If you have multiple Office 365 accounts, you must deploy a USM Anywhere Sensor in each Office 365 account from which you want to collect events.
## Azure AD Registration
BlueApp for Office 365 configuration includes creating an application in Azure AD. This application securely authenticates the BlueApp for Office 365 so that it can access and collect data according to the services and permission levels you define. This function requires that your Office 365 account is associated with an Azure subscription.
If you do not already have an Azure subscription, you must create one. The subscription is required to register an app in Azure AD for your Office 365 account.
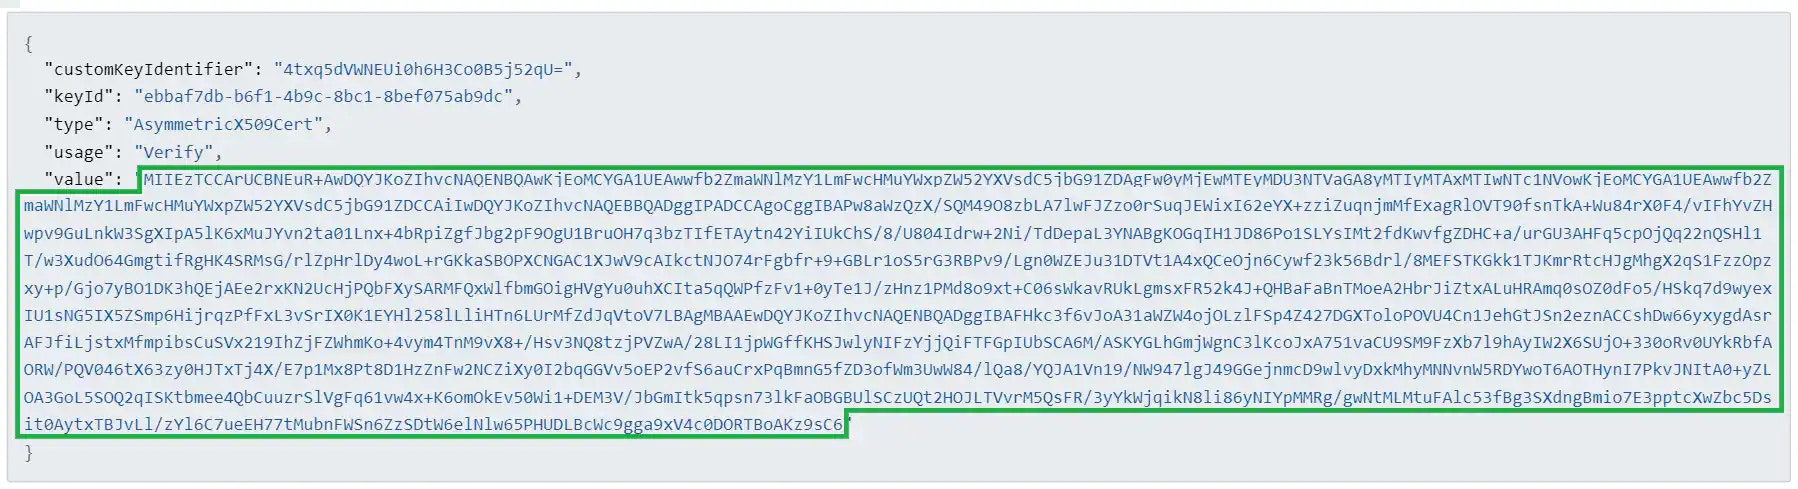
Before registering the application, you must first save a certificate from the BlueApp for Office 365.
**To obtain the certificate**
1. In USM Anywhere, go to **Data Sources > BlueApps**.
2. Click the **Available Apps** tab.
3. Enter **Office 365** in the Search field, and then click the tile.
4. Click the **Instructions** tab.
The page contains a manifest for the BlueApp and an abbreviated version of the following procedure.
5. Save the content of the *value* field within the manifest in a file named `cert.pem`.
**To register USM Anywhere in Azure**
1. Save the content of your **value** field in a file named `cert.pem`. Do not include quotation marks:
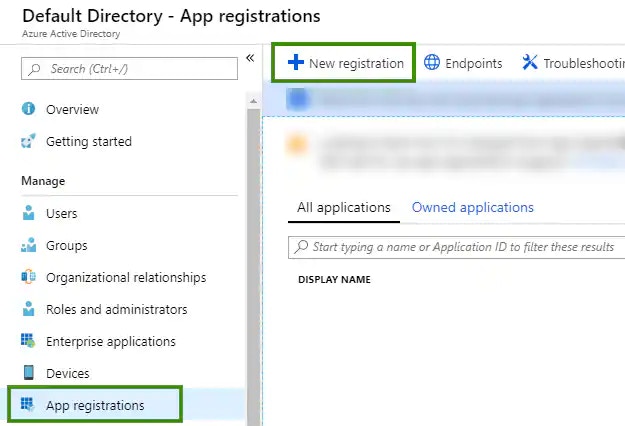
 2. Log in to the [Azure portal](https://portal.azure.com/#blade/Microsoft_AAD_IAM/ActiveDirectoryMenuBlade/Overview) and click **Azure Active Directory**.
3. Go to **App Registrations**, and then click **New Registration**.
2. Log in to the [Azure portal](https://portal.azure.com/#blade/Microsoft_AAD_IAM/ActiveDirectoryMenuBlade/Overview) and click **Azure Active Directory**.
3. Go to **App Registrations**, and then click **New Registration**.
 4. Register the application:
a. Enter a name for the application.
b. In Supported Account Types, select who can use this application.
Your selection decides if this application is single-tenant or multi-tenant in the Microsoft identity platform. See [Microsoft Documentation](https://docs.microsoft.com/en-us/azure/active-directory/develop/quickstart-register-app#register-an-application) for the description of each type.
c. In Redirect URI, enter your USM Anywhere login URL (for example, *[https://acmecompany.alienvault.cloud](https://acmecompany.alienvault.cloud)*).
4. Register the application:
a. Enter a name for the application.
b. In Supported Account Types, select who can use this application.
Your selection decides if this application is single-tenant or multi-tenant in the Microsoft identity platform. See [Microsoft Documentation](https://docs.microsoft.com/en-us/azure/active-directory/develop/quickstart-register-app#register-an-application) for the description of each type.
c. In Redirect URI, enter your USM Anywhere login URL (for example, *[https://acmecompany.alienvault.cloud](https://acmecompany.alienvault.cloud)*).
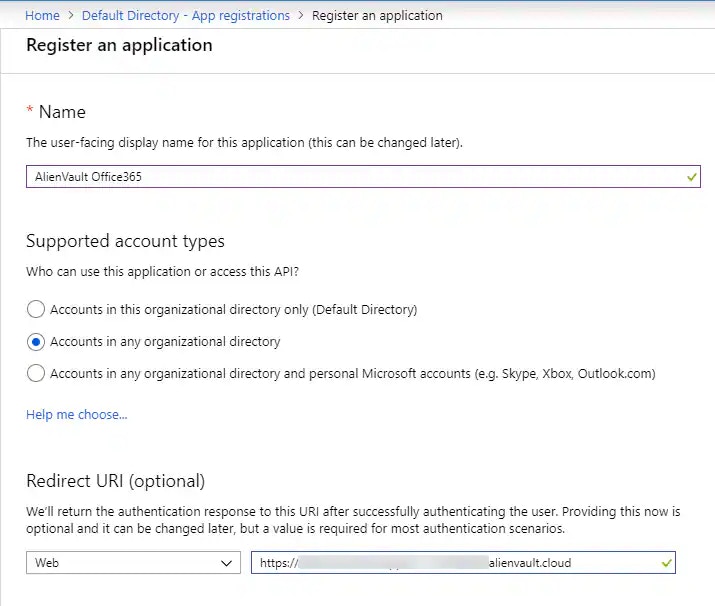 d. Click **Register**.
The application is created and the overview page displays.
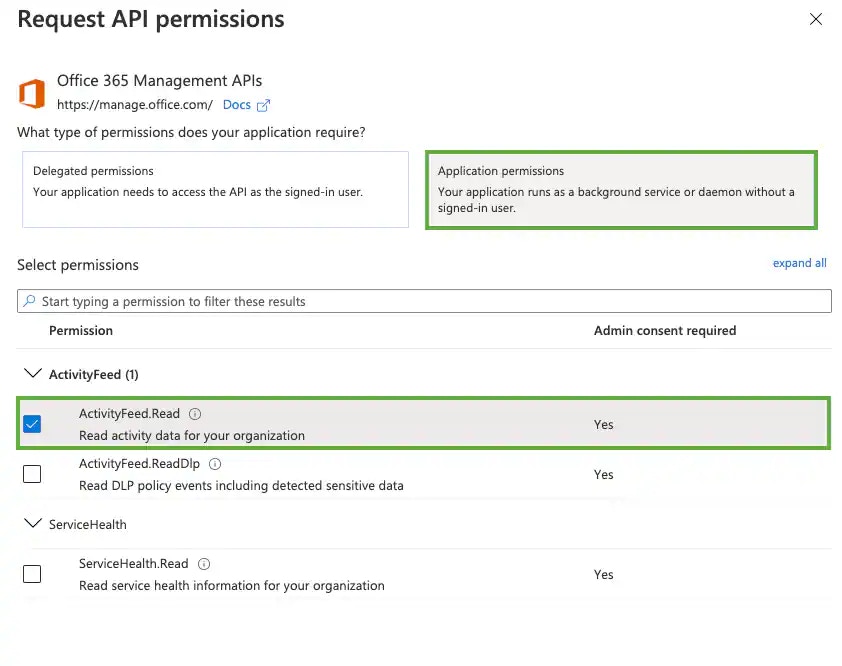
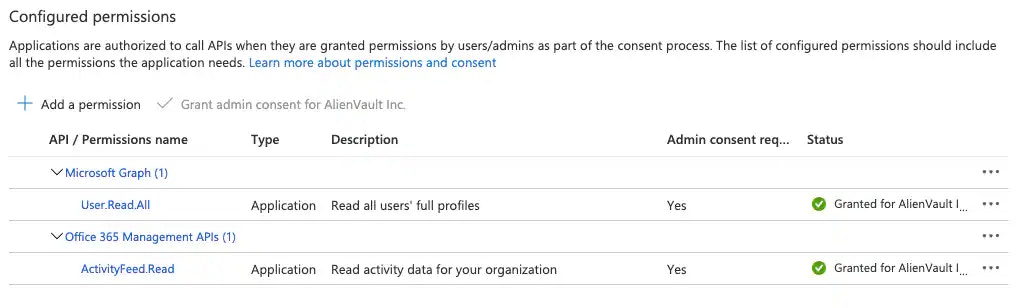
5. Add permissions for accessing Office 365 Management APIs:
a. Go to **API Permissions**, and then click **Add a Permission**.
b. Under Request API Permissions, click **Office 365 Management APIs**.
c. Click **Application Permissions**.
d. Expand the groups to select **ActivityFeed.Read** permissions, and then click **Add Permissions**.
d. Click **Register**.
The application is created and the overview page displays.
5. Add permissions for accessing Office 365 Management APIs:
a. Go to **API Permissions**, and then click **Add a Permission**.
b. Under Request API Permissions, click **Office 365 Management APIs**.
c. Click **Application Permissions**.
d. Expand the groups to select **ActivityFeed.Read** permissions, and then click **Add Permissions**.
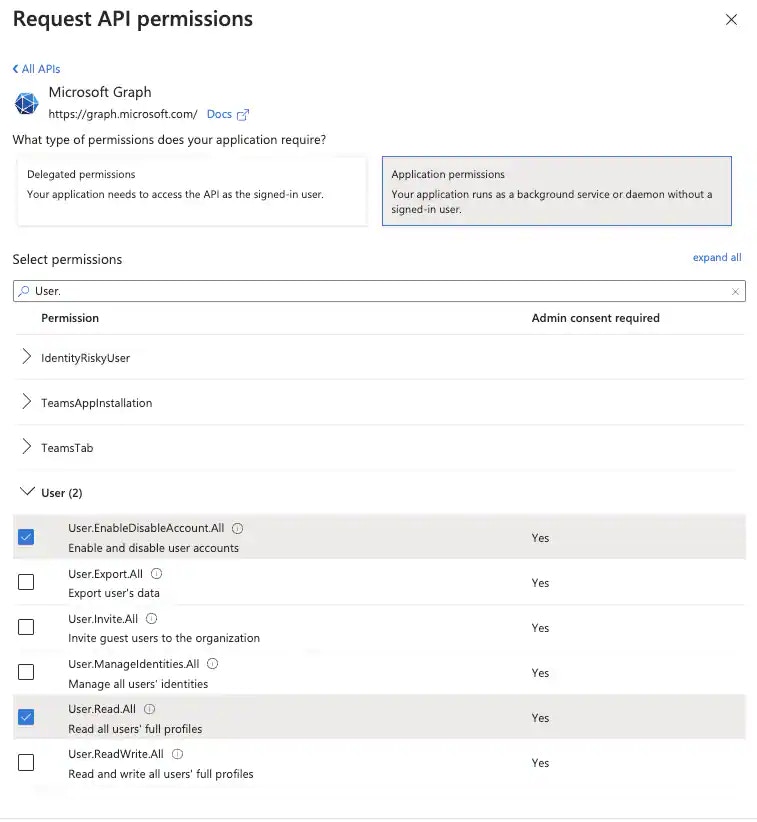
 6. Add permissions for pulling Azure AD users:
a. Go to **API Permissions**, and then click **Add a Permission**.
b. Under Request API Permissions, click **Microsoft Graph**.
c. Click **Application Permissions**.
d. Expand User to select **User.Read.All** and **Users.EnableDisableAccount.All** permissions, and then click **Add Permissions**.
6. Add permissions for pulling Azure AD users:
a. Go to **API Permissions**, and then click **Add a Permission**.
b. Under Request API Permissions, click **Microsoft Graph**.
c. Click **Application Permissions**.
d. Expand User to select **User.Read.All** and **Users.EnableDisableAccount.All** permissions, and then click **Add Permissions**.
 e. Click **Grant Admin Consent for Default Directory**, and then click **Yes** when prompted.
You must grant permissions for the application to work. You must have the global administrator privileges to successfully grant permissions.
e. Click **Grant Admin Consent for Default Directory**, and then click **Yes** when prompted.
You must grant permissions for the application to work. You must have the global administrator privileges to successfully grant permissions.
 7. Update the credentials of the application:
a. Go to **Certificates & Secrets**.
7. Update the credentials of the application:
a. Go to **Certificates & Secrets**.
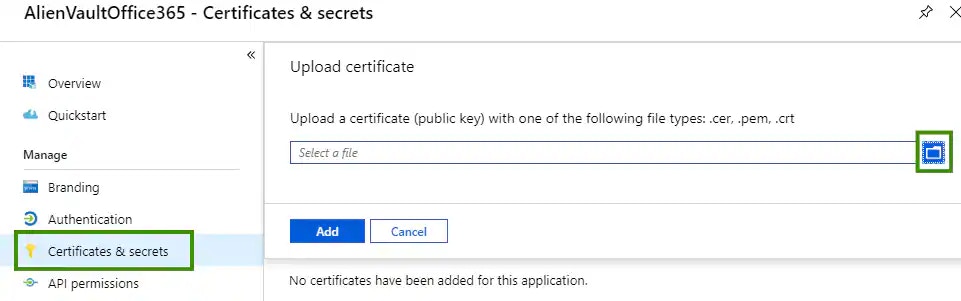 b. Select the `cert.pem` file created in the previous procedure, and then click **Add**.
The credentials of the application are updated.
8. Return to the overview page of the application and copy the **Application (Client) ID** and **Directory (Tenant) ID** to your clipboard.
b. Select the `cert.pem` file created in the previous procedure, and then click **Add**.
The credentials of the application are updated.
8. Return to the overview page of the application and copy the **Application (Client) ID** and **Directory (Tenant) ID** to your clipboard.
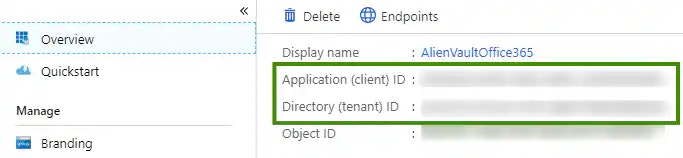 Return to USM Anywhere to finish setting up the BlueApp for Office 365. See [Configuring the BlueApp for Office 365](https://cybersecurity.att.com/documentation/usm-anywhere/alienapps-guide/office-365/config-alienapp-office365.htm) for more information.
## Audit Log Search
Office 365 audit logging records almost every significant action, including Office 365 logins, viewing documents, downloading documents, sharing documents, setting changes, and password resets. Office 365 includes the Security & Compliance Center to support search capabilities for these logs. You can use the search capabilities to compare events generated by the BlueApp for Office 365 with the information logged in the Office 365 environment.
This feature is required for logs to be collected and is enabled by default as of January 2019. See the [Microsoft Support article](https://support.office.com/en-us/article/turn-office-365-audit-log-search-on-or-off-e893b19a-660c-41f2-9074-d3631c95a014) for more detailed information.
## Mailbox Auditing
To collect additional mailbox access activity in your Office 365 environment, you must enable mailbox audit logging. Microsoft mailbox auditing records actions performed by mailbox owners, delegates, and administrators. Mailbox auditing in Office 365 is not mandatory for log collection using the BlueApp for Office 365, but it is turned on by default starting as of January 2019. See [the Microsoft Support article](https://support.office.com/en-us/article/Enable-mailbox-auditing-in-Office-365-aaca8987-5b62-458b-9882-c28476a66918) for detailed information.
Enabling mailbox auditing requires that you can connect to the Microsoft Exchange Online PowerShell. See [Using PowerShell with Exchange Online](https://technet.microsoft.com/en-us/library/jj200677\(v=exchg.160\).aspx) on the Microsoft site for more information.
It is a best practice to enable global audit logging, including non-owner mailbox access on every mailbox in your tenancy. You can use the following command to enable this auditing:
```
Get-Mailbox -ResultSize Unlimited -Filter {RecipientTypeDetails -eq "UserMailbox" -or RecipientTypeDetails -eq "SharedMailbox" -or RecipientTypeDetails -eq "RoomMailbox" -or RecipientTypeDetails -eq "DiscoveryMailbox"}| Set-Mailbox -AuditEnabled $true -AuditLogAgeLimit 365 -AuditOwner Create,HardDelete,MailboxLogin,MoveToDeletedItems,SoftDelete,Update,UpdateInboxRules
```
Return to USM Anywhere to finish setting up the BlueApp for Office 365. See [Configuring the BlueApp for Office 365](https://cybersecurity.att.com/documentation/usm-anywhere/alienapps-guide/office-365/config-alienapp-office365.htm) for more information.
## Audit Log Search
Office 365 audit logging records almost every significant action, including Office 365 logins, viewing documents, downloading documents, sharing documents, setting changes, and password resets. Office 365 includes the Security & Compliance Center to support search capabilities for these logs. You can use the search capabilities to compare events generated by the BlueApp for Office 365 with the information logged in the Office 365 environment.
This feature is required for logs to be collected and is enabled by default as of January 2019. See the [Microsoft Support article](https://support.office.com/en-us/article/turn-office-365-audit-log-search-on-or-off-e893b19a-660c-41f2-9074-d3631c95a014) for more detailed information.
## Mailbox Auditing
To collect additional mailbox access activity in your Office 365 environment, you must enable mailbox audit logging. Microsoft mailbox auditing records actions performed by mailbox owners, delegates, and administrators. Mailbox auditing in Office 365 is not mandatory for log collection using the BlueApp for Office 365, but it is turned on by default starting as of January 2019. See [the Microsoft Support article](https://support.office.com/en-us/article/Enable-mailbox-auditing-in-Office-365-aaca8987-5b62-458b-9882-c28476a66918) for detailed information.
Enabling mailbox auditing requires that you can connect to the Microsoft Exchange Online PowerShell. See [Using PowerShell with Exchange Online](https://technet.microsoft.com/en-us/library/jj200677\(v=exchg.160\).aspx) on the Microsoft site for more information.
It is a best practice to enable global audit logging, including non-owner mailbox access on every mailbox in your tenancy. You can use the following command to enable this auditing:
```
Get-Mailbox -ResultSize Unlimited -Filter {RecipientTypeDetails -eq "UserMailbox" -or RecipientTypeDetails -eq "SharedMailbox" -or RecipientTypeDetails -eq "RoomMailbox" -or RecipientTypeDetails -eq "DiscoveryMailbox"}| Set-Mailbox -AuditEnabled $true -AuditLogAgeLimit 365 -AuditOwner Create,HardDelete,MailboxLogin,MoveToDeletedItems,SoftDelete,Update,UpdateInboxRules
```