> ## Documentation Index
> Fetch the complete documentation index at: https://docs.levelblue.com/llms.txt
> Use this file to discover all available pages before exploring further.
# Orchestration Actions for BlueApp for ServiceNow
Orchestration actions for BlueApp for ServiceNow can be performed via the Events, Alarms, Rules, and Investigation pages.
## Creating Change Request from Events/Alarms
**To create change requests from an event or alarm**
1. In USM Anywhere, go to the **Alarms** (**Activity > Alarms**) or **Events** (**Activity > Events**) page.
2. Click the alarm or event to open the details.
3. Click **Select Action**.
4. In the Select Action dialog box, select the **ServiceNow** tile.
5. **\[OPTIONAL]** If you have more than one USM Anywhere Sensor configured for the BlueApp for ServiceNow, use the **Select Sensor** option to set the sensor you want to use for the action.
6. Select the **Create a Change Request** option from the **App Action** dropdown. Additional fields appear below with event/alarm details automatically populated.
7. Modify the rest of the fields accordingly.
Configuration items, like the **Source Address** and **Destination Address**, are handled by the backend. If the fields are empty, you can select one or more configurations from the provided list.
8. You can also modify the default values in the **Category**, **Priority**, **Urgency**, and **Assign To** fields.
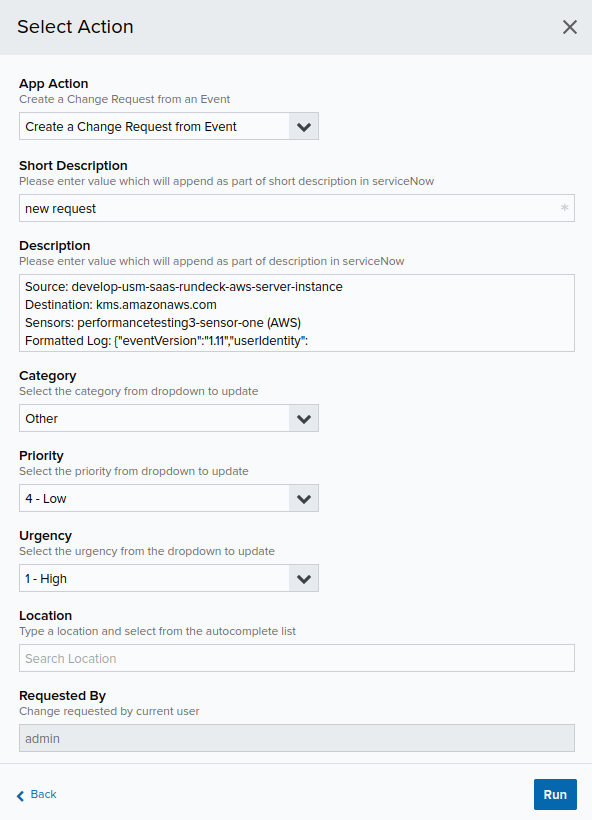 9. Once done, click **Run**.
## Updating Change Requests from Events/Alarms
**To update a change request from an event or alarm**
1. In USM Anywhere, go to the **Alarms** (**Activity > Alarms**) or **Events** (**Activity > Events**) page.
2. Click the alarm or event to open the details.
3. Click **Select Action**.
4. In the Select Action dialog box, select the **ServiceNow** tile.
5. **\[OPTIONAL]** If you have more than one USM Anywhere Sensor configured for the BlueApp for ServiceNow, use the **Select Sensor** option to set the sensor you want to use for the action.
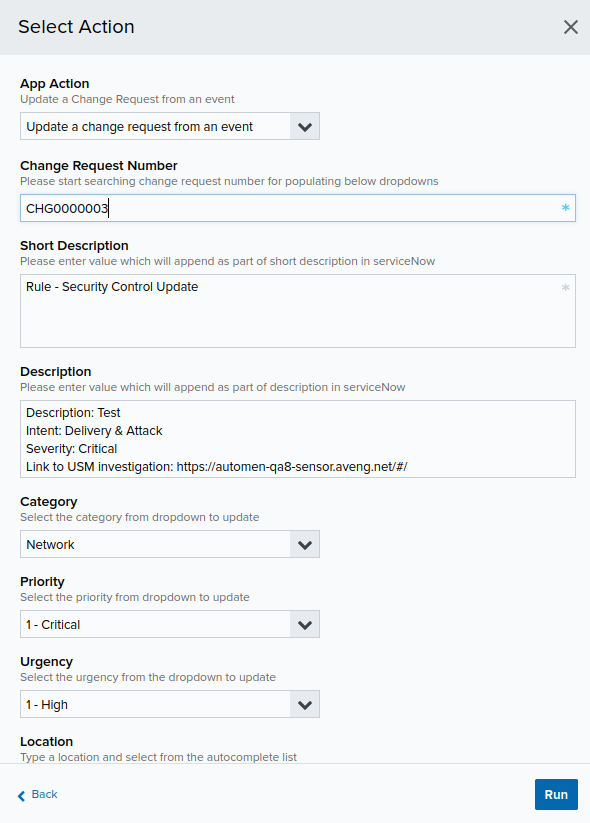
6. Select the **Update a Change Request** option from the **App Action** dropdown.
7. Select the **Change Request Number** from the dropdown. Additional fields appear below.
8. Modify the rest of the fields accordingly.
9. Once done, click **Run**.
## Updating Change Requests from Events/Alarms
**To update a change request from an event or alarm**
1. In USM Anywhere, go to the **Alarms** (**Activity > Alarms**) or **Events** (**Activity > Events**) page.
2. Click the alarm or event to open the details.
3. Click **Select Action**.
4. In the Select Action dialog box, select the **ServiceNow** tile.
5. **\[OPTIONAL]** If you have more than one USM Anywhere Sensor configured for the BlueApp for ServiceNow, use the **Select Sensor** option to set the sensor you want to use for the action.
6. Select the **Update a Change Request** option from the **App Action** dropdown.
7. Select the **Change Request Number** from the dropdown. Additional fields appear below.
8. Modify the rest of the fields accordingly.
 9. Once done, click **Run**.
## Creating Change Requests from Rule
**To create a change request from a rule**
1. Go to **Data Sources** > **Blue Apps** > **Available Apps**.
2. Search for **ServiceNow**, and then click the tile.
3. In the BlueApp for ServiceNow page, click the **Rules** tab.
4. Click **Response Action Rule**.
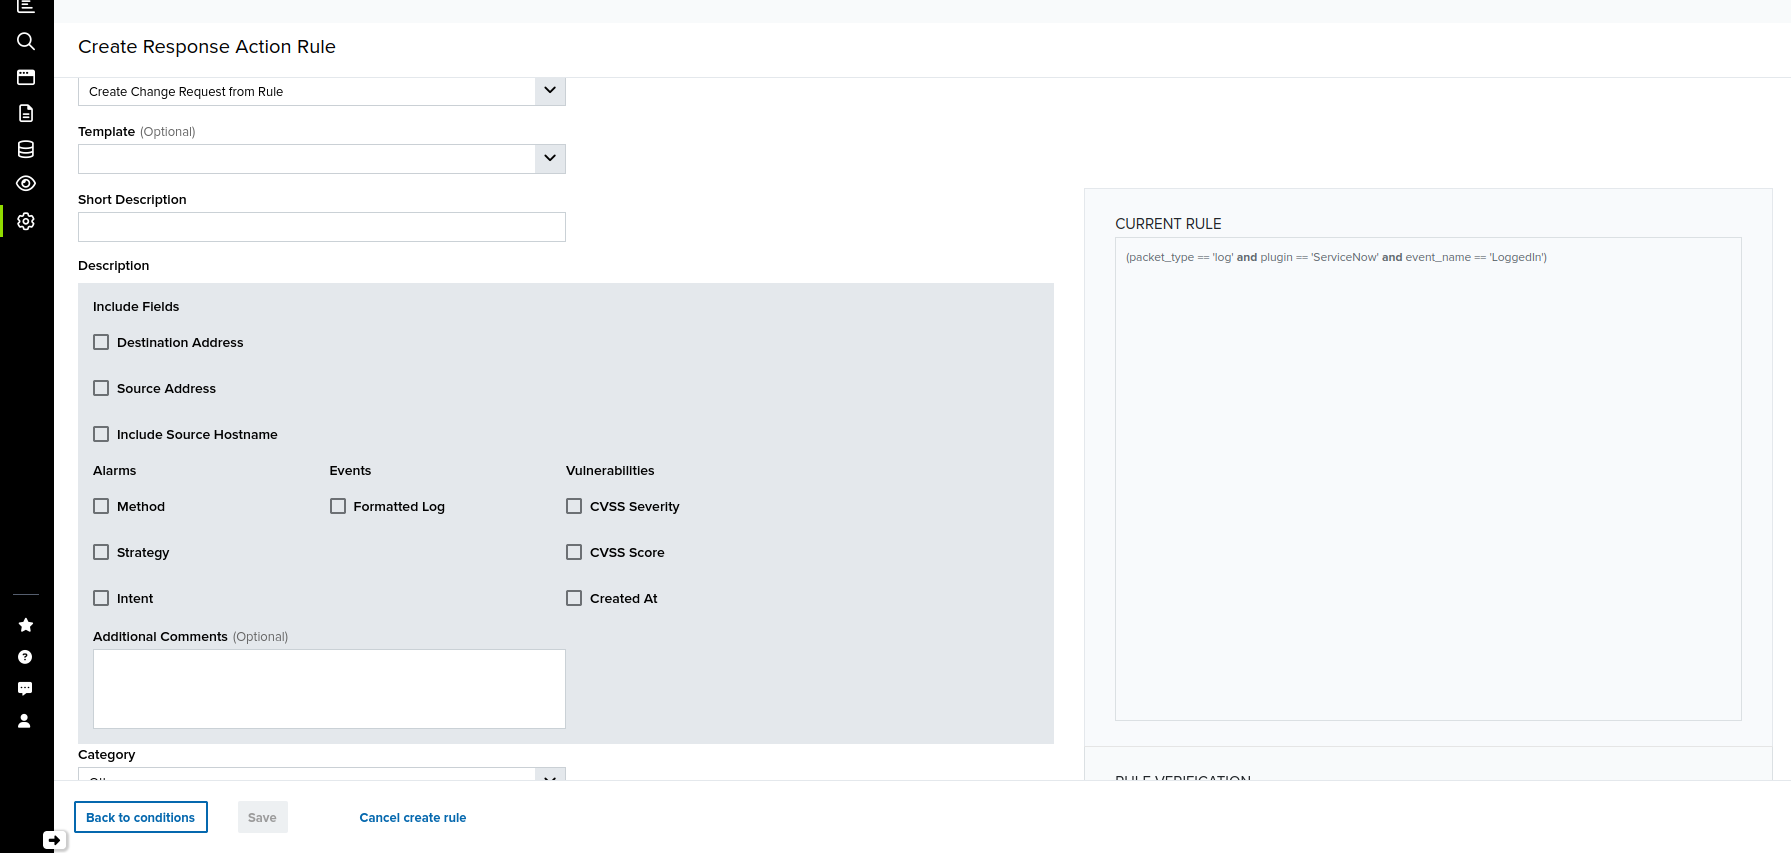
5. In the **Create Response Action Rule** page, select the **Create Change Request from Rule** option from the **App Action** dropdown.
6. Enter a **Short Description**, and then select the checkboxes of the fields to be included when the rule is triggered.
7. **\[OPTIONAL]** Enter **Additional Comments**.
8. Modify or select the default values in the **Category**, **Priority**, **Urgency**, and **Assign To** fields.
9. Once done, click **Run**.
## Creating Change Requests from Rule
**To create a change request from a rule**
1. Go to **Data Sources** > **Blue Apps** > **Available Apps**.
2. Search for **ServiceNow**, and then click the tile.
3. In the BlueApp for ServiceNow page, click the **Rules** tab.
4. Click **Response Action Rule**.
5. In the **Create Response Action Rule** page, select the **Create Change Request from Rule** option from the **App Action** dropdown.
6. Enter a **Short Description**, and then select the checkboxes of the fields to be included when the rule is triggered.
7. **\[OPTIONAL]** Enter **Additional Comments**.
8. Modify or select the default values in the **Category**, **Priority**, **Urgency**, and **Assign To** fields.
 9. Once done, click **Save**.
## Updating Change Requests from Rule
**To update a change request from a rule**
1. Go to **Data Sources** > **Blue Apps** > **Available Apps**.
2. Search for **ServiceNow**, and then click the tile.
3. In the BlueApp for ServiceNow page, click the **Rules** tab.
4. Click **Response Action Rule**.
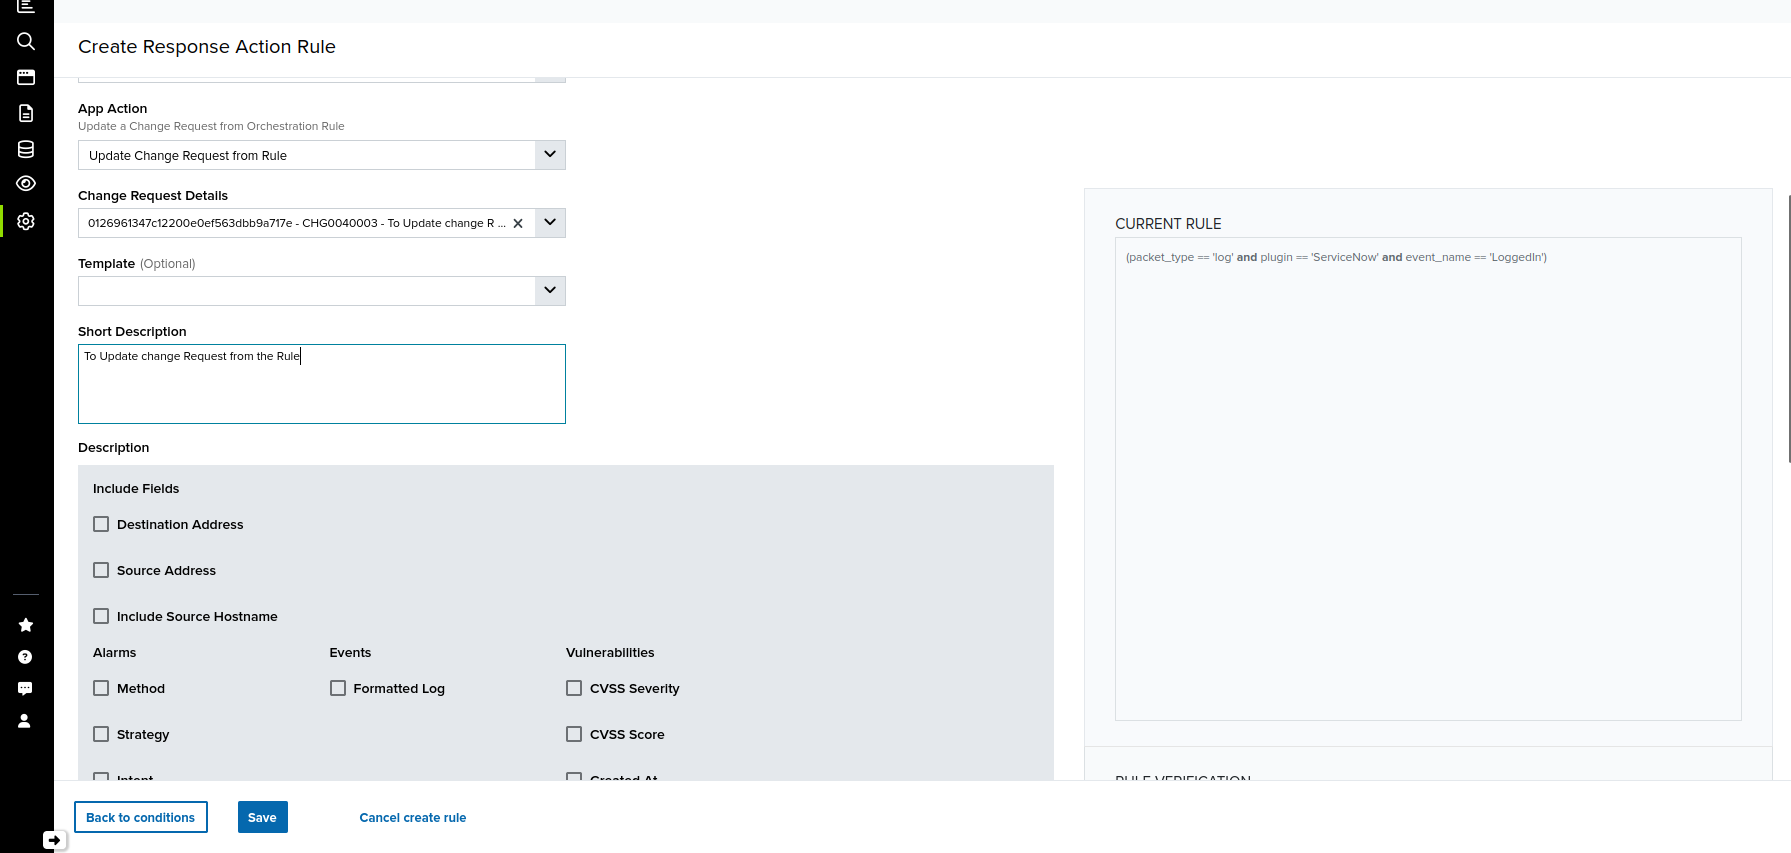
5. In the **Create Response Action Rule** page, select the **Update Change Request from Rule** option from the **App Action** dropdown.
6. Search for the **Change Request Details** from the dropdown. Additional fields appear below.
7. Modify the rest of the fields accordingly.
9. Once done, click **Save**.
## Updating Change Requests from Rule
**To update a change request from a rule**
1. Go to **Data Sources** > **Blue Apps** > **Available Apps**.
2. Search for **ServiceNow**, and then click the tile.
3. In the BlueApp for ServiceNow page, click the **Rules** tab.
4. Click **Response Action Rule**.
5. In the **Create Response Action Rule** page, select the **Update Change Request from Rule** option from the **App Action** dropdown.
6. Search for the **Change Request Details** from the dropdown. Additional fields appear below.
7. Modify the rest of the fields accordingly.
 8. Once done, click **Save**.
## Creating New Incidents from Events/Alarms
**To create a new incident from an event/alarm**
1. In USM Anywhere, go to the **Alarms** (**Activity > Alarms**) or **Events** (**Activity > Events**) page.
2. Click the alarm or event to open the details.
3. Click **Select Action**.
4. In the Select Action dialog box, select the **ServiceNow** tile.
5. **\[OPTIONAL]** If you have more than one USM Anywhere Sensor configured for the BlueApp for ServiceNow, use the **Select Sensor** option to set the sensor you want to use for the action.
6. Select the **Create a new incident** option from the **App Action** dropdown. Additional fields appear below.
7. Select the **Incident Type**.
8. Depending on your selection, other fields like **Short Description** and **Description** are automatically populated based on the alarm/event details. You may modify these fields accordingly.
9. Modify the default values in the **Category**, **Priority**, **Urgency**, and **Assign To** fields accordingly.
8. Once done, click **Save**.
## Creating New Incidents from Events/Alarms
**To create a new incident from an event/alarm**
1. In USM Anywhere, go to the **Alarms** (**Activity > Alarms**) or **Events** (**Activity > Events**) page.
2. Click the alarm or event to open the details.
3. Click **Select Action**.
4. In the Select Action dialog box, select the **ServiceNow** tile.
5. **\[OPTIONAL]** If you have more than one USM Anywhere Sensor configured for the BlueApp for ServiceNow, use the **Select Sensor** option to set the sensor you want to use for the action.
6. Select the **Create a new incident** option from the **App Action** dropdown. Additional fields appear below.
7. Select the **Incident Type**.
8. Depending on your selection, other fields like **Short Description** and **Description** are automatically populated based on the alarm/event details. You may modify these fields accordingly.
9. Modify the default values in the **Category**, **Priority**, **Urgency**, and **Assign To** fields accordingly.
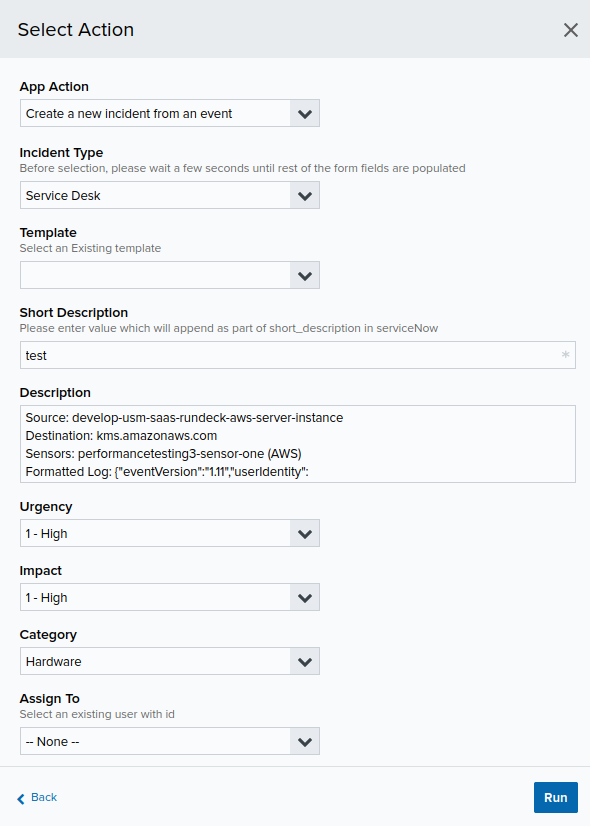 10. Once done, click **Run**.
## Updating Incidents from Events/Alarms
**To update an incident from an event/alarm**
1. In USM Anywhere, go to the **Alarms** (**Activity > Alarms**) or **Events** (**Activity > Events**) page.
2. Click the alarm or event to open the details.
3. Click **Select Action**.
4. In the Select Action dialog box, select the **ServiceNow** tile.
5. **\[OPTIONAL]** If you have more than one USM Anywhere Sensor configured for the BlueApp for ServiceNow, use the **Select Sensor** option to set the sensor you want to use for the action.
6. Select the **Update an incident** option from the **App Action** dropdown.
7. Select the **Incident Type**, and then search for the **Incident Number** from the dropdown. Additional fields appear below.
8. Modify the rest of the fields accordingly.
10. Once done, click **Run**.
## Updating Incidents from Events/Alarms
**To update an incident from an event/alarm**
1. In USM Anywhere, go to the **Alarms** (**Activity > Alarms**) or **Events** (**Activity > Events**) page.
2. Click the alarm or event to open the details.
3. Click **Select Action**.
4. In the Select Action dialog box, select the **ServiceNow** tile.
5. **\[OPTIONAL]** If you have more than one USM Anywhere Sensor configured for the BlueApp for ServiceNow, use the **Select Sensor** option to set the sensor you want to use for the action.
6. Select the **Update an incident** option from the **App Action** dropdown.
7. Select the **Incident Type**, and then search for the **Incident Number** from the dropdown. Additional fields appear below.
8. Modify the rest of the fields accordingly.
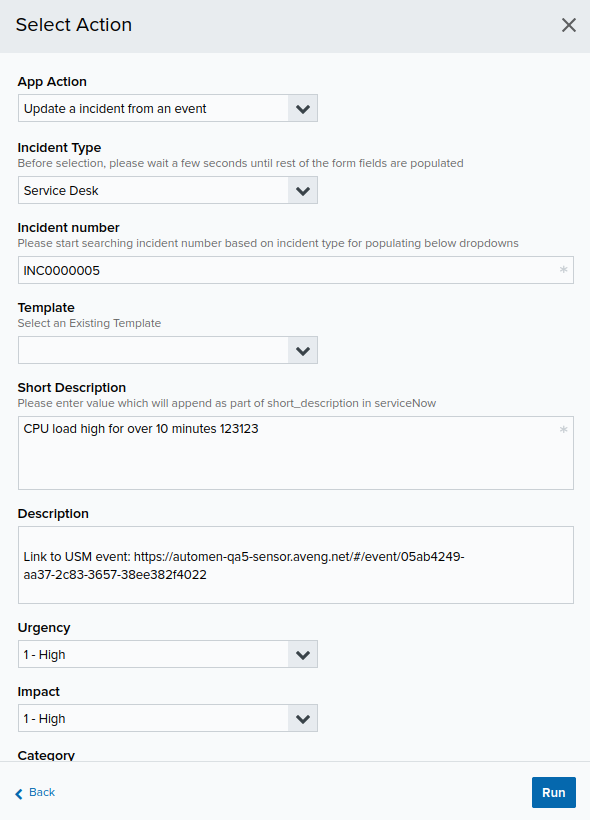 9. Once done, click **Run**.
## Creating New Incidents from Rule
**To create a new incident from a rule**
1. Go to **Data Sources** > **Blue Apps** > **Available Apps**.
2. Search for **ServiceNow**, and then click the tile.
3. In the BlueApp for ServiceNow page, click the **Rules** tab.
4. Click **Response Action Rule**.
5. In the **Create Response Action Rule** page, select the **Create a new incident from Rule** option from the **App Action** dropdown.
6. Select the **Incident Type**.
7. Enter a **Short Description**, and then select the checkboxes of the fields to be included when the rule is triggered.
8. **\[OPTIONAL]** Enter **Additional Comments**.
9. Modify or select the default values in the **Category**, **Priority**, **Urgency**, and **Assign To** fields.
9. Once done, click **Run**.
## Creating New Incidents from Rule
**To create a new incident from a rule**
1. Go to **Data Sources** > **Blue Apps** > **Available Apps**.
2. Search for **ServiceNow**, and then click the tile.
3. In the BlueApp for ServiceNow page, click the **Rules** tab.
4. Click **Response Action Rule**.
5. In the **Create Response Action Rule** page, select the **Create a new incident from Rule** option from the **App Action** dropdown.
6. Select the **Incident Type**.
7. Enter a **Short Description**, and then select the checkboxes of the fields to be included when the rule is triggered.
8. **\[OPTIONAL]** Enter **Additional Comments**.
9. Modify or select the default values in the **Category**, **Priority**, **Urgency**, and **Assign To** fields.
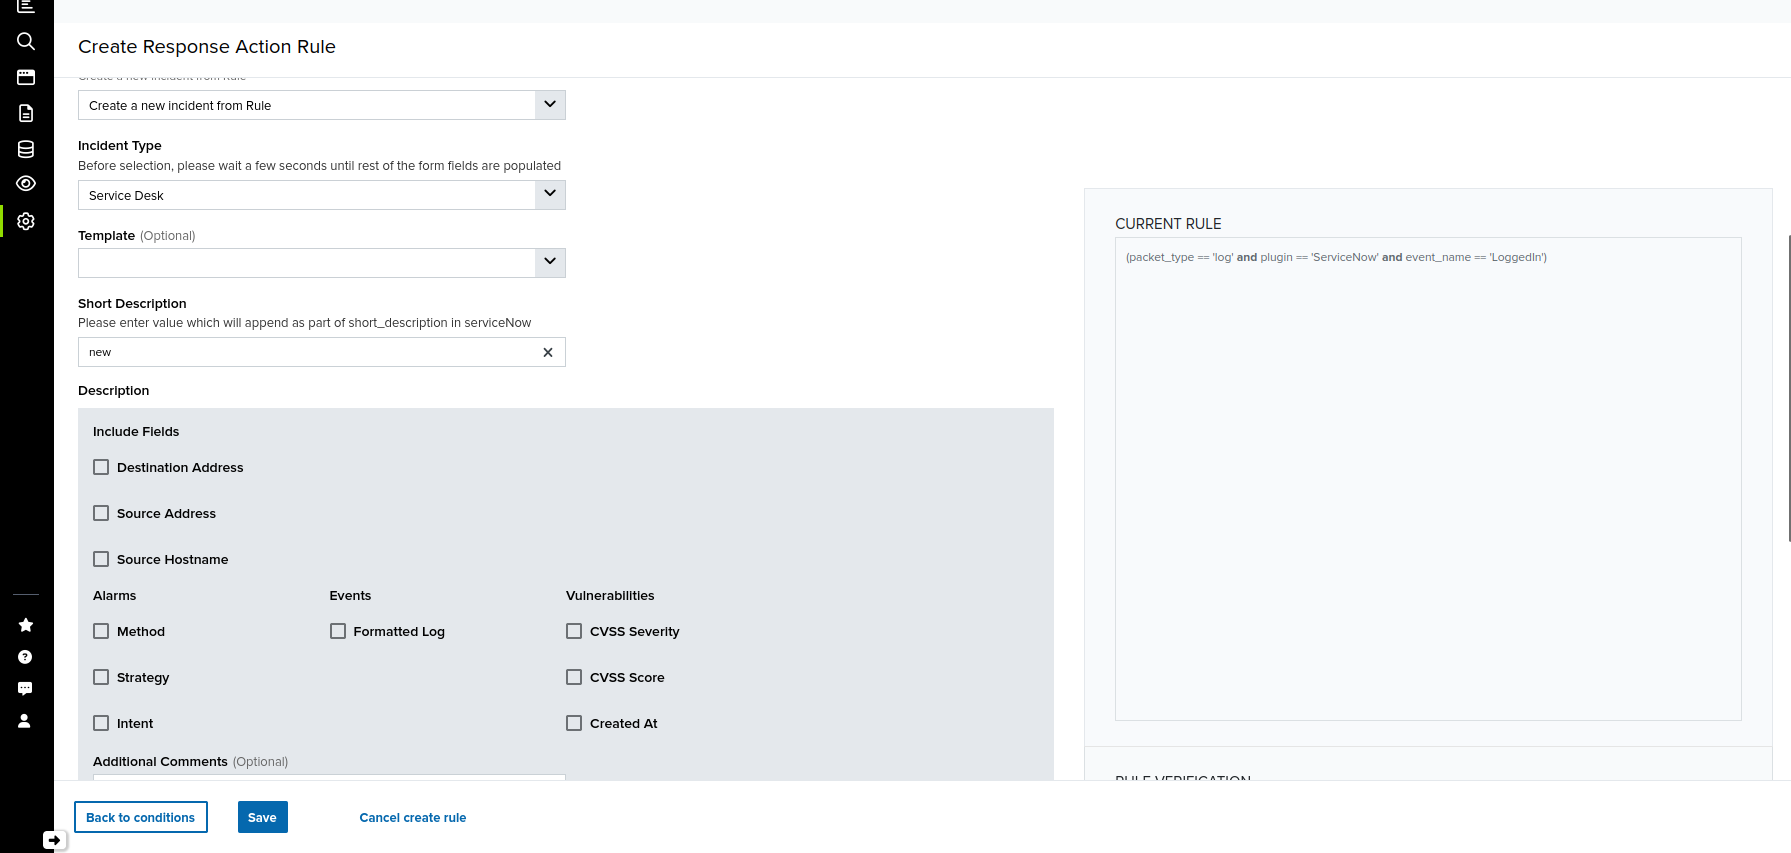 9. Once done, click **Save**.
## Updating Incidents from Rule
1. Go to **Data Sources** > **Blue Apps** > **Available Apps**.
2. Search for **ServiceNow**, and then click the tile.
3. In the BlueApp for ServiceNow page, click the **Rules** tab.
4. Click **Response Action Rule**.
5. In the **Create Response Action Rule** page, select the **Update an incident from Rule** option from the **App Action** dropdown.
6. Select the **Incident Number**.
7. The **Short Description** field appears and automatically populated. Modify the description, if necessary.
8. Select the checkboxes of the fields to be included when the rule is triggered.
9. **\[OPTIONAL]** Enter **Additional Comments**.
10. Modify or select the default values in the **Category**, **Priority**, **Urgency**, and **Assign To** fields.
11. Once done, click **Save**.
## Creating Change Requests from Investigations
**To create a change request from an investigation**
1. Go to the **Investigations** page.
2. Click on an investigation from the list to show the investigation details and perform a response action.
9. Once done, click **Save**.
## Updating Incidents from Rule
1. Go to **Data Sources** > **Blue Apps** > **Available Apps**.
2. Search for **ServiceNow**, and then click the tile.
3. In the BlueApp for ServiceNow page, click the **Rules** tab.
4. Click **Response Action Rule**.
5. In the **Create Response Action Rule** page, select the **Update an incident from Rule** option from the **App Action** dropdown.
6. Select the **Incident Number**.
7. The **Short Description** field appears and automatically populated. Modify the description, if necessary.
8. Select the checkboxes of the fields to be included when the rule is triggered.
9. **\[OPTIONAL]** Enter **Additional Comments**.
10. Modify or select the default values in the **Category**, **Priority**, **Urgency**, and **Assign To** fields.
11. Once done, click **Save**.
## Creating Change Requests from Investigations
**To create a change request from an investigation**
1. Go to the **Investigations** page.
2. Click on an investigation from the list to show the investigation details and perform a response action.
 3. Click **Select Action**.
4. In the Select Action dialog box, click on the **ServiceNow** tile.
5. **\[OPTIONAL]** If you have more than one USM Anywhere Sensor configured for the BlueApp for ServiceNow, use the **Select Sensor** option to set the sensor you want to use for the action.
6. Select the **Create Change Request from Investigation** option from the **App Action** dropdown. Additional fields appear below with details from the selected investigation.
7. Enter or modify the **Short Description** and **Description** fields, if necessary.
8. You may also modify the default values in the **Category**, **Priority**, **Urgency**, and **Assign To** fields.
9. Select the **Configuration Items** to be included in the change request.
3. Click **Select Action**.
4. In the Select Action dialog box, click on the **ServiceNow** tile.
5. **\[OPTIONAL]** If you have more than one USM Anywhere Sensor configured for the BlueApp for ServiceNow, use the **Select Sensor** option to set the sensor you want to use for the action.
6. Select the **Create Change Request from Investigation** option from the **App Action** dropdown. Additional fields appear below with details from the selected investigation.
7. Enter or modify the **Short Description** and **Description** fields, if necessary.
8. You may also modify the default values in the **Category**, **Priority**, **Urgency**, and **Assign To** fields.
9. Select the **Configuration Items** to be included in the change request.
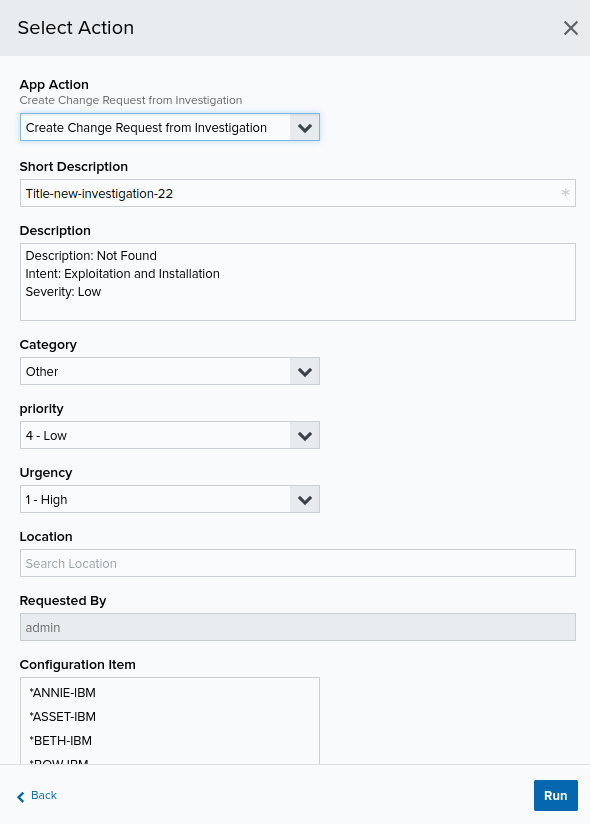 10. Once done, click **Run**.
## Updating Change Requests from Investigations
**To update a change request from an investigation**
1. Go to the **Investigations** page.
2. Click on the investigation from the list to show the investigation details and perform a response action.
3. Click **Select Action**.
4. In the Select Action dialog box, click on the **ServiceNow** tile.
5. **\[OPTIONAL]** If you have more than one USM Anywhere Sensor configured for the BlueApp for ServiceNow, use the **Select Sensor** option to set the sensor you want to use for the action.
6. Select the **Update Change Request from Investigation** option from the **App Action** dropdown.
7. Select the **Change Request Details**. Additional fields appear below with details from the selected investigation.
8. Modify the rest of the fields accordingly.
10. Once done, click **Run**.
## Updating Change Requests from Investigations
**To update a change request from an investigation**
1. Go to the **Investigations** page.
2. Click on the investigation from the list to show the investigation details and perform a response action.
3. Click **Select Action**.
4. In the Select Action dialog box, click on the **ServiceNow** tile.
5. **\[OPTIONAL]** If you have more than one USM Anywhere Sensor configured for the BlueApp for ServiceNow, use the **Select Sensor** option to set the sensor you want to use for the action.
6. Select the **Update Change Request from Investigation** option from the **App Action** dropdown.
7. Select the **Change Request Details**. Additional fields appear below with details from the selected investigation.
8. Modify the rest of the fields accordingly.
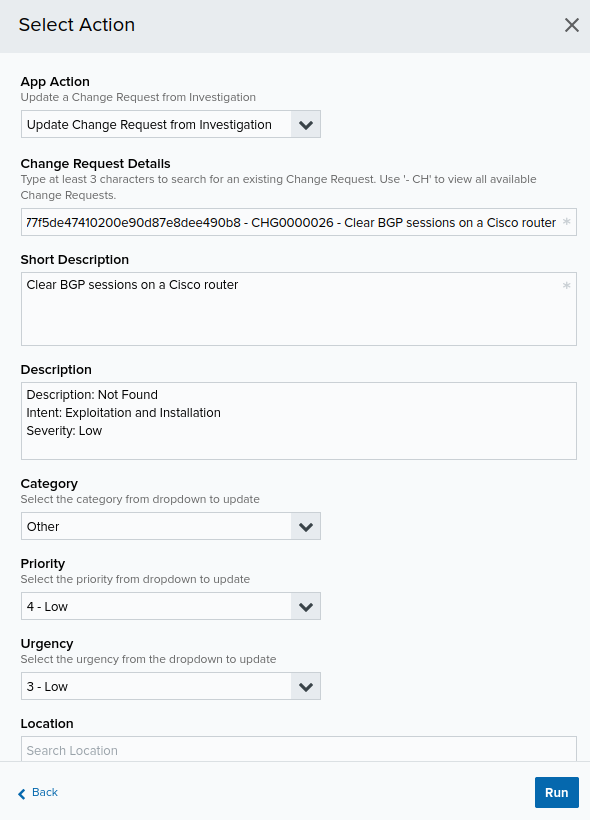 9. Once done, click **Run**.
## Creating New Incidents from Investigations
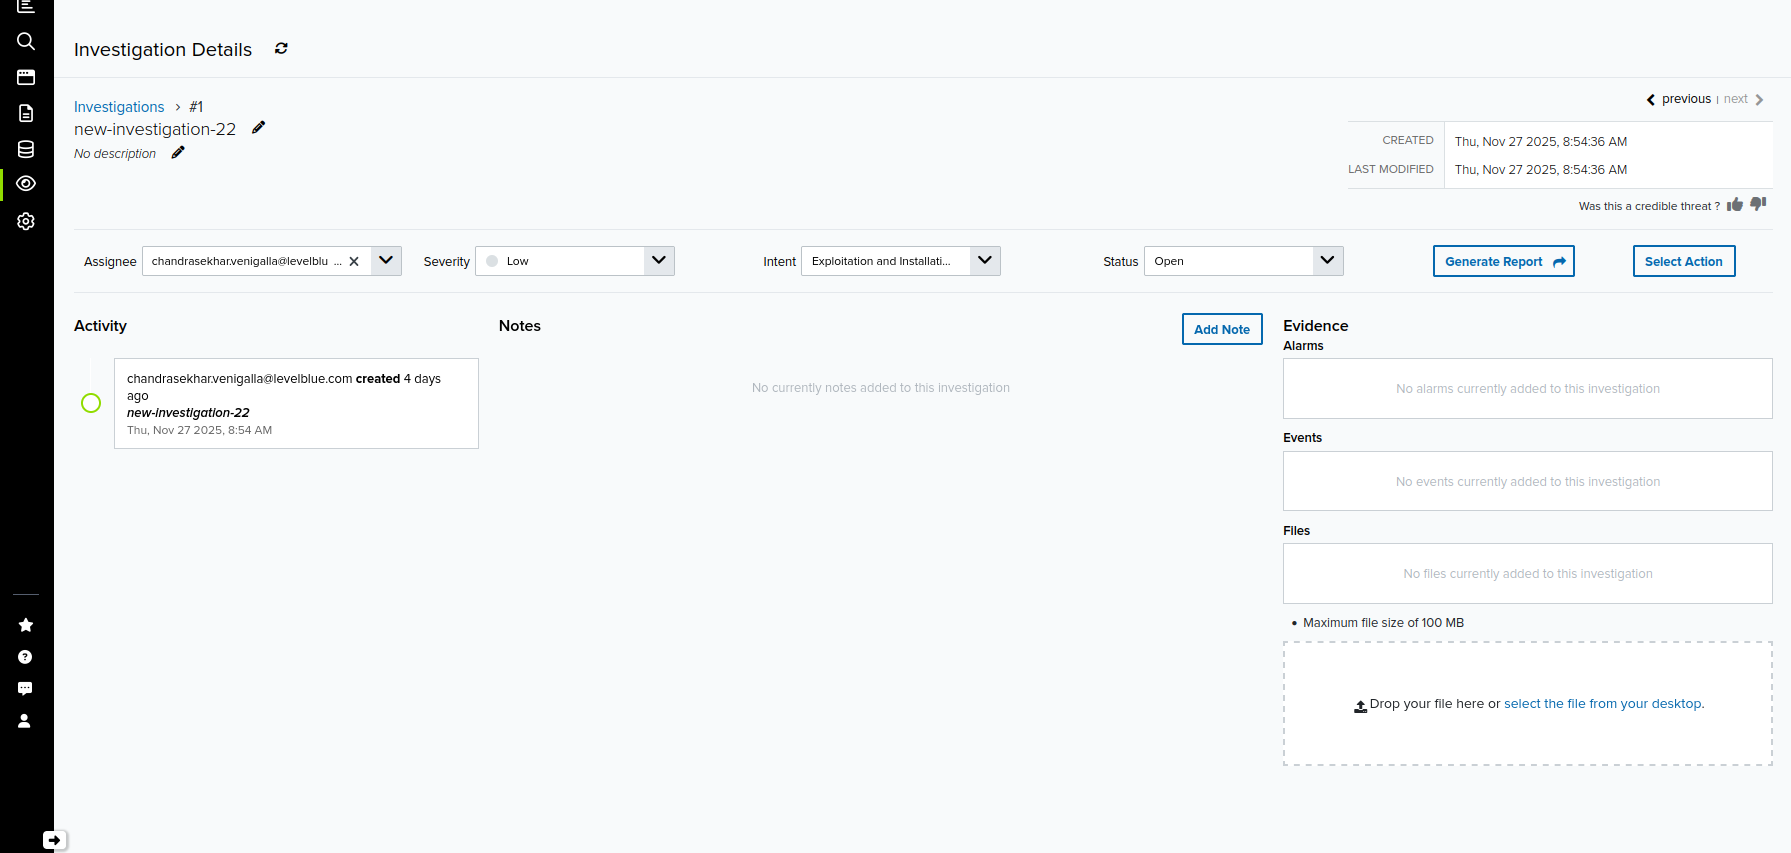
**To create a new incident from an investigation**
1. Go to the **Investigations** page.
2. Click on an investigation from the list to show the investigation details and perform a response action.
3. Click **Select Action**.
4. In the Select Action dialog box, click on the **ServiceNow** tile.
5. **\[OPTIONAL]** If you have more than one USM Anywhere Sensor configured for the BlueApp for ServiceNow, use the **Select Sensor** option to set the sensor you want to use for the action.
6. Select the **Create a New Incident from Investigation** option from the **App Action** dropdown. Additional fields appear below with details from the selected investigation.
7. Select the **Incident Type**.
8. Enter or modify the **Short Description** and **Description**, if necessary.
9. You may also modify the default values in the **Urgency**, **Impact**, **Category**, and **Assign To** fields.
9. Once done, click **Run**.
## Creating New Incidents from Investigations
**To create a new incident from an investigation**
1. Go to the **Investigations** page.
2. Click on an investigation from the list to show the investigation details and perform a response action.
3. Click **Select Action**.
4. In the Select Action dialog box, click on the **ServiceNow** tile.
5. **\[OPTIONAL]** If you have more than one USM Anywhere Sensor configured for the BlueApp for ServiceNow, use the **Select Sensor** option to set the sensor you want to use for the action.
6. Select the **Create a New Incident from Investigation** option from the **App Action** dropdown. Additional fields appear below with details from the selected investigation.
7. Select the **Incident Type**.
8. Enter or modify the **Short Description** and **Description**, if necessary.
9. You may also modify the default values in the **Urgency**, **Impact**, **Category**, and **Assign To** fields.
 10. Once done, click **Run**.
## Updating Incidents from Investigations
**To update an incident from an investigation**
1. Go to the **Investigations** page.
2. Click on the investigation from the list to show the investigation details and perform a response action.
3. Click **Select Action**.
4. In the Select Action dialog box, click on the **ServiceNow** tile.
5. **\[OPTIONAL]** If you have more than one USM Anywhere Sensor configured for the BlueApp for ServiceNow, use the **Select Sensor** option to set the sensor you want to use for the action.
6. Select the **Update an Incident from Investigation** option from the **App Action** dropdown.
7. Select the **Incident Type**. Additional fields appear below with details from the selected investigation.
8. Modify the rest of the fields accordingly.
10. Once done, click **Run**.
## Updating Incidents from Investigations
**To update an incident from an investigation**
1. Go to the **Investigations** page.
2. Click on the investigation from the list to show the investigation details and perform a response action.
3. Click **Select Action**.
4. In the Select Action dialog box, click on the **ServiceNow** tile.
5. **\[OPTIONAL]** If you have more than one USM Anywhere Sensor configured for the BlueApp for ServiceNow, use the **Select Sensor** option to set the sensor you want to use for the action.
6. Select the **Update an Incident from Investigation** option from the **App Action** dropdown.
7. Select the **Incident Type**. Additional fields appear below with details from the selected investigation.
8. Modify the rest of the fields accordingly.
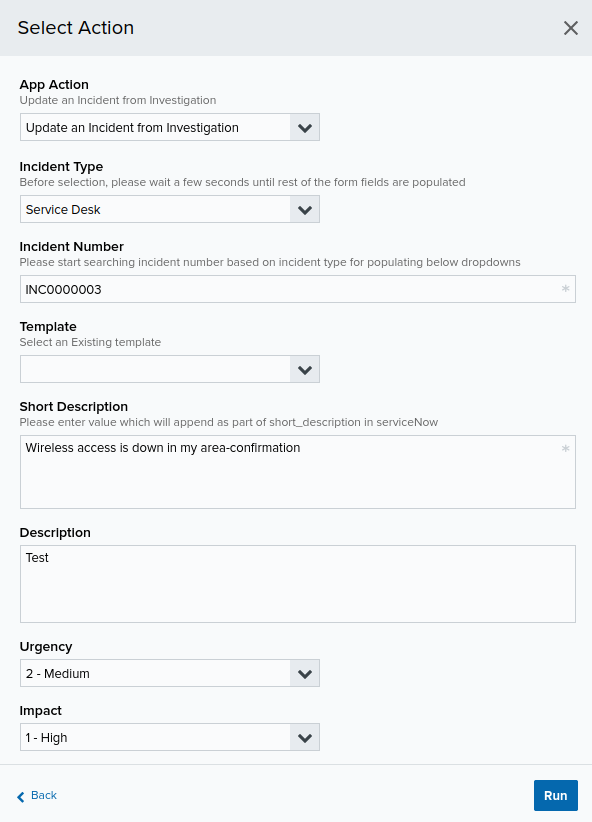 9. Once done, click **Run**.