> ## Documentation Index
> Fetch the complete documentation index at: https://docs.levelblue.com/llms.txt
> Use this file to discover all available pages before exploring further.
# Sending USM Anywhere Notifications to PagerDuty
From USM Anywhere, you can send an alarm or event notification to your PagerDuty incident management console so that team members receive alerts. This facilitates communication and collaboration within the same messaging tool that your organization uses for incident response. When you have this integration configured in USM Anywhere, you can create orchestration rules to automatically send these notifications when an event or alarm matches the rule criteria.
**Edition:** The Notification integrations are available in the Standard and Premium editions of USM Anywhere.
See the [Affordable pricing to fit every budget](https://cybersecurity.att.com/pricing) page for more information about the features and support provided by each of the USM Anywhere editions.
PagerDuty provides a mechanism to create services that include integrations to its Events API as a way to post data from external sources into PagerDuty incidents. The service configuration determines how PagerDuty handles the incoming incident. You must first create the integration key for a PagerDuty service before you set up the configuration in USM Anywhere to send these notifications.
**Note:** A PagerDuty service typically represents an application, component, or team for opening incidents. If you already have a defined service and you want to incorporate USM Anywhere notifications with it, you can simply add a new integration to that service and use the parameters outlined in the following procedure.
**To create a PagerDuty service and integration for USM Anywhere**
1. Log in to your PagerDuty account.
2. In the top menu, select **Configuration > Services**.
3. At the top of the page, click **Add New Service**.
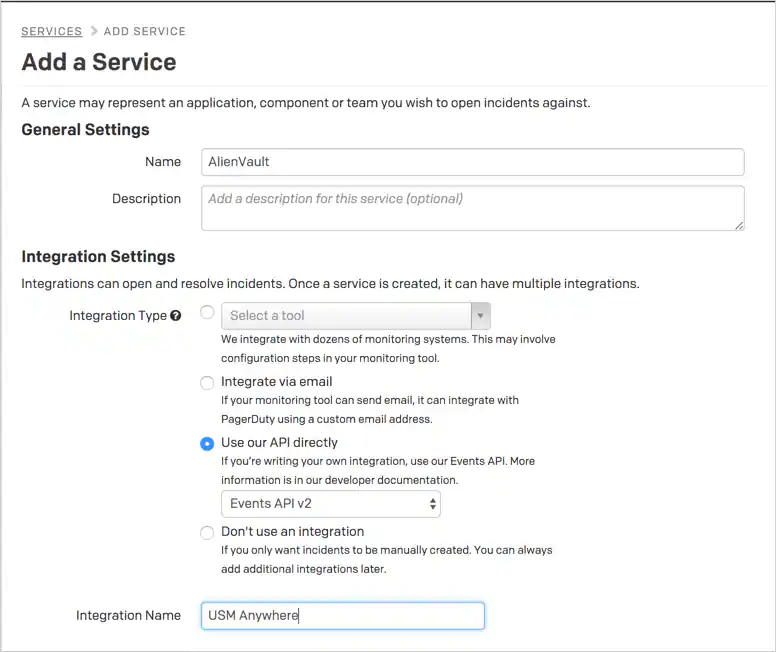
4. In the General Settings, enter a name for the new service (such as LevelBlue).
5. In Integration Settings, set the type and name for the integration.
* Choose **Use our API Directly** and select **Events API v2**.
* Enter an Integration Name (such as *USM Anywhere*).
 6. Set the Incident Settings and Incident Behavior according to how you want PagerDuty to handle the incidents (notifications) from USM Anywhere.
7. Click **Add Service**.
8. In the Integrations tab, copy the Integration Key for the new integration.
6. Set the Incident Settings and Incident Behavior according to how you want PagerDuty to handle the incidents (notifications) from USM Anywhere.
7. Click **Add Service**.
8. In the Integrations tab, copy the Integration Key for the new integration.
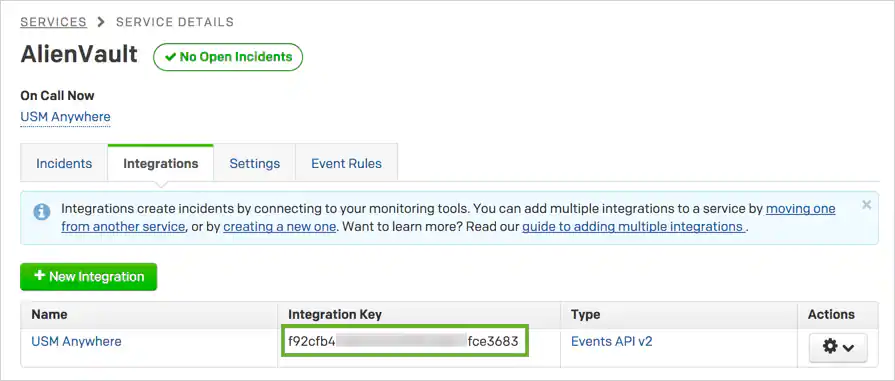 Make sure to copy the key value to a secured location.
After you have created the PagerDuty integration and copied the key, you can configure USM Anywhere for PagerDuty notifications. After this configuration is in place, any orchestration rules set up for PagerDuty notification will send the triggered notification to the PagerDuty service for incident handling.
**To configure the connection between PagerDuty and USM Anywhere**
1. In the USM Anywhere web UI, go to **Settings > Notifications**.
2. In the left navigation panel, click **PagerDuty**.
3. In the PagerDuty integration key field, paste the key value that you copied from your PagerDuty service integration.
Make sure to copy the key value to a secured location.
After you have created the PagerDuty integration and copied the key, you can configure USM Anywhere for PagerDuty notifications. After this configuration is in place, any orchestration rules set up for PagerDuty notification will send the triggered notification to the PagerDuty service for incident handling.
**To configure the connection between PagerDuty and USM Anywhere**
1. In the USM Anywhere web UI, go to **Settings > Notifications**.
2. In the left navigation panel, click **PagerDuty**.
3. In the PagerDuty integration key field, paste the key value that you copied from your PagerDuty service integration.
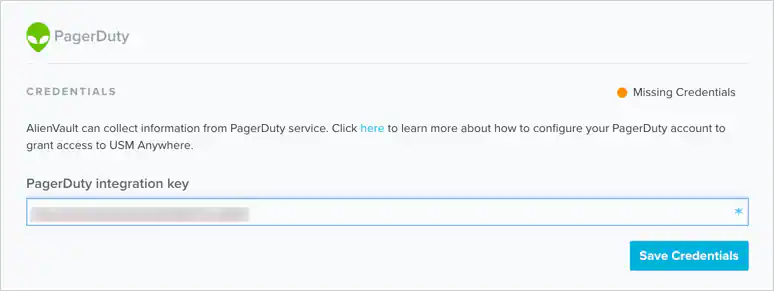 4. Click **Save Credentials**.
Create an orchestration rule to match new alarms or events and trigger a notification to your PagerDuty service. You can use an existing alarm or event with the desired characteristics to easily set the matching conditions for the rule.
**To create an orchestration rule to trigger a PagerDuty notification**
1. Go to **Activity > Alarms** or **Activity > Events**.
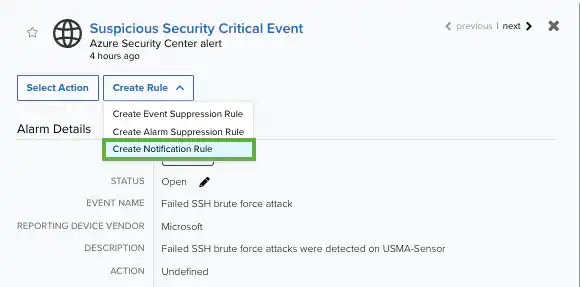
2. Click the alarm or event to open the details.
3. Click **Create Rule** and select **Create Notification Rule**.
4. Click **Save Credentials**.
Create an orchestration rule to match new alarms or events and trigger a notification to your PagerDuty service. You can use an existing alarm or event with the desired characteristics to easily set the matching conditions for the rule.
**To create an orchestration rule to trigger a PagerDuty notification**
1. Go to **Activity > Alarms** or **Activity > Events**.
2. Click the alarm or event to open the details.
3. Click **Create Rule** and select **Create Notification Rule**.
 4. You have already suggested property values to create a matching condition, but if you want to add new property values, click **Add Condition**.
**Note:** If the field is related to the name of a country, you should use the country code defined by the [ISO 3166](https://www.iso.org/iso-3166-country-codes.html).
**Note:** The Sources or Destinations field needs to match the universally unique identifier (UUID) of the event or alarm. You can use the Source Name or Destination Name field instead.
**Important:** Instead of using the `equals` and `equals`, `case insensitive` operators for array fields, LevelBlue recommends the use of the `in` or `contains` operators.
**Note:** If you need to add a property value that maps with a property key, you need to know the mapping of the field. See [Determining the Mapping of a Field](../../user-guide/rules-management/mapping-field) for more information.
5. (Optional) Click **Add Group** to group your conditions.
**Note:** See [Operators in the Orchestration Rules](../../user-guide/rules-management/orchestration-rules-operators) for more information.
6. In the **Occurrences** text box, enter the number of event occurrences that you want to produce a match on the conditional expression to trigger the rule.
You can enter the number of occurrences or use the arrows to scroll the value up or down. You can enter a number between 1 and 100.
**Note:** The current rule box shows you the syntax of your rule, and the rule verification box reviews that syntax before saving the rule.
7. Click **Next**.
4. You have already suggested property values to create a matching condition, but if you want to add new property values, click **Add Condition**.
**Note:** If the field is related to the name of a country, you should use the country code defined by the [ISO 3166](https://www.iso.org/iso-3166-country-codes.html).
**Note:** The Sources or Destinations field needs to match the universally unique identifier (UUID) of the event or alarm. You can use the Source Name or Destination Name field instead.
**Important:** Instead of using the `equals` and `equals`, `case insensitive` operators for array fields, LevelBlue recommends the use of the `in` or `contains` operators.
**Note:** If you need to add a property value that maps with a property key, you need to know the mapping of the field. See [Determining the Mapping of a Field](../../user-guide/rules-management/mapping-field) for more information.
5. (Optional) Click **Add Group** to group your conditions.
**Note:** See [Operators in the Orchestration Rules](../../user-guide/rules-management/orchestration-rules-operators) for more information.
6. In the **Occurrences** text box, enter the number of event occurrences that you want to produce a match on the conditional expression to trigger the rule.
You can enter the number of occurrences or use the arrows to scroll the value up or down. You can enter a number between 1 and 100.
**Note:** The current rule box shows you the syntax of your rule, and the rule verification box reviews that syntax before saving the rule.
7. Click **Next**.
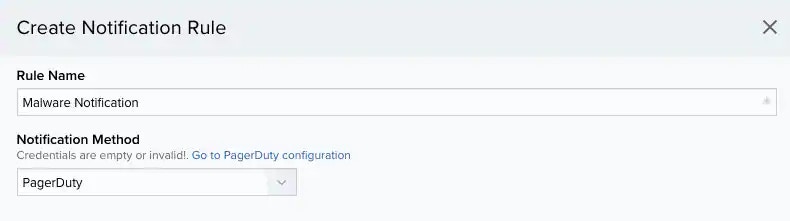
 8. Enter a name for the rule.
9. (Optional) Enter a description for identifying this rule.
10. For Notification Method, select the **Slack** option.
11. Enter the Slack Alert Username.
The username must be a valid team member for the Slack channel.
8. Enter a name for the rule.
9. (Optional) Enter a description for identifying this rule.
10. For Notification Method, select the **Slack** option.
11. Enter the Slack Alert Username.
The username must be a valid team member for the Slack channel.
 12. In the **Length** text box, specify the timespan that you want to use to identify a match for multiple occurrences. Enter the number in the text box, and then use the drop-down menu to select a value of seconds, minutes, or hours.
This duration identifies the amount of time that transpires from the beginning to the end of the occurrence. If the number of occurrences is not met within this period, the rule is not a match.
**Note:** Your defined length and occurrences function together to specify the number of occurrences within a time period that will produce a match for the rule. For example, you can define a rule to trigger an alarm for an unauthorized access attempt when a failed SSH login occurs three times within a five-minute window.
13. Click **Save**.
The created rule displays in the list of rules. You can see it from **Settings > Rules > Orchestration Rules**. See [Orchestration Rules](../../user-guide/rules-management/orchestration-rules) for more information.
**Important:** It takes a few minutes for an orchestration rule to become active.
14. For **Notification Method**, select the **PagerDuty** option.
12. In the **Length** text box, specify the timespan that you want to use to identify a match for multiple occurrences. Enter the number in the text box, and then use the drop-down menu to select a value of seconds, minutes, or hours.
This duration identifies the amount of time that transpires from the beginning to the end of the occurrence. If the number of occurrences is not met within this period, the rule is not a match.
**Note:** Your defined length and occurrences function together to specify the number of occurrences within a time period that will produce a match for the rule. For example, you can define a rule to trigger an alarm for an unauthorized access attempt when a failed SSH login occurs three times within a five-minute window.
13. Click **Save**.
The created rule displays in the list of rules. You can see it from **Settings > Rules > Orchestration Rules**. See [Orchestration Rules](../../user-guide/rules-management/orchestration-rules) for more information.
**Important:** It takes a few minutes for an orchestration rule to become active.
14. For **Notification Method**, select the **PagerDuty** option.
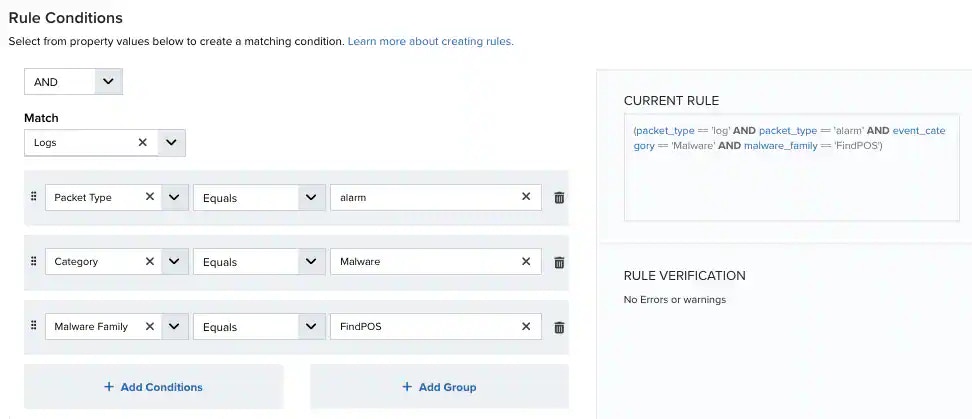
 15. At the bottom of the dialog box, set the rule condition parameters to specify the criteria for a matching alarm or event to trigger the rule.
 * This section provides suggested property/value pairs from the selected alarm or event that you can use as conditions for the rule. Click the
  icon to delete the items that you do not want to include in the matching conditions. You can also add other conditions that are not suggested.
* If you create the rule from the Rules page, you must use the Add Condition and Add Group functions to define the property/value pairs that you want to use as conditions for the rule.
* At the bottom of the dialog box, click **More** to display the optional multiple occurrence and window-length parameters.
Select an operator and add one or more conditions to form the conditional expression. You can include a condition group to evaluate a subset of conditions. The Current Rule pane displays the constructed expression in standard syntax. The box displays a red border if the expression is syntactically invalid as currently specified. A valid expression is required to save the rule definition.
Select the operator used to determine the match for multiple conditions:
* **AND**: Match all conditions.
* **OR**: Match any one condition.
* **AND NOT**: Exclude items matching all conditions after the first.
* **OR NOT**: Include all items that do not match any conditions after the first.
Click **Add Condition** to add a condition. For each condition, specify the field name, evaluator, and value. If the evaluation returns true for the condition, it is a match.
Click **Add Group** to add a condition group. A new group includes a condition and its own operator used to match the conditions within the group. You can nest condition groups.
Specify the number of event or alarm occurrences that produce a match on the conditional expression to trigger the rule. The default value is 1. You can enter the number of occurrences or use the arrow to scroll the value up or down.
USM Anywhere uses this in conjunction with the Length option to specify the number of occurrences within a time period that will trigger the rule. For example, you can define a rule to trigger for an unauthorized access attempt when a failed SSH login occurs three times within a five-minute window.
Specify the length of the window to identify a match for multiple occurrences. Enter the number and choose a time unit value of seconds, minutes, or hours. This time period identifies the amount of time that transpires from the first occurrence to the last occurrence. If the number of occurrences is not met within this period, the rule does not trigger.
7. Click **Save Rule**.
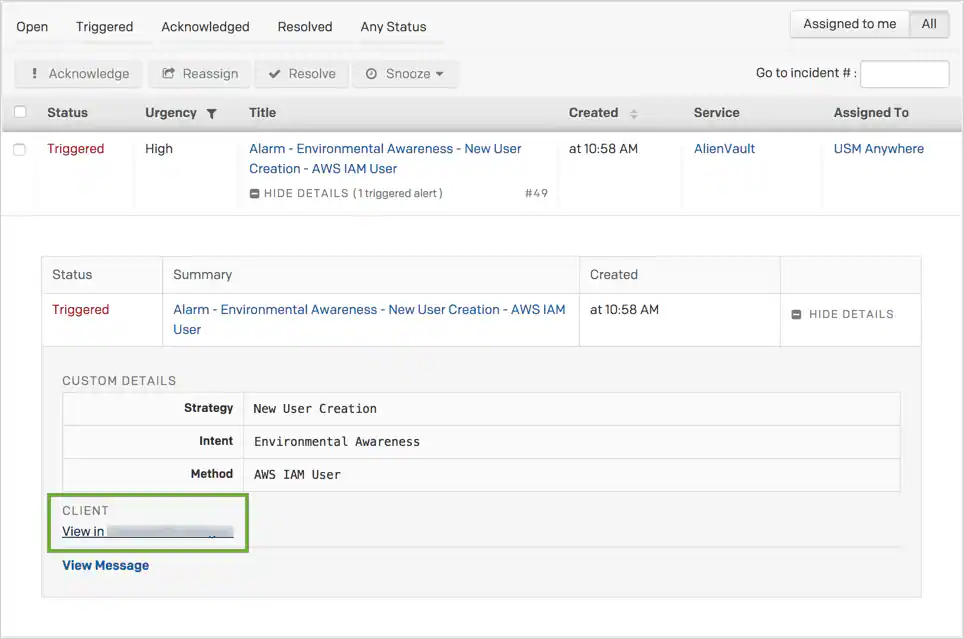
PagerDuty creates incidents for the service from the notifications that USM Anywhere sends. You can review and respond to these incidents from your PagerDuty incidents dashboard. When you expand the details for the incident, in the Client area, click the link to open the event or alarm in USM Anywhere.
icon to delete the items that you do not want to include in the matching conditions. You can also add other conditions that are not suggested.
* If you create the rule from the Rules page, you must use the Add Condition and Add Group functions to define the property/value pairs that you want to use as conditions for the rule.
* At the bottom of the dialog box, click **More** to display the optional multiple occurrence and window-length parameters.
Select an operator and add one or more conditions to form the conditional expression. You can include a condition group to evaluate a subset of conditions. The Current Rule pane displays the constructed expression in standard syntax. The box displays a red border if the expression is syntactically invalid as currently specified. A valid expression is required to save the rule definition.
Select the operator used to determine the match for multiple conditions:
* **AND**: Match all conditions.
* **OR**: Match any one condition.
* **AND NOT**: Exclude items matching all conditions after the first.
* **OR NOT**: Include all items that do not match any conditions after the first.
Click **Add Condition** to add a condition. For each condition, specify the field name, evaluator, and value. If the evaluation returns true for the condition, it is a match.
Click **Add Group** to add a condition group. A new group includes a condition and its own operator used to match the conditions within the group. You can nest condition groups.
Specify the number of event or alarm occurrences that produce a match on the conditional expression to trigger the rule. The default value is 1. You can enter the number of occurrences or use the arrow to scroll the value up or down.
USM Anywhere uses this in conjunction with the Length option to specify the number of occurrences within a time period that will trigger the rule. For example, you can define a rule to trigger for an unauthorized access attempt when a failed SSH login occurs three times within a five-minute window.
Specify the length of the window to identify a match for multiple occurrences. Enter the number and choose a time unit value of seconds, minutes, or hours. This time period identifies the amount of time that transpires from the first occurrence to the last occurrence. If the number of occurrences is not met within this period, the rule does not trigger.
7. Click **Save Rule**.
PagerDuty creates incidents for the service from the notifications that USM Anywhere sends. You can review and respond to these incidents from your PagerDuty incidents dashboard. When you expand the details for the incident, in the Client area, click the link to open the event or alarm in USM Anywhere.