> ## Documentation Index
> Fetch the complete documentation index at: https://docs.levelblue.com/llms.txt
> Use this file to discover all available pages before exploring further.
# Forward NXLog Messages Directly to a USM Anywhere Sensor
The simplest method to receive NXLog messages is to install NXLog Community Edition (CE) on each Microsoft Windows host and configure it to forward messages to the USM Anywhere Sensor. In the event of a [sensor disconnect](../../user-guide/sensor-management/sensor-disconnected), NXLog messages are cached locally and will be forwarded when the connection resumes.
**To install NXLog and create your configuration file**
1. On your Windows host, download and install the latest version of NXLog.
**Note:** The [NXLog Community Edition](https://nxlog.co/products/nxlog-community-edition/download) is open source and free of charge. But to use the File Integrity Monitoring plugin, you must download and install the NXLog Enterprise Edition instead. See [vendor documentation](https://nxlog.co/documentation/nxlog-user-guide/fim.html) for more information.
2. Make a backup copy of the original file and give it another name. Depending on the version, this file can be `C:\Program Files (x86)\nxlog\conf\nxlog.conf (32-bit) or C:\Program Files\nxlog\conf\nxlog.conf` (64-bit).
3. Log in to USM Anywhere and go to **Settings > System**.
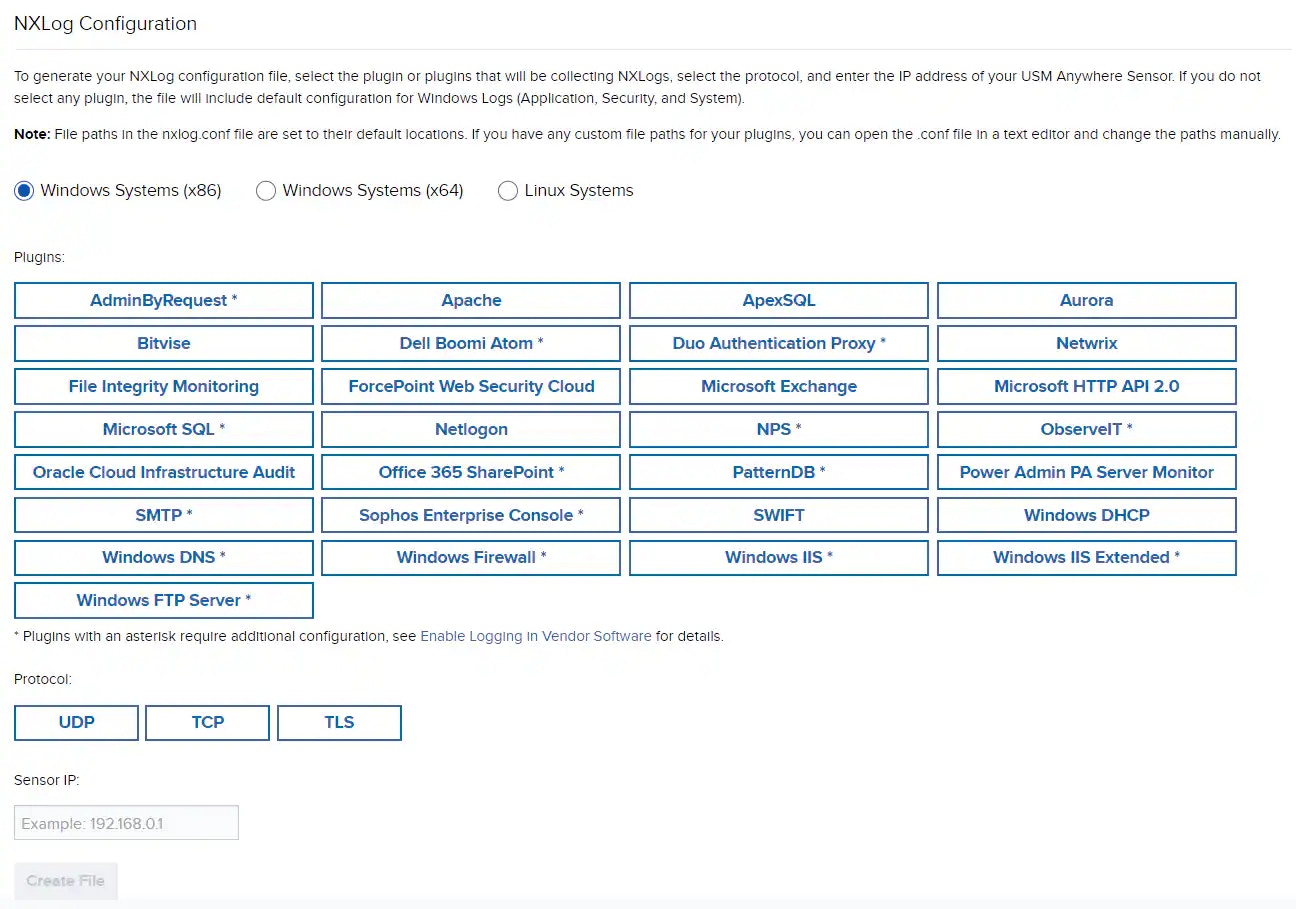
4. In the left navigation panel, click **NXLog Configuration** to open the page. By default, USM Anywhere displays all the plugins available for the 32-bit Windows system.
5. Select the desired Windows system and the plugin (or plugins) to collect NXLogs. You don't need to select any plugin to collect default Windows Logs or [Sysmon logs](nxlog-direct-forward#microsoft-sysmon).
**Note:** Plugins with asterisk require additional configuration on the Windows host. See [Enable Logging in Vendor Software](https://cybersecurity.att.com/documentation/usm-anywhere/deployment-guide/setup/nxlog-direct-forward#enable-logging-in-vendor-software) for details.
6. Select the protocol you want to use.
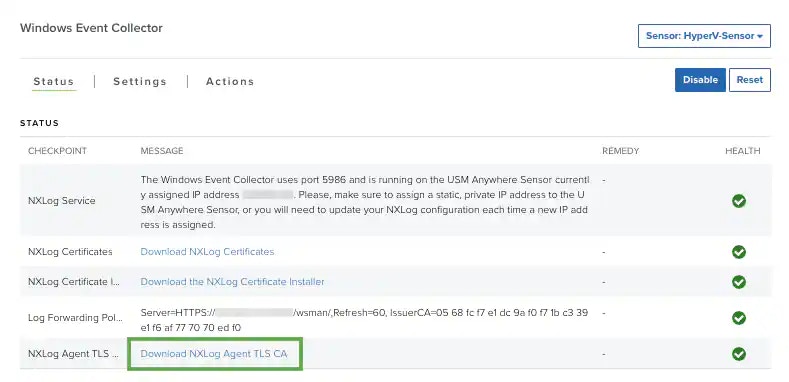
To use TLS, you need to download the certificate and save the file `USM-NXLog-Agent-TLS-CA.pem` in the `\nxlog\cert\` directory on your machine.
* Go to **Data Sources > Sensors**.
* Click **Sensor Apps** tab.
* In the left navigation pane, click **Windows Event Collector** to open the page.
* Download the certificate by clicking the **Download NXLog Agent TLS CA** link.
* Copy the certificate file to the client system.
7. Enter the IP address of your USM Anywhere Sensor.
8. Click **Create File** to generate the new nxlog.conf file and save it to the `\nxlog\conf\` directory on your machine.
9. Open Windows Services and restart the NXLog service.
10. In USM Anywhere, verify that you are receiving NXLog events.
If you decide not to use NXLog after the installation, you can uninstall the program using the Add or Remove Programs feature in the Windows Control Panel, or see [How to Uninstall NXLog](https://nxlog.co/question/3750/how-uninstall-nxlog) for detailed instructions from the vendor.
## PatternDB
If you want to limit the events collected and sent to USM Anywhere, you can download [the patterndb file](https://docs.levelblue.com/files/patterndb.xml) provided by LevelBlue and place it in the `\nxlog\conf\` directory on your machine. Follow the procedure above to download the NXLog configuration file and select the PatternDB plugin.
**Important:** Windows Event IDs not present in patterndb.xml are not forwarded. Excluding events not relevant to security helps improve the overall performance of the plugin. Consequently, some correlation rules may not be triggered because they rely on those events.
## Microsoft Sysmon
System Monitor (Sysmon) is a Windows system service and device driver that remains resident across system reboots to monitor and log system activity to the Windows Event Log. It provides detailed information about process creations, network connections, and changes to file creation time. Sysmon is a free [Windows Sysinternals tool](https://technet.microsoft.com/en-us/sysinternals/dn798348) from Microsoft. Using NXLog, you can send Sysmon logs to USM Anywhere for event correlation.
**To collect Sysmon logs**
1. [Download the NXLog configuration file](https://cybersecurity.att.com/documentation/resources/downloads/usm-anywhere/nxlog.conf) from USM Anywhere. You do not need to select any plugin for Sysmon.
2. Open the NXLog configuration file, look for the `` tag and add this line under ``:
```text theme={null}
\
```
With the line added, it should look like this example:
```text theme={null}
Module im_msvistalog
Query \
\
\
\
\
\
\
```
3. Save the file.
4. Open Windows Services and restart the NXLog service.
5. In USM Anywhere, verify that you are receiving Sysmon events.
## Enable Logging in Vendor Software
Some of the vendor plugins need to be configured to enable logging so that USM Anywhere can receive the logs. If you are using any of the plugins below, follow the described integration process to initiate system logging for the plugin.
Before configuring NXLog, you must download and install the Dell Boomi Atom on your host. Follow the steps in the [Boomi AtomSphere Documentation](https://help.boomi.com/bundle/integration/page/t-atm-Downloading_the_local_Atom_installer.html) to download the local Atom installer.
Before configuring NXLog, you must export the Duo Authentication Proxy events to a secondary log file. See [Enabling SIEM Logging in the Duo Authentication Proxy](https://help.duo.com/s/article/3959?language=en_US) for detailed instructions from the vendor.
Before configuring NXLog, you need to format data in Forcepoint (formerly Websense) Web Security Cloud for use by USM Anywhere. See [Exporting data to a third-party SIEM tool](https://www.websense.com/content/support/library/web/hosted/admin_guide/siem_integration_explain.aspx) for detailed instructions from the vendor.
Before configuring NXLog, you need to configure logging in the Microsoft 365 SharePoint Server. See [Configure diagnostic logging in SharePoint Server](https://docs.microsoft.com/en-us/SharePoint/administration/configure-diagnostic-logging) for detailed instructions from the vendor.
Before configuring NXLog, you need to enable debug logging on the DNS server.
**To enable DNS server debug logging**
1. From the Windows Start Menu, select **All Programs > Administrative Tools > DNS**.
2. From the console tree, right-click the applicable DNS server, and then click **Properties**.
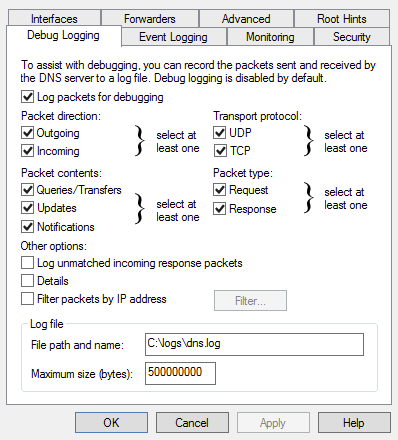
3. Click the **Debug Logging** tab.
4. Select **Log packets for debugging**. The most useful debug logging output comes from selecting at least three options:
* One option under Packet direction
* One option under Transport protocol
* At least one more option in another category
5. (Optional) Consider limiting the traffic captured by applying filters: a. Select **Filter packets by IP address**. b. Add the appropriate IP addresses by clicking **Filter**.
Warning: Do not select the **Details** option, because it produces logs in multi-line format instead of single-line, which the USM Anywhere plugins cannot process.
6. Specify the name and location for the log file. For example, in the screenshot above, the file path and name is `C:\logs\dns.log`. If you use a different file path, you will need to open the `nxlog.conf` file with a text editor and update the file path in the DNS-NXLOG section to reflect the file path you are using.
7. Click **Apply** to save and apply the settings.
8. Ensure that the log messages use the `MM/DD/YYYY` date format so USM Anywhere can parse the data correctly.
The Microsoft Internet Information Services (IIS) Management Pack includes a FTP Server that you can configure. (See vendor website for documentation.)
Before configuring NXLog, you must configure FTP logging in IIS.
**To configure FTP Logging in IIS Manager**
1. Open IIS Manager.
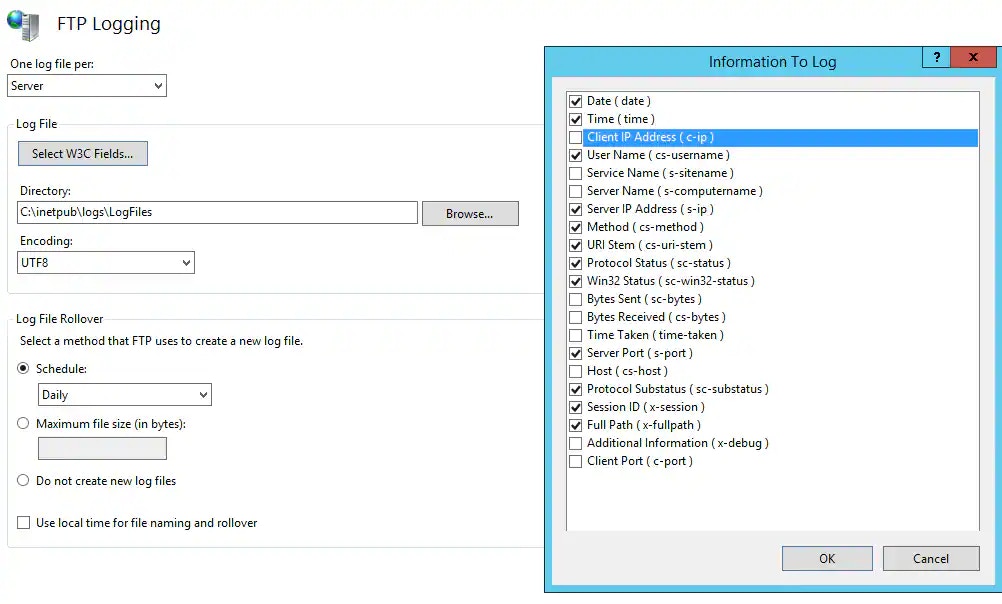
2. In the Connections tab, select either the server or the site, and then click the **FTP Logging** icon.
3. Under Log File, click **Select W3C Fields**, and then select the information you want to log. Make sure to select the items checked in the screenshot below and click OK.
4. Select **UTF8** under Encoding and **Daily** under Schedule.
5. Click **Apply**.
6. Restart the FTP Server for the changes to take effect.
Before configuring NXLog, you need to configure logging for the Microsoft HTTP Server API. See [Configuring HTTP Server API Error Logging](https://docs.microsoft.com/en-us/windows/win32/http/configuring-http-server-api-error-logging) for detailed instructions from the vendor.
Before configuring NXLog , you need to first configure logging on IIS.
**To configure logging at the server level**
1. Open the IIS Manager.
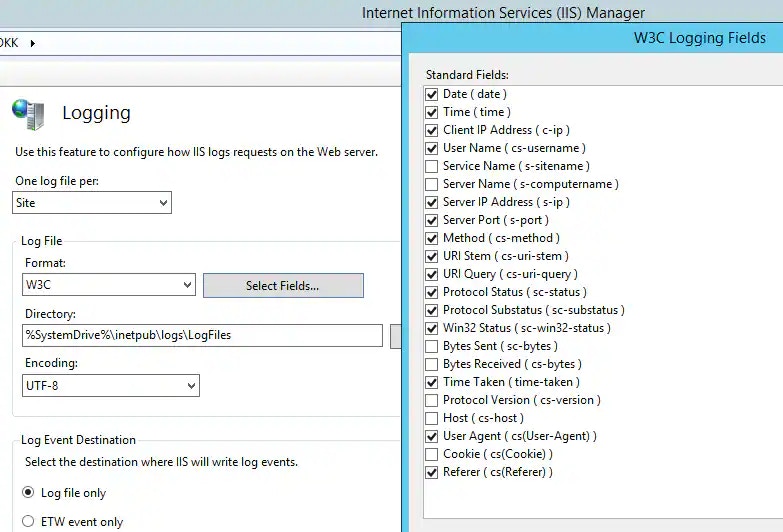
2. In the Connections tab, select the server and double-click the **Logging** icon.
3. Under One log file per, select **Site**.
4. Under Log File, click **Select Fields** to choose the information you want to log. Make sure to match the following screenshot because the Windows IIS plugin will look for these fields:
5. To use the *Windows IIS Extended* plugin, you must also enable Bytes Sent (sc-bytes), Bytes Received (cs-bytes), and Host (cs-host). In addition, you can add a custom field for X-Forwarded-For by clicking **Add Field** to fill in the information as shown:
**Note:** If you're using Microsoft Windows Server 2008, which doesn't provide an option to add more fields, the Window IIS Extended plugin won't work. Please use the Windows IIS plugin instead.
6. Click **Apply**.
Before configuring NXLog, you need to configure logging for Network Policy Server (NPS) in Microsoft Windows Server 2016 and Server 2019. See [Configure NPS Log File Properties](https://docs.microsoft.com/en-us/windows-server/networking/technologies/nps/nps-accounting-configure#configure-nps-log-file-properties) for detailed instructions from the vendor. Make sure to select **DTS Compliant** as the log format.
Before configuring NXLog, you must have enabled the SQL Server Audit feature and send audit results to the Windows Application Log.
**Note:** You can use SQL Server Management Studio or Microsoft Transact-SQL (T-SQL) to perform this task. See the [Microsoft documentation](https://docs.microsoft.com/en-us/sql/relational-databases/security/auditing/create-a-server-audit-and-database-audit-specification?view=sql-server-2017) if you need detailed step-by-step assistance.
**To use the SQL Server Management Studio**
1. Create a new server audit: a. In Object Explorer, expand the **Security** folder, right-click the **Audits** folder, and select New Audit. b. In the Audit destination list, select **Application Log**. c. Select the other options as needed and click **OK**.
2. Create a database-level audit specification a. In Object Explorer, expand the database you want to send log to USM Anywhere. b. Expand the **Security** folder, right-click the **Database Audit Specifications** folder and select **New Database Audit Specification**. c. In the Audit list, select the audit you created in the previous step. d. Select the other options as needed and click **OK**.
Netwrix provides a free add-on for LevelBlue to integrate Netwrix Auditor with USM Anywhere through the RESTful API. Before configuring NXLog, you must first use the add-on to generate special Windows event logs for USM Anywhere.
If you haven't already, download the add-on from the [Netwrix website](https://www.netwrix.com/add-on_for_alienvault_usm.html). Follow the detailed instructions in [their Quick-Start Guide](https://www.netwrix.com/download/QuickStart/Netwrix_Auditor_Add-on_for_AlienVault_USM_Quick_Start_Guide.pdf) to install and properly configure the add-on. Make sure you have reviewed the events generated by the add-on, as documented in the Quick-Start Guide.
The ObserveIT plugin leverages the integration support that ObserveIT provides for the HP ArcSight SIEM monitoring software. To configure the SIEM Log Integration, follow the ObserveIT documentation, [Configuring CEF Log Integration](https://documentation.observeit.com/configuration_guide/configuring_cef_log_integration.htm).
**Warning:** ObserveIT has been renamed Proofpoint Insider Threat Management.
**Important:** Follow the steps closely and keep all the default values even though they contain the word "ArcSight". The NXLog configuration file that you download from LevelBlue has been specified to parse logs in the default location.
Before configuring NXLog, you need to request a bulk export of audit logs for Oracle Cloud Infrastructure. See [Bulk Export of Audit Log Events](https://docs.cloud.oracle.com/en-us/iaas/Content/Audit/Concepts/bulkexport.htm) for detailed instructions from the vendor.
You must download and install the Sophos Reporting Log Writer for this integration. Follow the instructions in the [Sophos Reporting Log Writer user guide](https://www.sophos.com/en-us/medialibrary/PDFs/documentation/srlw_51_ugeng.pdf?la=en).
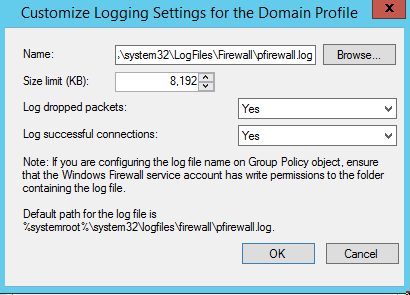
Before configuring NXLog, you must first enable logging in Windows Firewall with Advanced Security.
**To enable logging in Windows Firewall**
1. Open Windows Firewall with Advanced Security.
2. In the Actions panel, click **Properties**.
3. On the Domain Profile tab, click the **Customize** button in Logging.
4. In the new window, complete these steps: a. Keep the name as default. b. Increase the Size limit (KB) to 8192. c. Change both Log dropped packets and Log successful connections to **Yes**.
5. Click **OK**.
## Manual File Creation and Installation Process
If you are unable to create the nxlog.conf file using the process above, or if you wish to edit it manually, you can use the manual process instead.
**To install NXLog CE and configure forwarding**
1. Download the latest stable version of NXLog.
**Note:** [The NXLog Community Edition](https://nxlog.co/products/nxlog-community-edition/download) is open source and free of charge. But to use the File Integrity Monitoring plugin, you must download and install the NXLog Enterprise Edition instead. See [vendor documentation](https://nxlog.co/documentation/nxlog-user-guide/fim.html) for more information.
2. Make a backup copy of the original file, `C:\Program Files (x86)\nxlog\conf\nxlog.conf (32-bit) or C:\Program Files\nxlog\conf\nxlog.conf (64-bit)`, and give it another name.
3. Download the [NXLog configuration for USM Anywhere](https://cybersecurity.att.com/documentation/resources/downloads/usm-anywhere/nxlog.conf) and save it as your new `nxlog.conf` file.
4. Open the configuration file for editing and replace usmsensoriphere with the IP address of the USM Anywhere Sensor. USM Anywhere listens for syslog at UDP port 514, TCP port 601, or TLS/TCP port 6514.
5. Depending on the protocol you decide to use, edit the configuration file as detailed below. Make sure USM Anywhere allows inbound requests to the corresponding port.
Keep the defaults and move to the next step.
a. Replace define OUTPUT\_DESTINATION\_PORT 514 with define OUTPUT\_DESTINATION\_PORT 601. b. In `
a. First, you need to download the certificate from USM Anywhere, and place the file `USM-NXLog-Agent-TLS-CA.pem` in the `\nxlog\cert\` directory on your machine.
* Go to **Data Sources > Sensors**.
* Click **Sensor Apps** tab.
* In the left navigation pane, click **Windows Event Collector** to open the page.
* Download the certificate by clicking the **Download NXLog Agent TLS CA** link.
* Copy the certificate file to the client system. b. In the nxlog.conf file, add define `CERTDIR %ROOT%\cert` after the last define statement. c. Replace `define OUTPUT_DESTINATION_PORT 514` with `define OUTPUT_DESTINATION_PORT 6514`. d. In `
6. Some sections in the nxlog.conf file have been commented out to improve performance. Depending on which product you want to collect logs from, you need to uncomment the corresponding section or sections.
7. Save the file.
8. Open Windows Services and restart the NXLog service.
9. Log in to USM Anywhere and verify that you are receiving NXLog events.
**Note:** If you need to debug NXLog, open \nxlog\data\nxlog.log.
 * Copy the certificate file to the client system.
 5. Select the desired Windows system and the plugin (or plugins) to collect NXLogs. You don't need to select any plugin to collect default Windows Logs or [Sysmon logs](nxlog-direct-forward#microsoft-sysmon).
 4. Select **Log packets for debugging**. The most useful debug logging output comes from selecting at least three options:
* One option under Packet direction
* One option under Transport protocol
* At least one more option in another category
5. (Optional) Consider limiting the traffic captured by applying filters: a. Select **Filter packets by IP address**. b. Add the appropriate IP addresses by clicking **Filter**.
4. Select **Log packets for debugging**. The most useful debug logging output comes from selecting at least three options:
* One option under Packet direction
* One option under Transport protocol
* At least one more option in another category
5. (Optional) Consider limiting the traffic captured by applying filters: a. Select **Filter packets by IP address**. b. Add the appropriate IP addresses by clicking **Filter**.
 4. Select **UTF8** under Encoding and **Daily** under Schedule.
5. Click **Apply**.
6. Restart the FTP Server for the changes to take effect.
4. Select **UTF8** under Encoding and **Daily** under Schedule.
5. Click **Apply**.
6. Restart the FTP Server for the changes to take effect.
 5. To use the *Windows IIS Extended* plugin, you must also enable Bytes Sent (sc-bytes), Bytes Received (cs-bytes), and Host (cs-host). In addition, you can add a custom field for X-Forwarded-For by clicking **Add Field** to fill in the information as shown:

 5. Click **OK**.