> ## Documentation Index
> Fetch the complete documentation index at: https://docs.levelblue.com/llms.txt
> Use this file to discover all available pages before exploring further.
# Direct Traffic from Your Physical Network to the VMware Sensor
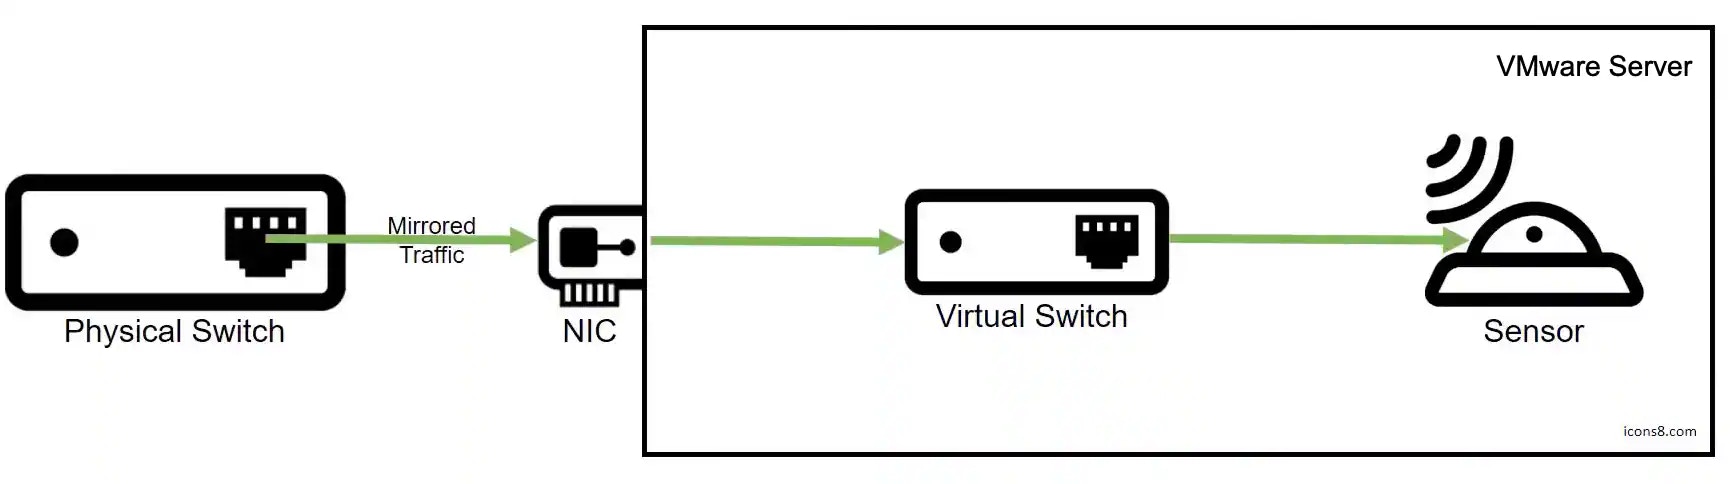
For USM Anywhere to monitor traffic from your physical network, you need to allocate a spare network interface card (NIC) to pass the mirrored traffic, or in Cisco terms the Switched Port Analyzer (SPAN) traffic, to the virtual network. LevelBlue recommends that you implement SPAN on your internal firewall ports, connect the SPAN port to the spare NIC, and then associate the spare NIC with a virtual switch (vSwitch) on your VMware server, as illustrated in the following diagram:
 **Important:** USM Anywhere provides multiple network interfaces to monitor your network. To avoid duplicating data, you should not connect them all to the same vSwitch. Instead, you can connect each interface to a different vSwitch dedicated to a different subnet within your network or a different virtual local area network (VLAN).
In the following procedure, you will create a new standard vSwitch in VMware vSphere, configure it to allow promiscuous mode, and then assign it to one of the network adapters on the USM Anywhere VMware Sensor virtual machine (VM). It is important to create a new vSwitch dedicated to the mirrored traffic. Adding a promiscuous port group to an existing vSwitch may cause instability in the hypervisor.
This procedure assumes that you have completed the following tasks:
* Enabled port mirroring on the network you want USM Anywhere to monitor.
* Allocated a spare NIC on the VMware ESXi server to receive the mirrored traffic.
**To direct the mirrored traffic to the VMware Sensor**
1. Configure a new standard vSwitch specifically for the mirrored traffic (see [VMware Documentation](https://docs.vmware.com/en/VMware-vSphere/6.5/com.vmware.vsphere.networking.doc/GUID-DAF824CD-104D-4ED7-8BA3-D769DF688CEB.html) for detailed instructions):
* For the connection type, select **Virtual Machine Port Group for a Standard Switch**.
* Add the spare NIC as the network adapter for the new switch.
* For the connection settings, enter a new network label for the port group, for example, *SPAN* Target.
* Enter a VLAN number or select \*\*All (4095), \*\*which enables the switch to capture traffic from all the VLANs connected to the spare NIC.
2. Configure the port group to allow promiscuous mode so that connected devices can view traffic on the entire switch:
a. Next to the new vSwitch, click **Properties**.
b. Select the vSwitch and click **Edit**.
c. Set Promiscuous Mode\*\* to Accept,\*\* and click **OK**.
d. Select the port group and make sure that the default security policy permits promiscuous mode there as well.
**Important:** USM Anywhere provides multiple network interfaces to monitor your network. To avoid duplicating data, you should not connect them all to the same vSwitch. Instead, you can connect each interface to a different vSwitch dedicated to a different subnet within your network or a different virtual local area network (VLAN).
In the following procedure, you will create a new standard vSwitch in VMware vSphere, configure it to allow promiscuous mode, and then assign it to one of the network adapters on the USM Anywhere VMware Sensor virtual machine (VM). It is important to create a new vSwitch dedicated to the mirrored traffic. Adding a promiscuous port group to an existing vSwitch may cause instability in the hypervisor.
This procedure assumes that you have completed the following tasks:
* Enabled port mirroring on the network you want USM Anywhere to monitor.
* Allocated a spare NIC on the VMware ESXi server to receive the mirrored traffic.
**To direct the mirrored traffic to the VMware Sensor**
1. Configure a new standard vSwitch specifically for the mirrored traffic (see [VMware Documentation](https://docs.vmware.com/en/VMware-vSphere/6.5/com.vmware.vsphere.networking.doc/GUID-DAF824CD-104D-4ED7-8BA3-D769DF688CEB.html) for detailed instructions):
* For the connection type, select **Virtual Machine Port Group for a Standard Switch**.
* Add the spare NIC as the network adapter for the new switch.
* For the connection settings, enter a new network label for the port group, for example, *SPAN* Target.
* Enter a VLAN number or select \*\*All (4095), \*\*which enables the switch to capture traffic from all the VLANs connected to the spare NIC.
2. Configure the port group to allow promiscuous mode so that connected devices can view traffic on the entire switch:
a. Next to the new vSwitch, click **Properties**.
b. Select the vSwitch and click **Edit**.
c. Set Promiscuous Mode\*\* to Accept,\*\* and click **OK**.
d. Select the port group and make sure that the default security policy permits promiscuous mode there as well.
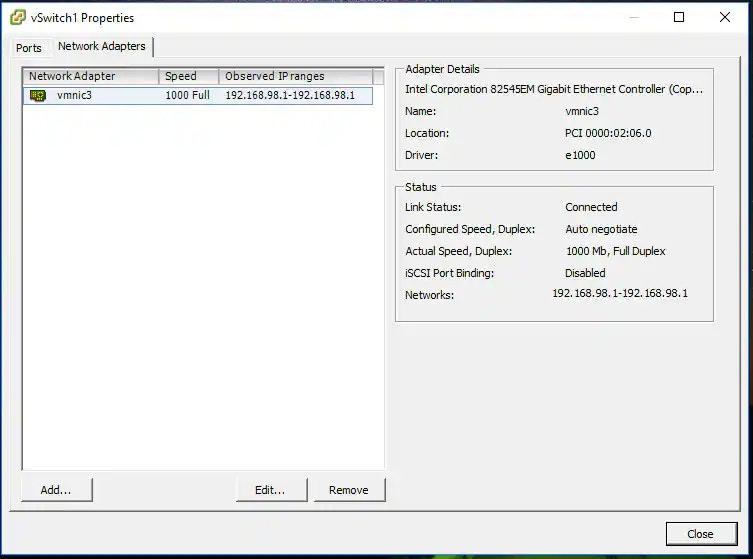
 e. Select the **Network Adapters** tab and make sure that your spare NIC is associated with the vSwitch.
 f. In the dialog box, click **Close**.
3. Connect the vSwitch to your VMware Sensor.
a. Edit the VMware Sensor VM and select an available network adapter.
Network adapter 1 is reserved for the management interface. See [Configure Network Interfaces for On-Premises Sensors](../setup/configuring-network) for more information.
b. Associate the adapter with the vSwitch and save your changes.
c. Restart the VM if changes are not automatically applied.
4. Repeat the steps for every vSwitch you want to monitor, as shown in the video.
f. In the dialog box, click **Close**.
3. Connect the vSwitch to your VMware Sensor.
a. Edit the VMware Sensor VM and select an available network adapter.
Network adapter 1 is reserved for the management interface. See [Configure Network Interfaces for On-Premises Sensors](../setup/configuring-network) for more information.
b. Associate the adapter with the vSwitch and save your changes.
c. Restart the VM if changes are not automatically applied.
4. Repeat the steps for every vSwitch you want to monitor, as shown in the video.
 To view other related training videos, [click here](https://cybersecurity.att.com/training/self-paced-training).