> ## Documentation Index
> Fetch the complete documentation index at: https://docs.levelblue.com/llms.txt
> Use this file to discover all available pages before exploring further.
# Generating a CSV report
You can export the results of your custom query run as a CSV file for offline analysis or scheduled delivery.
**To generate a CSV report**
1. Go to **Data Sources** > **Hunting Library**.
2. Click **Create Custom Query**. The **New Query** section appears.
3. Enter your query in the **New Query** field.
4. Click **Generate CSV Report**. The **Configure Report** section appears.
 5. Configure the **Parameters & Export Settings** of the report:
* **Current Filters (All report dates saved in UTC)**: Select the date filter to be used for the report from the dropdown list. The default value is Last Hour.
* **Schedule**: Select the recurring schedule of the report to be generated.
The scheduling parameters in Advanced Query follow the same format as in the **USM Anywhere Scheduled Reports**. Refer to [Create and Schedule Reports](/documentation/usm-anywhere/user-guide/reports/scheduled-reports) for more information.
* **Email Addresses**: Enter one or more email addresses that will receive the report.
Press **Enter** after each email address. No commas or semicolons are needed.
* **Send to My Email Address**: When selected, your email (as a logged-in user) is automatically added as a recipient.
Manually typing your email also automatically selects this checkbox.
* **Enable Link Expiration**: When selected, a download link will be included in the email. This link expires 14 days after it is clicked.
6. Click **Next** to continue.
7. Configure the **Format Output** of the report.
5. Configure the **Parameters & Export Settings** of the report:
* **Current Filters (All report dates saved in UTC)**: Select the date filter to be used for the report from the dropdown list. The default value is Last Hour.
* **Schedule**: Select the recurring schedule of the report to be generated.
The scheduling parameters in Advanced Query follow the same format as in the **USM Anywhere Scheduled Reports**. Refer to [Create and Schedule Reports](/documentation/usm-anywhere/user-guide/reports/scheduled-reports) for more information.
* **Email Addresses**: Enter one or more email addresses that will receive the report.
Press **Enter** after each email address. No commas or semicolons are needed.
* **Send to My Email Address**: When selected, your email (as a logged-in user) is automatically added as a recipient.
Manually typing your email also automatically selects this checkbox.
* **Enable Link Expiration**: When selected, a download link will be included in the email. This link expires 14 days after it is clicked.
6. Click **Next** to continue.
7. Configure the **Format Output** of the report.
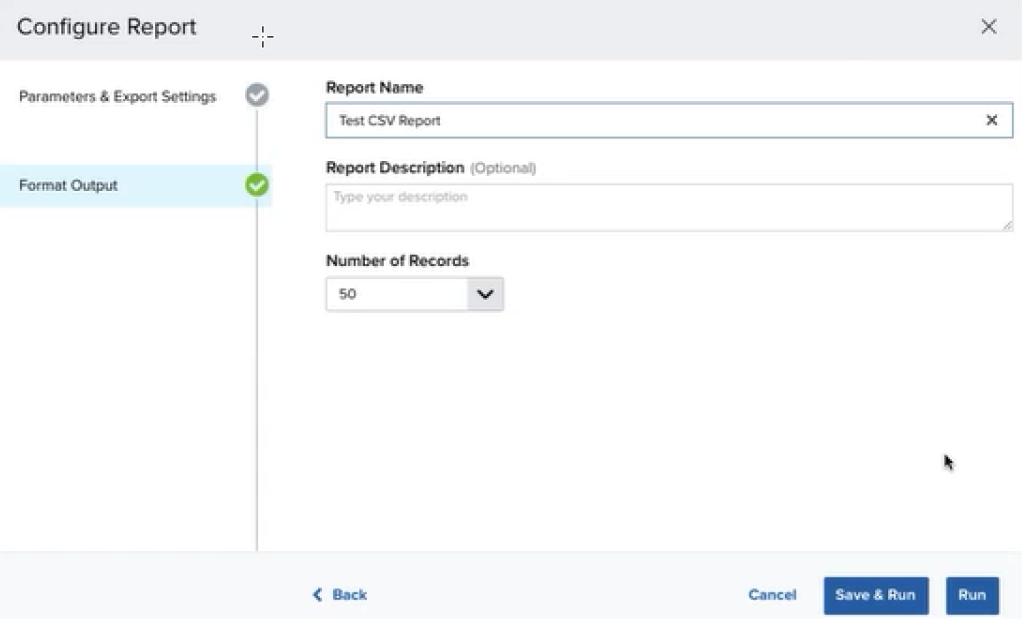 * **Report Name**: Enter the name of the report.
* **Report Description \[OPTIONAL]**: Describe what the report is about.
* **Number of Records**: Select the number of records to be included in the report.
8. Click **Save & Run** or **Run** to generate the report.
* Clicking **Save & Run** generates the report and saves it to the **Saved Reports** list. Refer to [Saved Reports on USM Anywhere](/documentation/usm-anywhere/user-guide/reports/saved-reports) for more information.
* Clicking **Run** generates the report without saving it.
A download link will be sent to the email addresses upon generation of the report.
* **Report Name**: Enter the name of the report.
* **Report Description \[OPTIONAL]**: Describe what the report is about.
* **Number of Records**: Select the number of records to be included in the report.
8. Click **Save & Run** or **Run** to generate the report.
* Clicking **Save & Run** generates the report and saves it to the **Saved Reports** list. Refer to [Saved Reports on USM Anywhere](/documentation/usm-anywhere/user-guide/reports/saved-reports) for more information.
* Clicking **Run** generates the report without saving it.
A download link will be sent to the email addresses upon generation of the report.