> ## Documentation Index
> Fetch the complete documentation index at: https://docs.levelblue.com/llms.txt
> Use this file to discover all available pages before exploring further.
# Viewing Alarm Details
Role Availability | ✔️ Read-Only ✔️ Investigator ✔️ Analyst ✔️ Manager
The Alarm Details page provides in-depth information on an alarm, what caused it, and how to resolve the situation.
**To view the details of an alarm**
1. Go to **Activity > Alarms**.
2. Click the alarm to display a summary view, and then click the alarm name to open the full details of the alarm.
 Click the
  icon to bookmark an item for quick access.
Clicking the icon on the secondary menu shows the bookmarked items and provides links to them.
Not all alarms found during monitoring are necessary in managing your environment because they do not pose a security threat. It is common for low priority alarms to create noise, which can make it difficult to monitor alarms that require more attention. You can identify these alarms and suppress them by using a rule.
The Alarms Details page includes alarm management functions that are supported for your assigned user role:
* **Select Action**: See [Applying Actions to Alarms](/documentation/usm-anywhere/user-guide/alarms/actions-to-alarms) for more information.
* **Create Rule**: See [Creating Rules from Alarms](/documentation/usm-anywhere/user-guide/alarms/creating-rules-from-alarms) for more information.
* **Generate Report**: See [Create an Alarms Report](/documentation/usm-anywhere/user-guide/alarms/exporting-alarms) for more information.
* **Was this alarm a true positive?:** Click the
icon to bookmark an item for quick access.
Clicking the icon on the secondary menu shows the bookmarked items and provides links to them.
Not all alarms found during monitoring are necessary in managing your environment because they do not pose a security threat. It is common for low priority alarms to create noise, which can make it difficult to monitor alarms that require more attention. You can identify these alarms and suppress them by using a rule.
The Alarms Details page includes alarm management functions that are supported for your assigned user role:
* **Select Action**: See [Applying Actions to Alarms](/documentation/usm-anywhere/user-guide/alarms/actions-to-alarms) for more information.
* **Create Rule**: See [Creating Rules from Alarms](/documentation/usm-anywhere/user-guide/alarms/creating-rules-from-alarms) for more information.
* **Generate Report**: See [Create an Alarms Report](/documentation/usm-anywhere/user-guide/alarms/exporting-alarms) for more information.
* **Was this alarm a true positive?:** Click the  or
or  icon to apply an alarm outcome of True Positive or False Positive. If this alarm was a False Positive, select an optional reason from the drop-down list. Leave these icons unselected to retain a status of Undetermined.
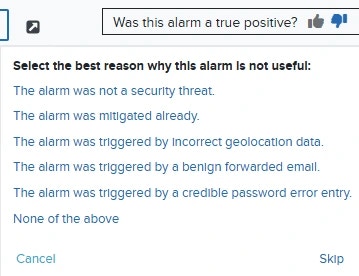 Once specified, the reason an alarm was not useful cannot be viewed in the Alarm Details. It can only be checked through the Alarms Explorer page by adding the Alarm Outcome Reason filter, or by using the related Console User Events generated for that action.
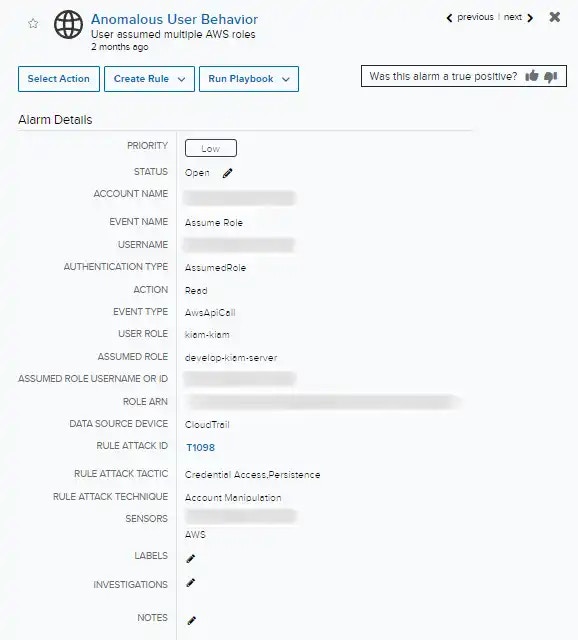
The alarm details include the main fields that identify an alarm. You can edit or add values into these fields:
* **Status**: This field indicates the status for the alarm: Open, In Review, or Closed. You can click the
Once specified, the reason an alarm was not useful cannot be viewed in the Alarm Details. It can only be checked through the Alarms Explorer page by adding the Alarm Outcome Reason filter, or by using the related Console User Events generated for that action.
The alarm details include the main fields that identify an alarm. You can edit or add values into these fields:
* **Status**: This field indicates the status for the alarm: Open, In Review, or Closed. You can click the  icon to edit the field and apply a status. See [Alarm Status](/documentation/usm-anywhere/user-guide/alarms/alarms-status) for more information.
* **Labels**: This field indicates if the alarm has been classified by using a label. You can click the icon to manage the labels of the alarm. See Labeling the Alarms for more information.
* **Investigations**: This field indicates if the alarm has been associated to an investigation. You can click the icon to edit the field and enter the title or the number that identifies each investigation. See Adding an Alarm to an Investigation for more information.
* **Notes**: This field allows you to enter notes regarding this alarm. You can click the icon to enter text into this field.
* **HTTP Hostname**: If the alarm includes this field, you can search for events by using it. See [Searching Events](/documentation/usm-anywhere/user-guide/events/searching-events) from the Details of an Alarm for more information.
* **DNS RR Name**: If the alarm includes this field, you can search for events by using it. See [Searching Events](/documentation/usm-anywhere/user-guide/events/searching-events) from the Details of an Alarm for more information.
Below the alarm details you can see the source, the destination, the associated alarm if it exists, the associated events, a description, and, in the case of an alarm with a high priority, a recommendation to fix the problem.
Your environment can have sources and destinations included in the inventory and those not included in the inventory. Assets included in the inventory display their names in blue, and assets not included in the inventory display their names in gray.
The
icon to edit the field and apply a status. See [Alarm Status](/documentation/usm-anywhere/user-guide/alarms/alarms-status) for more information.
* **Labels**: This field indicates if the alarm has been classified by using a label. You can click the icon to manage the labels of the alarm. See Labeling the Alarms for more information.
* **Investigations**: This field indicates if the alarm has been associated to an investigation. You can click the icon to edit the field and enter the title or the number that identifies each investigation. See Adding an Alarm to an Investigation for more information.
* **Notes**: This field allows you to enter notes regarding this alarm. You can click the icon to enter text into this field.
* **HTTP Hostname**: If the alarm includes this field, you can search for events by using it. See [Searching Events](/documentation/usm-anywhere/user-guide/events/searching-events) from the Details of an Alarm for more information.
* **DNS RR Name**: If the alarm includes this field, you can search for events by using it. See [Searching Events](/documentation/usm-anywhere/user-guide/events/searching-events) from the Details of an Alarm for more information.
Below the alarm details you can see the source, the destination, the associated alarm if it exists, the associated events, a description, and, in the case of an alarm with a high priority, a recommendation to fix the problem.
Your environment can have sources and destinations included in the inventory and those not included in the inventory. Assets included in the inventory display their names in blue, and assets not included in the inventory display their names in gray.
The  icon located next to the source and destination fields allows you to access these options:
* **Search Pivot**: Identify alarms triggered in the last hour, 24 hours, 7 days, 30 days, or 90 days. You can also configure your own period of time by clicking the **Custom Range** option. When you click the icon, a calendar opens. You can choose the first and last day to delimit your search by clicking the days on the calendar or entering the days directly. Then select the hours, minutes, and seconds by clicking the specific box. Finally, select **AM** or **PM**.
* **Find Source or Destination in Events**: Use this link to search events having the same source or destination as the alarm.
* **Find Source & Destination in Events**: Use this link to search events having the same source and destination as the alarm.
The icon located next to the asset enables you to access the following options. Your access to these options may vary based on your user role. See [Role-Based Access Control (RBAC)](/documentation/usm-anywhere/user-guide/user-management/rbac) in USM Anywhere for more information:
* **Add to Current Filter:** Use this option to add the asset name as a search filter. See [Searching Alarms](/documentation/usm-anywhere/user-guide/alarms/searching-alarms) for more information.
* **Find in Events:** Use this option to execute a search of the asset name in the Events page. See [Events List View](/documentation/usm-anywhere/user-guide/events/events-list-view) for more information.
* **Look Up in OTX:** This option searches the IP address of the source asset in the Open Threat Exchange page. See [Using OTX in USM Anywhere](/documentation/usm-anywhere/user-guide/otx/using-otx-in-anywhere) for more information.
* **Add Asset to System:** Use this option to create the asset in the system. See [Adding Assets](/documentation/usm-anywhere/user-guide/asset-management/asset-administration/adding-assets) for more information.
The value in the FQDN field comes from the event itself (raw log). This field can have a real FQDN, an IP address, or be empty.
The
icon located next to the source and destination fields allows you to access these options:
* **Search Pivot**: Identify alarms triggered in the last hour, 24 hours, 7 days, 30 days, or 90 days. You can also configure your own period of time by clicking the **Custom Range** option. When you click the icon, a calendar opens. You can choose the first and last day to delimit your search by clicking the days on the calendar or entering the days directly. Then select the hours, minutes, and seconds by clicking the specific box. Finally, select **AM** or **PM**.
* **Find Source or Destination in Events**: Use this link to search events having the same source or destination as the alarm.
* **Find Source & Destination in Events**: Use this link to search events having the same source and destination as the alarm.
The icon located next to the asset enables you to access the following options. Your access to these options may vary based on your user role. See [Role-Based Access Control (RBAC)](/documentation/usm-anywhere/user-guide/user-management/rbac) in USM Anywhere for more information:
* **Add to Current Filter:** Use this option to add the asset name as a search filter. See [Searching Alarms](/documentation/usm-anywhere/user-guide/alarms/searching-alarms) for more information.
* **Find in Events:** Use this option to execute a search of the asset name in the Events page. See [Events List View](/documentation/usm-anywhere/user-guide/events/events-list-view) for more information.
* **Look Up in OTX:** This option searches the IP address of the source asset in the Open Threat Exchange page. See [Using OTX in USM Anywhere](/documentation/usm-anywhere/user-guide/otx/using-otx-in-anywhere) for more information.
* **Add Asset to System:** Use this option to create the asset in the system. See [Adding Assets](/documentation/usm-anywhere/user-guide/asset-management/asset-administration/adding-assets) for more information.
The value in the FQDN field comes from the event itself (raw log). This field can have a real FQDN, an IP address, or be empty.
The  icon located next to the asset enables you to access the following options. Your access to these options may vary based on your user role. See [Role-Based Access Control (RBAC)](/documentation/usm-anywhere/user-guide/user-management/rbac) in USM Anywhere for more information:
* **Add to Current Filter:** Use this option to add the asset name as a search filter. See [Searching Events](/documentation/usm-anywhere/user-guide/events/searching-events) for more information.
* **Find in Events:** Use this option to execute a search of the asset name in the Events page. See [Searching Events](/documentation/usm-anywhere/user-guide/events/searching-events) for more information.
* **Look Up in OTX:** This option searches the IP address of the asset in the OTX page. See [Using OTX in USM Anywhere](/documentation/usm-anywhere/user-guide/otx/using-otx-in-anywhere) for more information.
* **Full Details:** See [Viewing Assets Details](/documentation/usm-anywhere/user-guide/asset-management/asset-administration/viewing-asset-details) for more information.
* **Configure Asset:** See [Editing Assets](/documentation/usm-anywhere/user-guide/asset-management/asset-administration/editing-assets) for more information.
* **Delete Asset:** See [Deleting the Assets](/documentation/usm-anywhere/user-guide/asset-management/asset-administration/deleting-assets#DeletingAssets) for more information.
* **Assign Credentials:** See [Managing Credentials in USM Anywhere](/documentation/usm-anywhere/user-guide/vulnerability-assessment/credentials) for more information.
* **Authenticated Scan:** This option displays depending on the USM Anywhere Sensor associated with the asset. See [Running Authenticated Asset Scans](/documentation/usm-anywhere/user-guide/asset-management/asset-administration/running-vuln-scan) for more information.
* **Scan with BlueApp:** This option enables you to run an asset scan through an BlueApp. See [Running Asset Scans Using a BlueApp](/documentation/usm-anywhere/user-guide/asset-management/asset-administration/scan-with-alienapp) for more information.
* **Configuration Issues:** This option opens the Assets Details page. The Configuration Issues tab is selected in the page. See [Viewing Assets Details](/documentation/usm-anywhere/user-guide/asset-management/asset-administration/viewing-asset-details) for more information.
* **Vulnerabilities:** This option opens the Assets Details page. The Vulnerabilities tab is selected in the page. See [Viewing Assets Details](/documentation/usm-anywhere/user-guide/asset-management/asset-administration/viewing-asset-details) for more information.
* **Alarms:** This option opens the Assets Details page. The Alarms tab is selected in the page. See [Viewing Assets Details](/documentation/usm-anywhere/user-guide/asset-management/asset-administration/viewing-asset-details) for more information.
* **Events:** This option opens the Assets Details page. The Events tab is selected in the page. See [Viewing Assets Details](/documentation/usm-anywhere/user-guide/asset-management/asset-administration/viewing-asset-details) for more information.
3. Click the link of an associated event to open its details page.
The Associated Events list displays all events associated with the alarm.
4. In the upper right corner, click **Previous** and **Next** to navigate between items.
5. Click the
icon located next to the asset enables you to access the following options. Your access to these options may vary based on your user role. See [Role-Based Access Control (RBAC)](/documentation/usm-anywhere/user-guide/user-management/rbac) in USM Anywhere for more information:
* **Add to Current Filter:** Use this option to add the asset name as a search filter. See [Searching Events](/documentation/usm-anywhere/user-guide/events/searching-events) for more information.
* **Find in Events:** Use this option to execute a search of the asset name in the Events page. See [Searching Events](/documentation/usm-anywhere/user-guide/events/searching-events) for more information.
* **Look Up in OTX:** This option searches the IP address of the asset in the OTX page. See [Using OTX in USM Anywhere](/documentation/usm-anywhere/user-guide/otx/using-otx-in-anywhere) for more information.
* **Full Details:** See [Viewing Assets Details](/documentation/usm-anywhere/user-guide/asset-management/asset-administration/viewing-asset-details) for more information.
* **Configure Asset:** See [Editing Assets](/documentation/usm-anywhere/user-guide/asset-management/asset-administration/editing-assets) for more information.
* **Delete Asset:** See [Deleting the Assets](/documentation/usm-anywhere/user-guide/asset-management/asset-administration/deleting-assets#DeletingAssets) for more information.
* **Assign Credentials:** See [Managing Credentials in USM Anywhere](/documentation/usm-anywhere/user-guide/vulnerability-assessment/credentials) for more information.
* **Authenticated Scan:** This option displays depending on the USM Anywhere Sensor associated with the asset. See [Running Authenticated Asset Scans](/documentation/usm-anywhere/user-guide/asset-management/asset-administration/running-vuln-scan) for more information.
* **Scan with BlueApp:** This option enables you to run an asset scan through an BlueApp. See [Running Asset Scans Using a BlueApp](/documentation/usm-anywhere/user-guide/asset-management/asset-administration/scan-with-alienapp) for more information.
* **Configuration Issues:** This option opens the Assets Details page. The Configuration Issues tab is selected in the page. See [Viewing Assets Details](/documentation/usm-anywhere/user-guide/asset-management/asset-administration/viewing-asset-details) for more information.
* **Vulnerabilities:** This option opens the Assets Details page. The Vulnerabilities tab is selected in the page. See [Viewing Assets Details](/documentation/usm-anywhere/user-guide/asset-management/asset-administration/viewing-asset-details) for more information.
* **Alarms:** This option opens the Assets Details page. The Alarms tab is selected in the page. See [Viewing Assets Details](/documentation/usm-anywhere/user-guide/asset-management/asset-administration/viewing-asset-details) for more information.
* **Events:** This option opens the Assets Details page. The Events tab is selected in the page. See [Viewing Assets Details](/documentation/usm-anywhere/user-guide/asset-management/asset-administration/viewing-asset-details) for more information.
3. Click the link of an associated event to open its details page.
The Associated Events list displays all events associated with the alarm.
4. In the upper right corner, click **Previous** and **Next** to navigate between items.
5. Click the  icon to close the dialog box.
See the [Searching Events from the Details of an Alarm](/documentation/usm-anywhere/user-guide/alarms/searching-details-alarms) page for more information about the options in the HTTP Hostname, DNS RR Name, Source, and Destination fields.
icon to close the dialog box.
See the [Searching Events from the Details of an Alarm](/documentation/usm-anywhere/user-guide/alarms/searching-details-alarms) page for more information about the options in the HTTP Hostname, DNS RR Name, Source, and Destination fields.