> ## Documentation Index
> Fetch the complete documentation index at: https://docs.levelblue.com/llms.txt
> Use this file to discover all available pages before exploring further.
# Assigning Credentials to Assets
| | | | | |
| --------------------- | --------- | ------------ | ----------- | ----------- |
| **Role Availability** | Read-Only | Investigator | **Analyst** | **Manager** |
USM Anywhere enables you to assign credentials to an asset, to an asset group, or to members of an asset group.
**Note:** Credentials assigned directly to an asset have higher priority than those assigned to an asset group.
When USM Anywhere runs a scan or executes a system-level action, it uses the credential set assigned directly to the asset, if there is one. If those credentials don't connect or the asset doesn't have an assigned credential set, it uses the credential set assigned to the group where the asset is a member, if that asset is a member of an asset group.
## Assigning Credentials to an Asset
In USM Anywhere, you assign a defined credential set to an individual asset in order to use the credentials for authenticated scans, active directory (AD) scans, and BlueApp for Forensics and Response actions on the host. You can assign assets to a credential set in the Credentials page, or you can perform this task from the Assets page.
**To assign a credential on the Credentials page**
1. Go to **Settings > Credentials**.
2. In the line of the credential you want to assign, click the  icon.
icon.
 A dialog box opens.
 3. Enter part of the asset name in the field at the bottom of the dialog box
 This displays the matching items below the field. You can enter more text to filter the list further.
4. Select the asset to assign to the credential set.
The credentials overwrite dialog box opens.
This displays the matching items below the field. You can enter more text to filter the list further.
4. Select the asset to assign to the credential set.
The credentials overwrite dialog box opens.
 **Warning:** If the asset has already assigned credentials, these credentials are going to be overwritten.
5. Next to the displayed asset name, click **Test** to execute a test connection to the asset using the credentials.
If the test detects any warnings, a Permissions Warnings section displays. This section contains a Warning column that lists the individual warnings.
**Warning:** If the asset has already assigned credentials, these credentials are going to be overwritten.
5. Next to the displayed asset name, click **Test** to execute a test connection to the asset using the credentials.
If the test detects any warnings, a Permissions Warnings section displays. This section contains a Warning column that lists the individual warnings.
 A permissions error doesn't prevent the scan from running, but it can result in the incomplete information being detailed in the scan results.
6. Click the
A permissions error doesn't prevent the scan from running, but it can result in the incomplete information being detailed in the scan results.
6. Click the  icon to close the dialog box.
**To assign a credential on the Assets page**
1. Go to **Environment > Assets** and locate the asset.
2. Next to the asset name, click the
icon to close the dialog box.
**To assign a credential on the Assets page**
1. Go to **Environment > Assets** and locate the asset.
2. Next to the asset name, click the  icon and select **Assign Credentials**.
The assign credentials dialog box opens.
icon and select **Assign Credentials**.
The assign credentials dialog box opens.
 3. In the Available Credentials drop-down list, select the credential to use.
 **Note:** If the needed credentials do not already exist, you can select **Add New Credentials** to define them in USM Anywhere. See [Creating Credentials](/documentation/usm-anywhere/user-guide/vulnerability-assessment/creating-credentials) for more information. Use the
  icon to modify any information.
4. (Optional.) Select the **Jump Box** option if you want to authenticate through another asset.
Select the checkbox and use the field to search for the asset you want to use as an authentication server.
5. Click **Test** to execute a test connection to the asset using the selected credentials.
If the test detects any warnings, a Permissions Warnings section displays. This section contains a Warning column that lists the individual warnings and a Remediation that provides a suggested solution to resolve each warning. A permissions error doesn't prevent the scan from running, but it can result in the incomplete information being detailed in the scan results.
6. Click **Save**.
## Assigning Credentials to an Asset Group
In USM Anywhere, you assign a defined credential set to an asset group to use the credentials for authenticated scans, AD scans, and BlueApp Forensics and Response actions on members of the group. You can assign asset groups to a credential set in the Credentials page, or you can perform this task from the Asset Groups page.
**Important:** When you assign a credential to an asset group, USM Anywhere assigns the credential to the asset group instead of assigning it to all of its members. If you want to assign a credential to all members of a group, see Assign Credentials to Group Members.
**To assign a credential on the Credentials page**
1. Go to **Settings > Credentials**.
2. In the line of the credential you want to assign, click the icon.
A dialog box opens.
3. Click the **Asset Groups** tab.
4. At the bottom of the dialog box, enter part of the asset group name in the field.
This displays the matching items below the field. You can enter more text to filter the list further.
5. Select the asset group to assign to the credential set.
icon to modify any information.
4. (Optional.) Select the **Jump Box** option if you want to authenticate through another asset.
Select the checkbox and use the field to search for the asset you want to use as an authentication server.
5. Click **Test** to execute a test connection to the asset using the selected credentials.
If the test detects any warnings, a Permissions Warnings section displays. This section contains a Warning column that lists the individual warnings and a Remediation that provides a suggested solution to resolve each warning. A permissions error doesn't prevent the scan from running, but it can result in the incomplete information being detailed in the scan results.
6. Click **Save**.
## Assigning Credentials to an Asset Group
In USM Anywhere, you assign a defined credential set to an asset group to use the credentials for authenticated scans, AD scans, and BlueApp Forensics and Response actions on members of the group. You can assign asset groups to a credential set in the Credentials page, or you can perform this task from the Asset Groups page.
**Important:** When you assign a credential to an asset group, USM Anywhere assigns the credential to the asset group instead of assigning it to all of its members. If you want to assign a credential to all members of a group, see Assign Credentials to Group Members.
**To assign a credential on the Credentials page**
1. Go to **Settings > Credentials**.
2. In the line of the credential you want to assign, click the icon.
A dialog box opens.
3. Click the **Asset Groups** tab.
4. At the bottom of the dialog box, enter part of the asset group name in the field.
This displays the matching items below the field. You can enter more text to filter the list further.
5. Select the asset group to assign to the credential set.
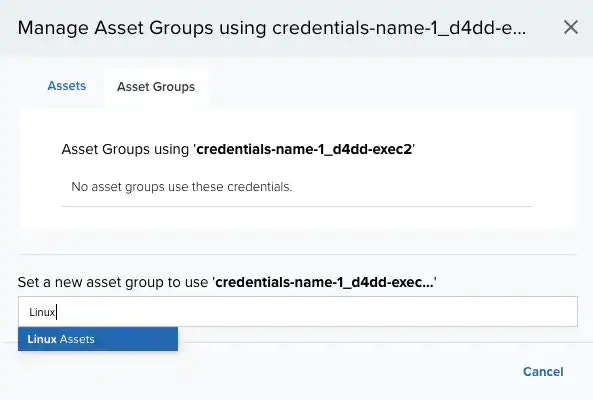 After you select the asset group, the dialog displays the item at the top. If needed, you can enter text for another asset group name and select it to assign multiple asset groups for the credential set.
6. Click the icon to close the dialog box.
**To assign a credential on the Asset Groups page**
1. Go to **Environment > Assets** and locate the asset.
2. Next to the asset name, click the icon and select **Assign Credentials**.
The assign credentials dialog box opens.
After you select the asset group, the dialog displays the item at the top. If needed, you can enter text for another asset group name and select it to assign multiple asset groups for the credential set.
6. Click the icon to close the dialog box.
**To assign a credential on the Asset Groups page**
1. Go to **Environment > Assets** and locate the asset.
2. Next to the asset name, click the icon and select **Assign Credentials**.
The assign credentials dialog box opens.
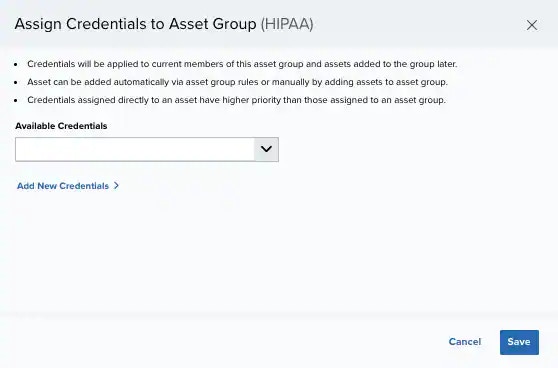 3. In the Available Credentials drop-down list, select the credential to use.
**Note:** If the needed credentials do not already exist, you can select **Add New Credentials** to define them in USM Anywhere. See [Creating Credentials](/documentation/usm-anywhere/user-guide/vulnerability-assessment/creating-credentials) to create the new credential set. Use the icon to modify any information. Click **Remove Current Credentials From Asset Group** to remove that credential from the asset group.
4. Click **Save**.
## Assigning Credentials to Group Members
1. Go to **Environment > Asset Groups**.
2. Click the icon next to the asset group name and select **Full Details**.
3. Click **Actions > Assign Credentials to Group Members**.
The Configure Asset Group Members dialog box opens.
3. In the Available Credentials drop-down list, select the credential to use.
**Note:** If the needed credentials do not already exist, you can select **Add New Credentials** to define them in USM Anywhere. See [Creating Credentials](/documentation/usm-anywhere/user-guide/vulnerability-assessment/creating-credentials) to create the new credential set. Use the icon to modify any information. Click **Remove Current Credentials From Asset Group** to remove that credential from the asset group.
4. Click **Save**.
## Assigning Credentials to Group Members
1. Go to **Environment > Asset Groups**.
2. Click the icon next to the asset group name and select **Full Details**.
3. Click **Actions > Assign Credentials to Group Members**.
The Configure Asset Group Members dialog box opens.
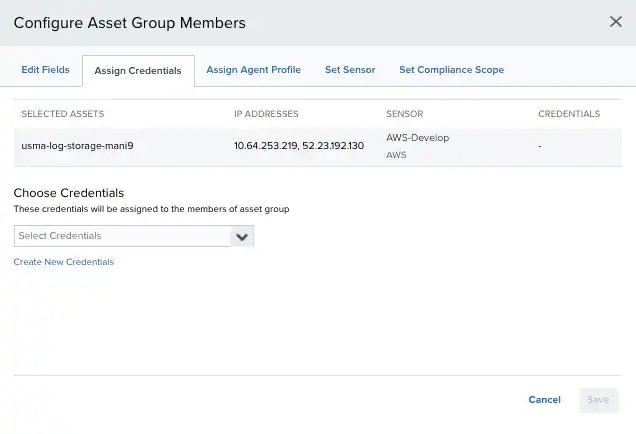 4. Select the credentials to use or create a new one, see [Creating Credentials](/documentation/usm-anywhere/user-guide/vulnerability-assessment/creating-credentials)
5. Click **Save**.
4. Select the credentials to use or create a new one, see [Creating Credentials](/documentation/usm-anywhere/user-guide/vulnerability-assessment/creating-credentials)
5. Click **Save**.