> ## Documentation Index
> Fetch the complete documentation index at: https://docs.levelblue.com/llms.txt
> Use this file to discover all available pages before exploring further.
# Performing Vulnerability Scans
| | | | | |
| --------------------- | --------- | ------------ | ----------- | ----------- |
| **Role Availability** | Read-Only | Investigator | **Analyst** | **Manager** |
In USM Anywhere you can run:
An authenticated scan verifies scanned IPs and detects vulnerabilities, configuration issues, and software. The USM Anywhere Sensor initiates a credentialed SSH (Linux), WinRM (Windows), or MacOS connection to the asset and remotely runs a series of commands for host-based assessment. See [Managing Credentials in USM Anywhere](/documentation/usm-anywhere/user-guide/vulnerability-assessment/credentials). You can run authenticated asset scans from these pages:
* **Environment > Assets** for running an authenticated scan in that precise moment. See [Running Authenticated Asset Scans](/documentation/usm-anywhere/user-guide/asset-management/asset-administration/running-vuln-scan)for more information.
* **Environment > Asset Groups** for running an authenticated asset groups scan in that precise moment. See [Running Authenticated Asset Groups Scans](/documentation/usm-anywhere/user-guide/asset-management/asset-groups/running-vuln-scan-asset-groups) for more information.
* **Settings > Scheduler** for scheduling an authenticated scan job during a specific period of time. See [Scheduling Asset Scans from the Job Scheduler Page](/documentation/usm-anywhere/user-guide/scheduler/scheduling-asset-scans-from-scheduler) and [Scheduling Asset Groups Scans from the Job Scheduler Page](/documentation/usm-anywhere/user-guide/scheduler/scheduling-ag-scans-from-scheduler) for more information.
* **Environment > Vulnerabilities** for running an asset scan. You can scan a single asset, an asset group, or enter a network range. See [Running an Asset Scan from Vulnerabilities](/documentation/usm-anywhere/user-guide/vulnerability-assessment/perf-vulnerability-scans) for more information.
**Warning:** An authenticated scan may fail if the local mail exchanger, which applies to Linux hosts, is enabled in the target asset.
You cannot scan USM Anywhere sensors.
Use an asset scan to discover services, operating systems, hostnames, IP and MAC addresses, and vulnerabilities of known hosts in the deployed network. You can run non-authenticated asset scans from these pages:
* **Environment > Assets** for running an asset scan in that precise moment. See [Running Asset Scans](/documentation/usm-anywhere/user-guide/asset-management/asset-administration/running-asset-scan) for more information.
* **Environment > Asset Groups** for running an asset group scan in that precise moment. See [Running Asset Groups Scans](https://cybersecurity.att.com/documentation/usm-anywhere/user-guide/asset-management/asset-groups/running-asset-groups-scan) for more information.
* **Settings > Scheduler** for scheduling an authenticated scan job during a specific period of time. See [Scheduling Asset Scans from the Job Scheduler Page](/documentation/usm-anywhere/user-guide/scheduler/scheduling-asset-scans-from-scheduler) and [Scheduling Asset Groups Scans from the Job Scheduler Page](/documentation/usm-anywhere/user-guide/scheduler/scheduling-ag-scans-from-scheduler) for more information.
**Note:** See [USM Anywhere Scans Best Practices](/documentation/usm-anywhere/user-guide/vulnerability-assessment/scans-best-practices) for more information.
## Commands Used in Authenticated Scans
When you run an authenticated scan in USM Anywhere, there are multiple commands executing at the same time. These commands change constantly and there are new definitions released every day. You can also verify which commands have been executing at any given moment.
Linux-authenticated scans use privilege escalation over ssh. Commands are logged in the audit log:
* `/var/log/secure`\*
* `/var/log/auth`\*
Windows-authenticated scans perform file and registry checks to determine the version of the installed patch.
## Running an Asset Scan from Vulnerabilities
1. Go to **Environment > Vulnerabilities**.
2. Click **New Scan**.
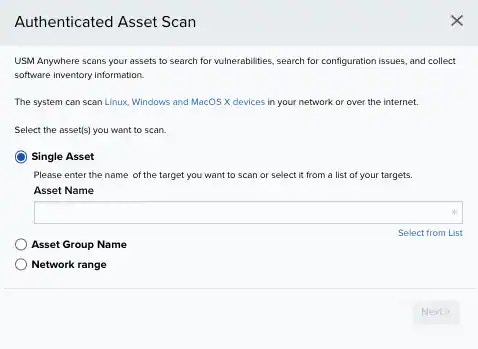
The Authenticated Asset Scan dialog box opens.
 3. Select the assets you want to scan:
* Single Asset. You need to enter the name of the target you want to scan or select it from a list of your targets.
* Asset Group Name. You need to enter the name of the asset group you want to scan or click **Select from List** for selecting it from a list of your asset groups.
* Network ranged. You need to enter the network range you want to scan.
4. Click **Next**.
A new Authenticated Asset Scan dialog box opens.
3. Select the assets you want to scan:
* Single Asset. You need to enter the name of the target you want to scan or select it from a list of your targets.
* Asset Group Name. You need to enter the name of the asset group you want to scan or click **Select from List** for selecting it from a list of your asset groups.
* Network ranged. You need to enter the network range you want to scan.
4. Click **Next**.
A new Authenticated Asset Scan dialog box opens.
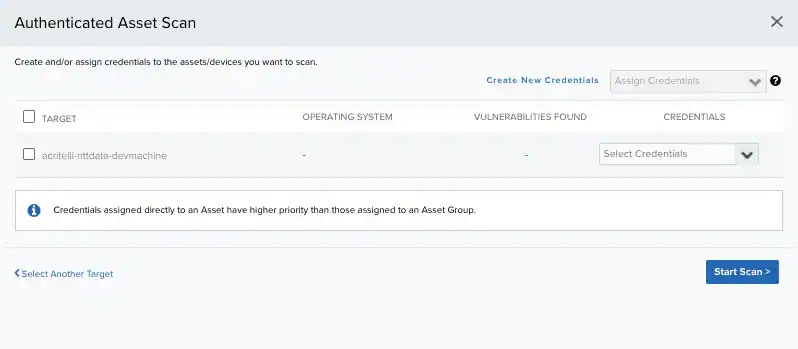 5. Click **Assign Credentials** for assigning credentials to the assets and devices you want to scan. Click **Create New Credentials** for creating a credential. See [Managing Credentials in USM Anywhere](/documentation/usm-anywhere/user-guide/vulnerability-assessment/credentials) for more information.
6. Click **Select Another Target** if you want to come back.
7. You can select the targets to scan if you have more than one.
8. Click **Start Scan**.
The scan starts. Depending on the selected asset, the scan can last several minutes. When the scan finishes, you can see the status and if the scan found vulnerabilities. If you want to view the results of your scan, you need to go to the asset details page. See [Viewing Assets Details](/documentation/usm-anywhere/user-guide/asset-management/asset-administration/viewing-asset-details) for more information.
9. Click **Continue Scanning And Close**.
While the scan is running, a Scanning button shows. When the scan finishes, the message **Scan finished. Refresh to view scan results** displays.
10. Click **Refresh Scan Results** to update the list.
5. Click **Assign Credentials** for assigning credentials to the assets and devices you want to scan. Click **Create New Credentials** for creating a credential. See [Managing Credentials in USM Anywhere](/documentation/usm-anywhere/user-guide/vulnerability-assessment/credentials) for more information.
6. Click **Select Another Target** if you want to come back.
7. You can select the targets to scan if you have more than one.
8. Click **Start Scan**.
The scan starts. Depending on the selected asset, the scan can last several minutes. When the scan finishes, you can see the status and if the scan found vulnerabilities. If you want to view the results of your scan, you need to go to the asset details page. See [Viewing Assets Details](/documentation/usm-anywhere/user-guide/asset-management/asset-administration/viewing-asset-details) for more information.
9. Click **Continue Scanning And Close**.
While the scan is running, a Scanning button shows. When the scan finishes, the message **Scan finished. Refresh to view scan results** displays.
10. Click **Refresh Scan Results** to update the list.