> ## Documentation Index
> Fetch the complete documentation index at: https://docs.levelblue.com/llms.txt
> Use this file to discover all available pages before exploring further.
# LevelBlue Vulnerability Scanner Guide
> This section explains how to use the LevelBlue Vulnerability Scanner powered by Tenable within LevelBlue USM, including its configuration, scanning workflows, credential management, and known limitations.
LevelBlue USM is modernizing its vulnerability scanning capabilities. The legacy jOVAL scanning engine has been replaced with Tenable Vulnerability Scanner technology, delivered through the LevelBlue Vulnerability Scanner BlueApp.
This change improves scanning accuracy and coverage, while preserving the existing LevelBlue USM user experience. No workflow changes are required for day-to-day scanning operations.
**Important considerations after enabling the scanner:**
* All assets must be visible to Tenable.
* Public assets should use the Tenable Cloud Scanner.
* Private assets require a locally installed Nessus scanner.
* Review and validate asset credentials before running authenticated scans.
By default, the LevelBlue Vulnerability Scanner is licensed for unlimited endpoints; however, there is an API limit of 8192 endpoints per scan.
### **Configure and enable LevelBlue Vulnerability Scanner**
1. Go to **Data Sources > BlueApps > Available Apps**.
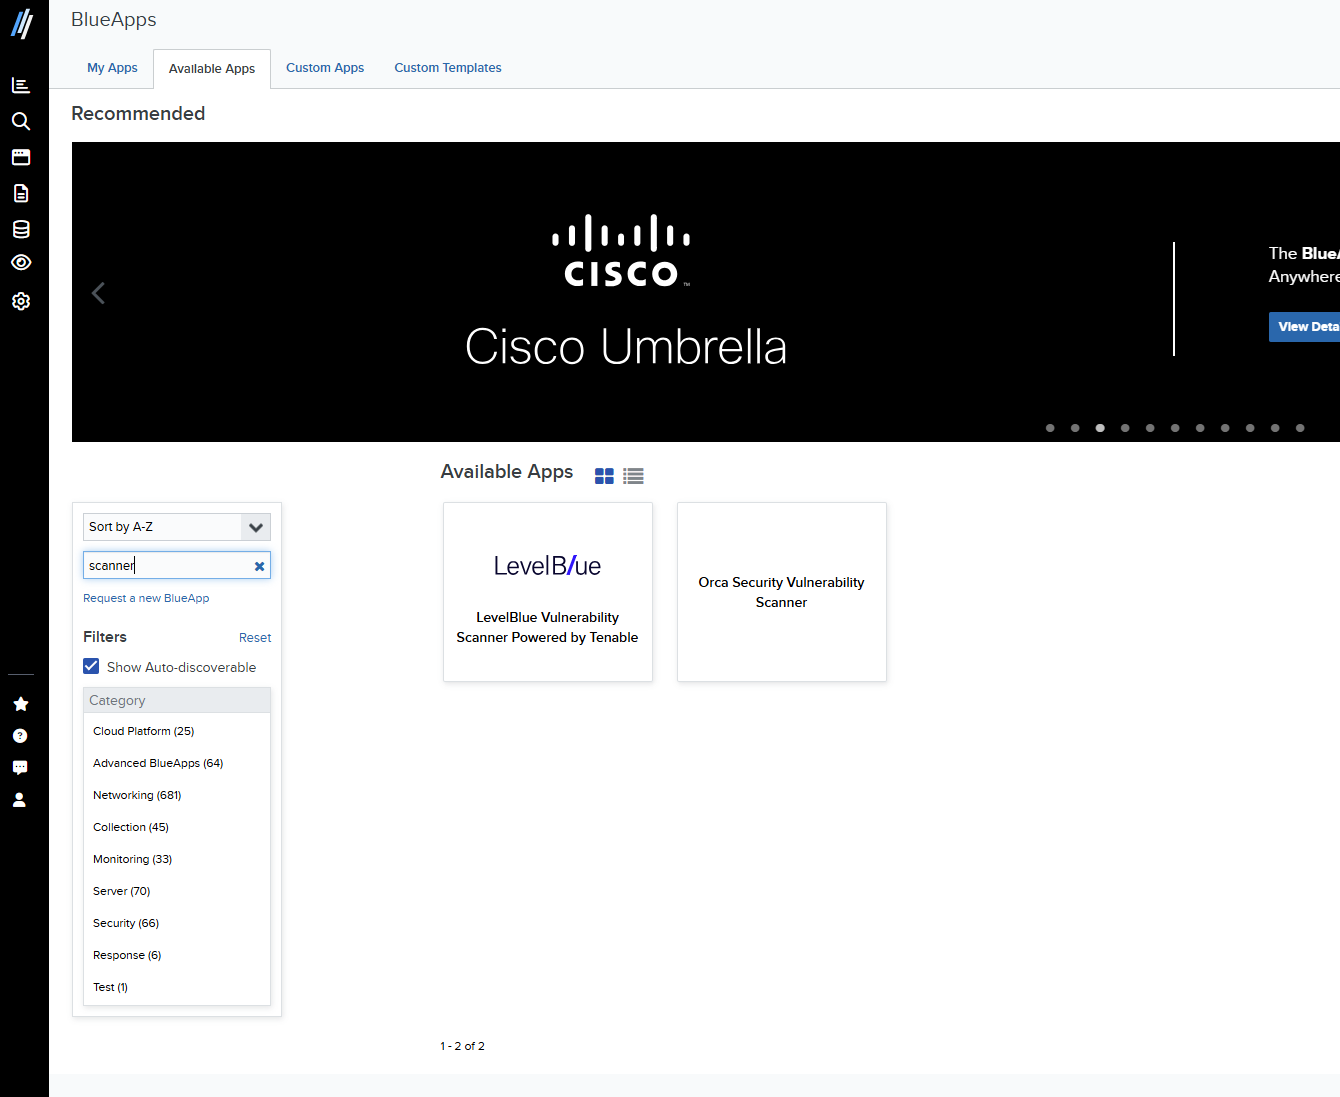 3. Filter by **Scanner**, and then select **LevelBlue Vulnerability Scanner Powered by Tenable**. The **Authorize Apps** tab of the Blue Apps page opens.
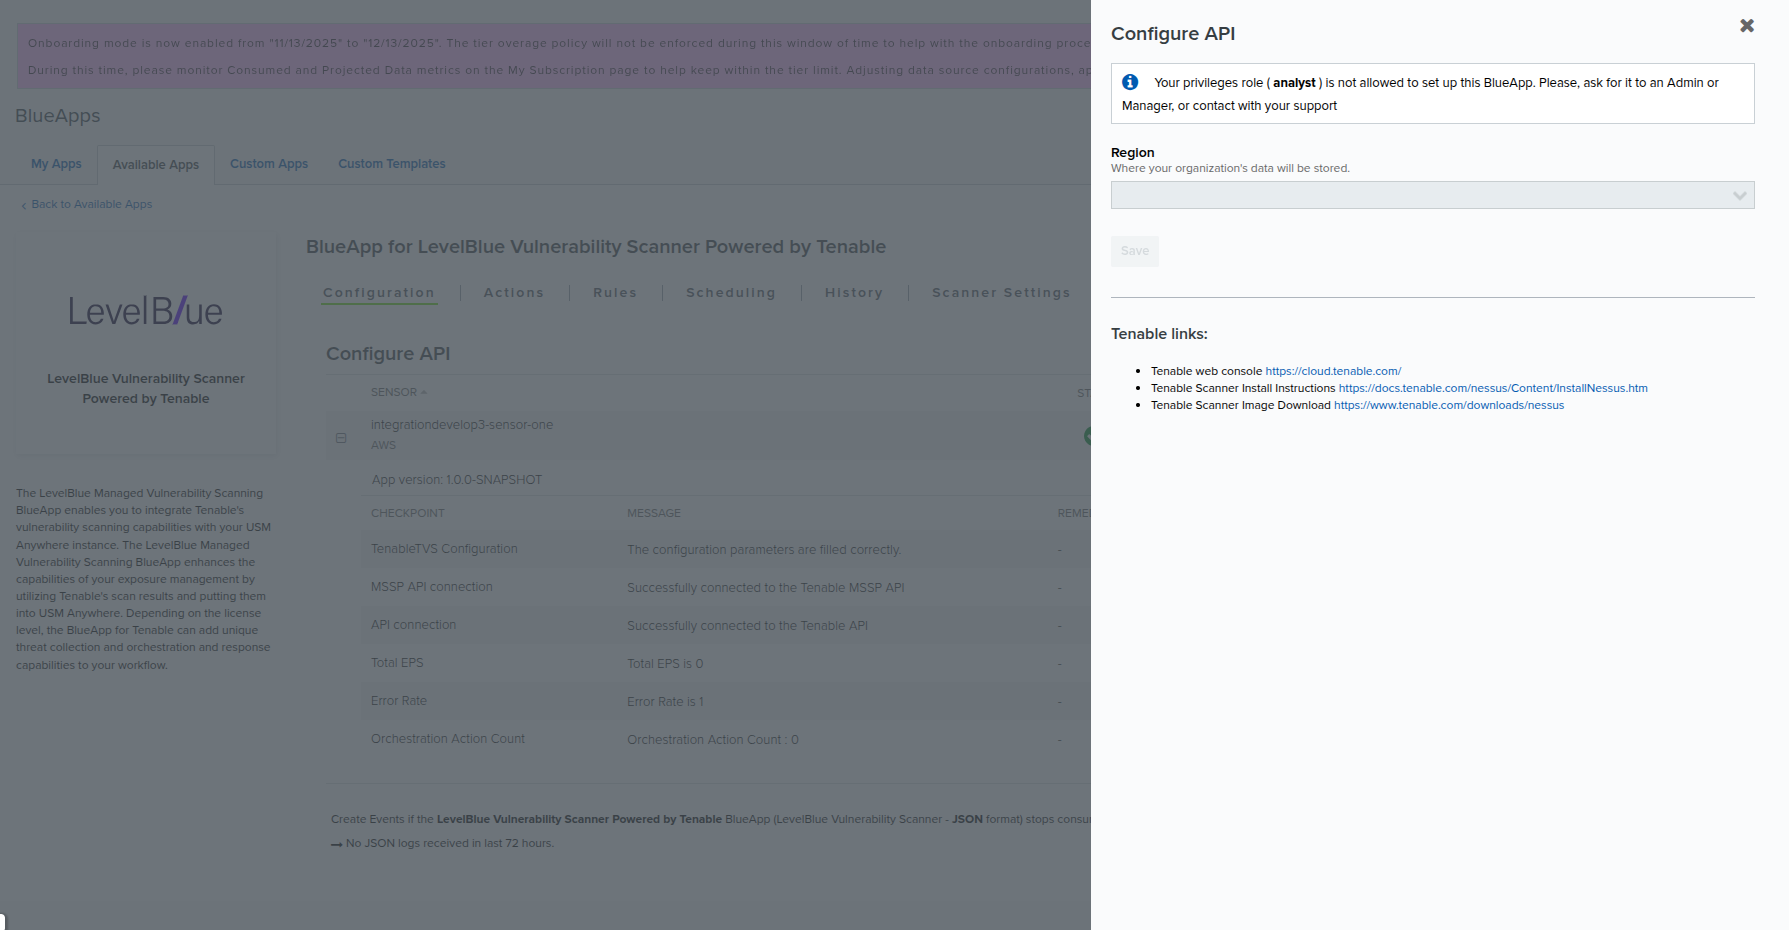
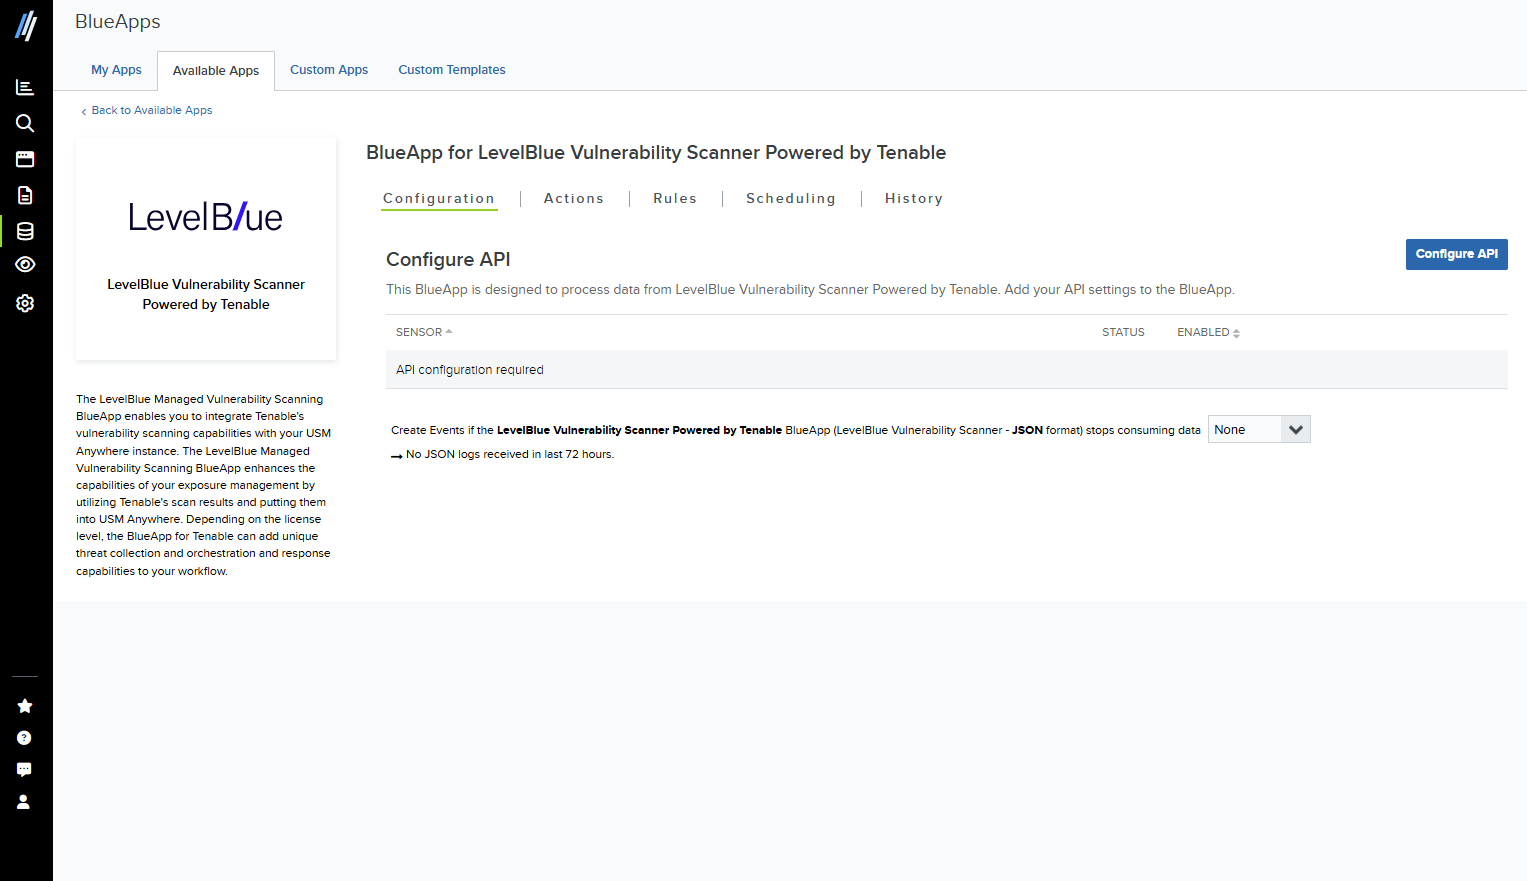 4. Click **Configure API**.
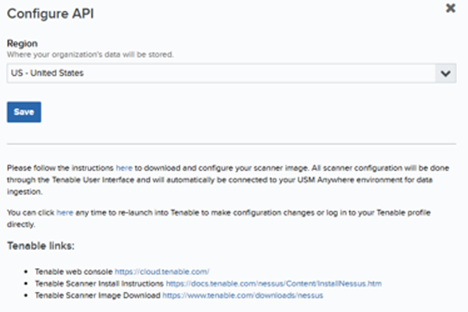
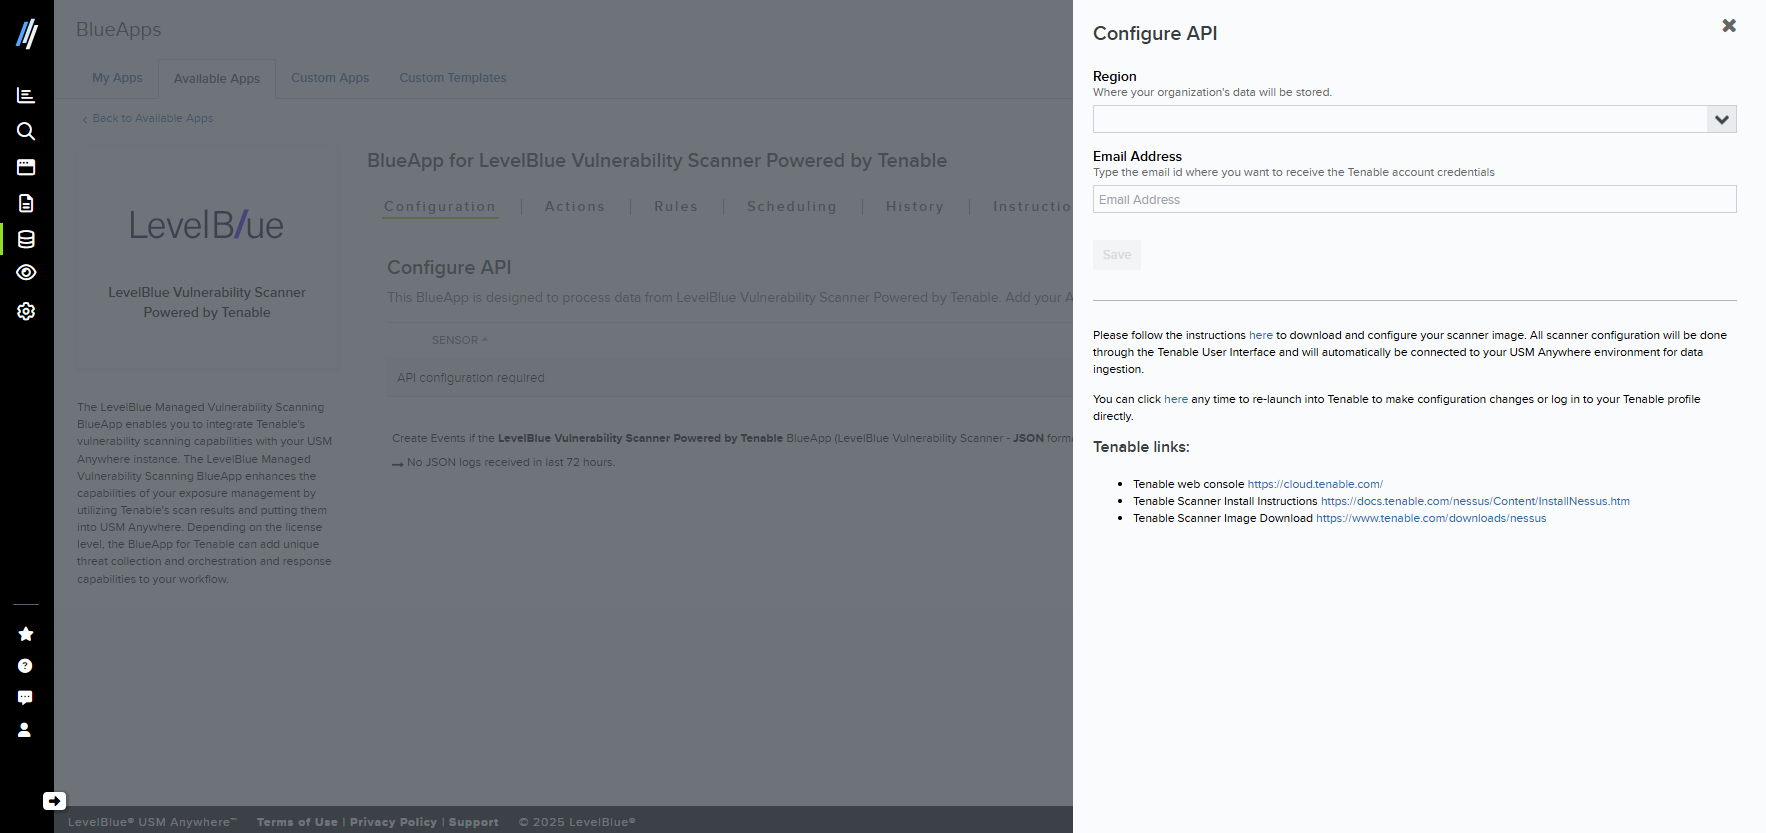 5. Select the **Region** where the configuration data will be stored.
6. Click **Save**.
5. Select the **Region** where the configuration data will be stored.
6. Click **Save**.
 **Note:** Only users with a **Manager** role can perform this configuration.
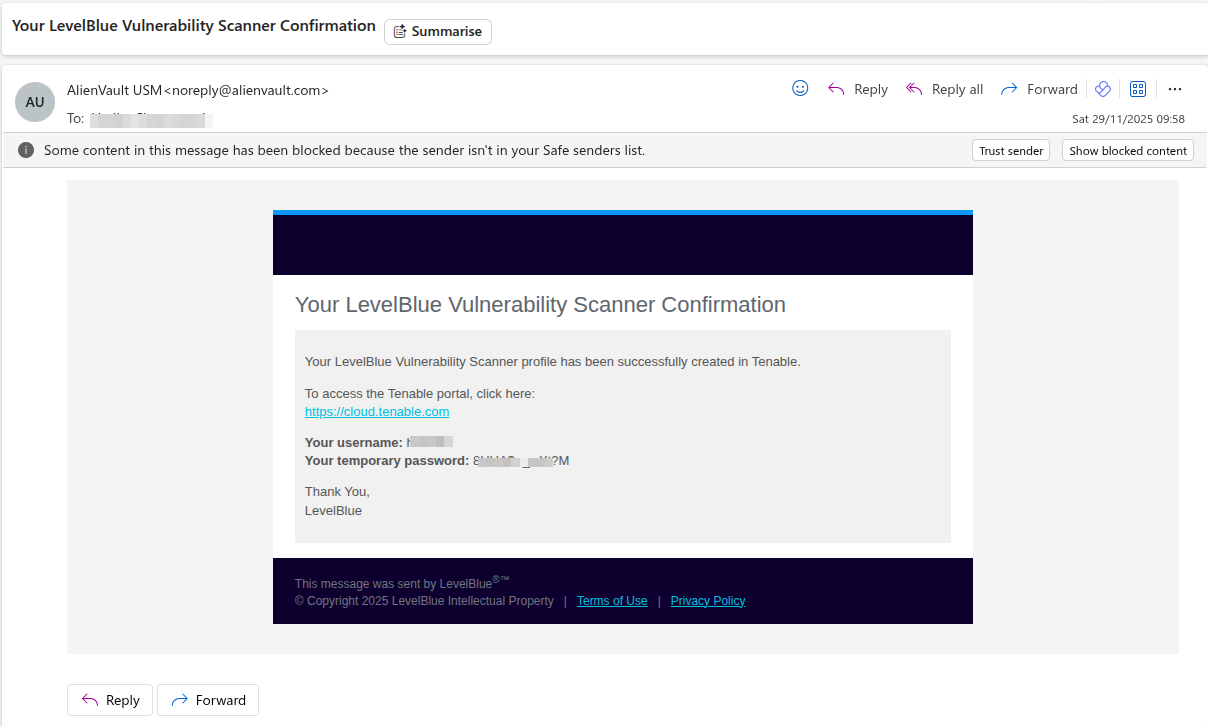
A Tenable tenant and user account are automatically created during configuration. Login credentials for the Tenable portal are sent to the same email address used for LevelBlue USM.
**Note:** Only users with a **Manager** role can perform this configuration.
A Tenable tenant and user account are automatically created during configuration. Login credentials for the Tenable portal are sent to the same email address used for LevelBlue USM.
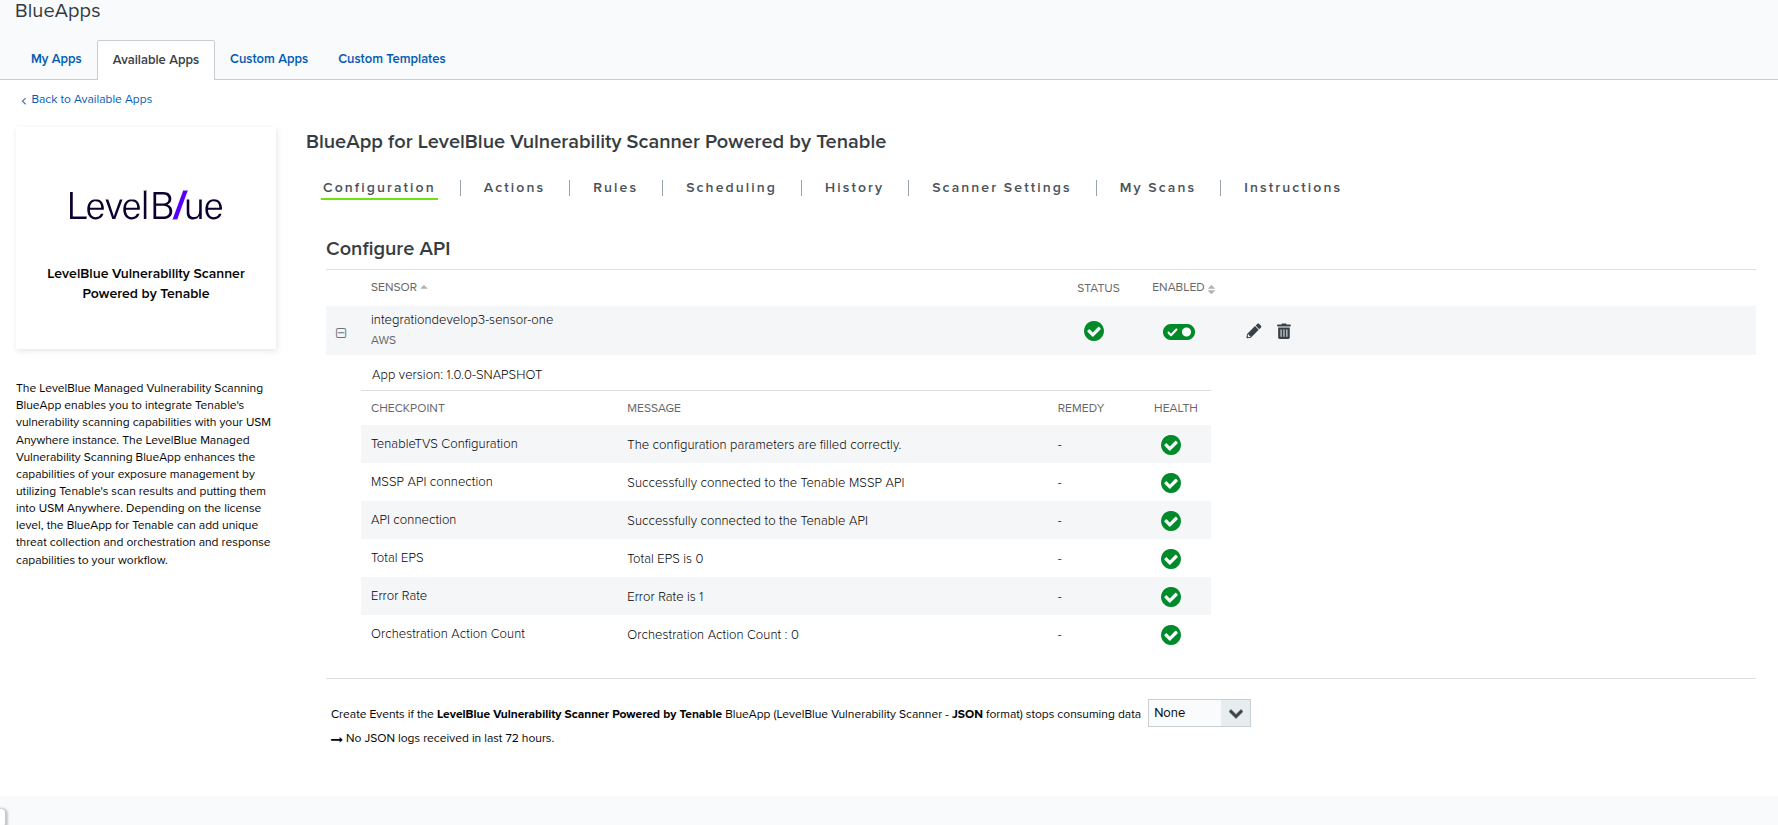 Once the configuration is complete, you will receive an email confirmation.
 7. Log into the [Tenable](https://cloud.tenable.com) portal using the temporary credentials provided.
8. Returning to the **LevelBlue Vulnerability Scanner** page > **Authorize Apps** tab, go to the **Scanner Settings** tab.
9. Select a default scan template.
7. Log into the [Tenable](https://cloud.tenable.com) portal using the temporary credentials provided.
8. Returning to the **LevelBlue Vulnerability Scanner** page > **Authorize Apps** tab, go to the **Scanner Settings** tab.
9. Select a default scan template.
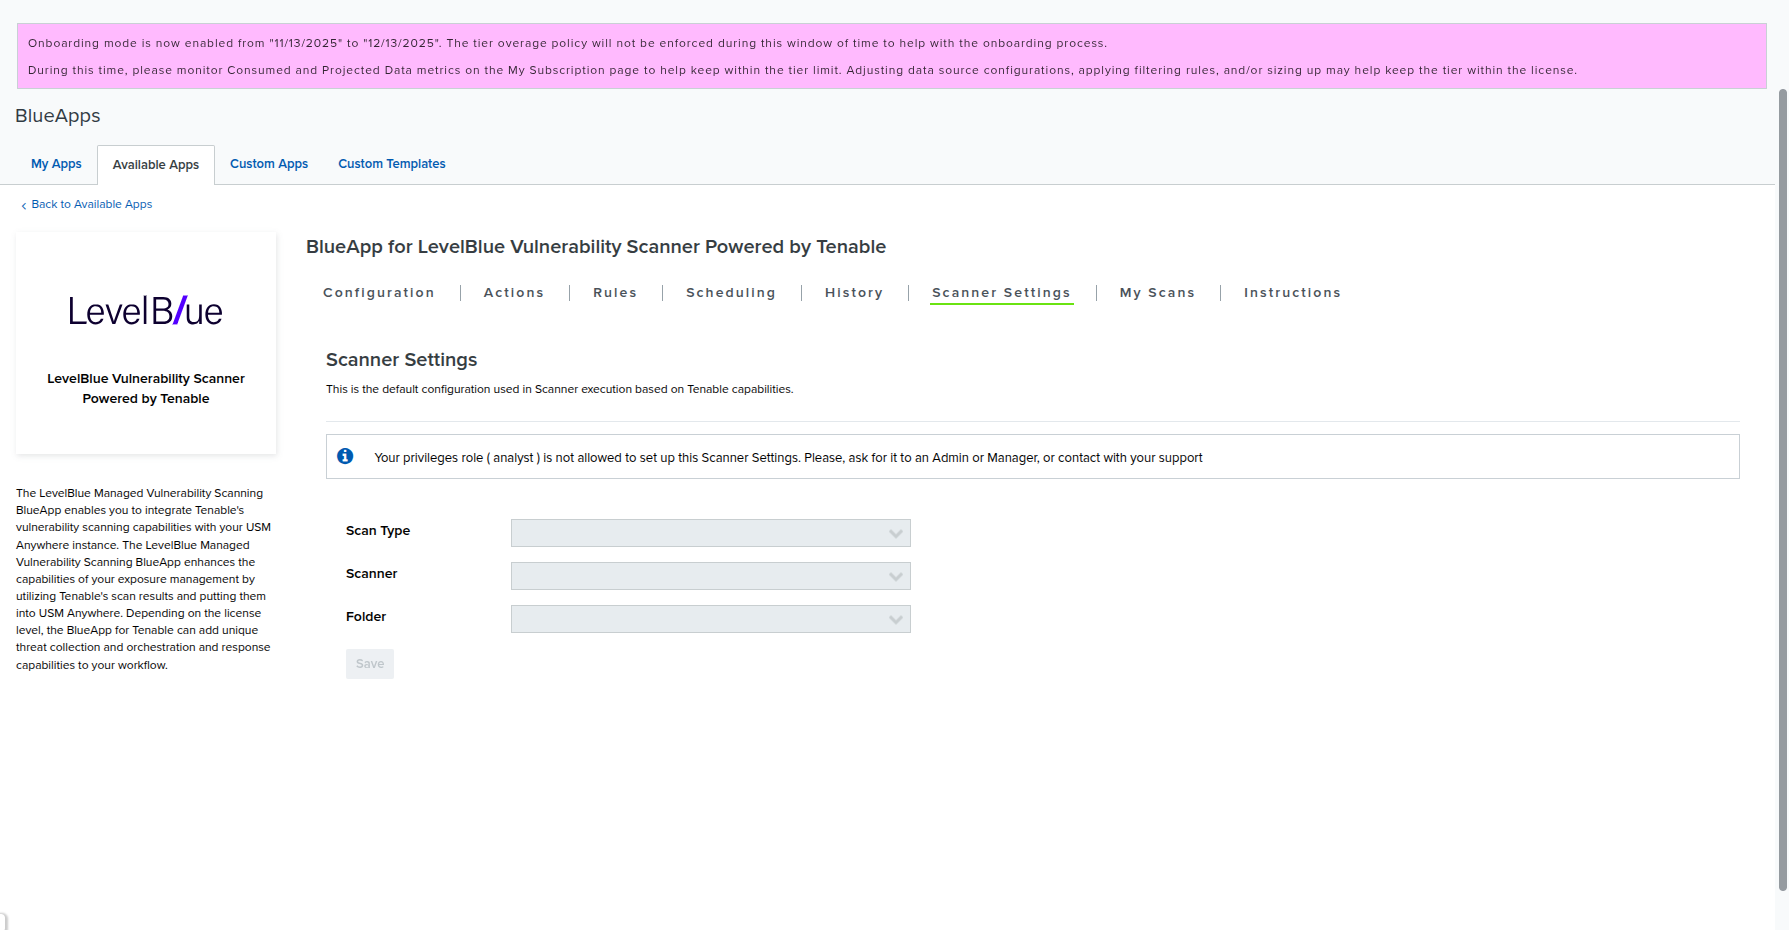
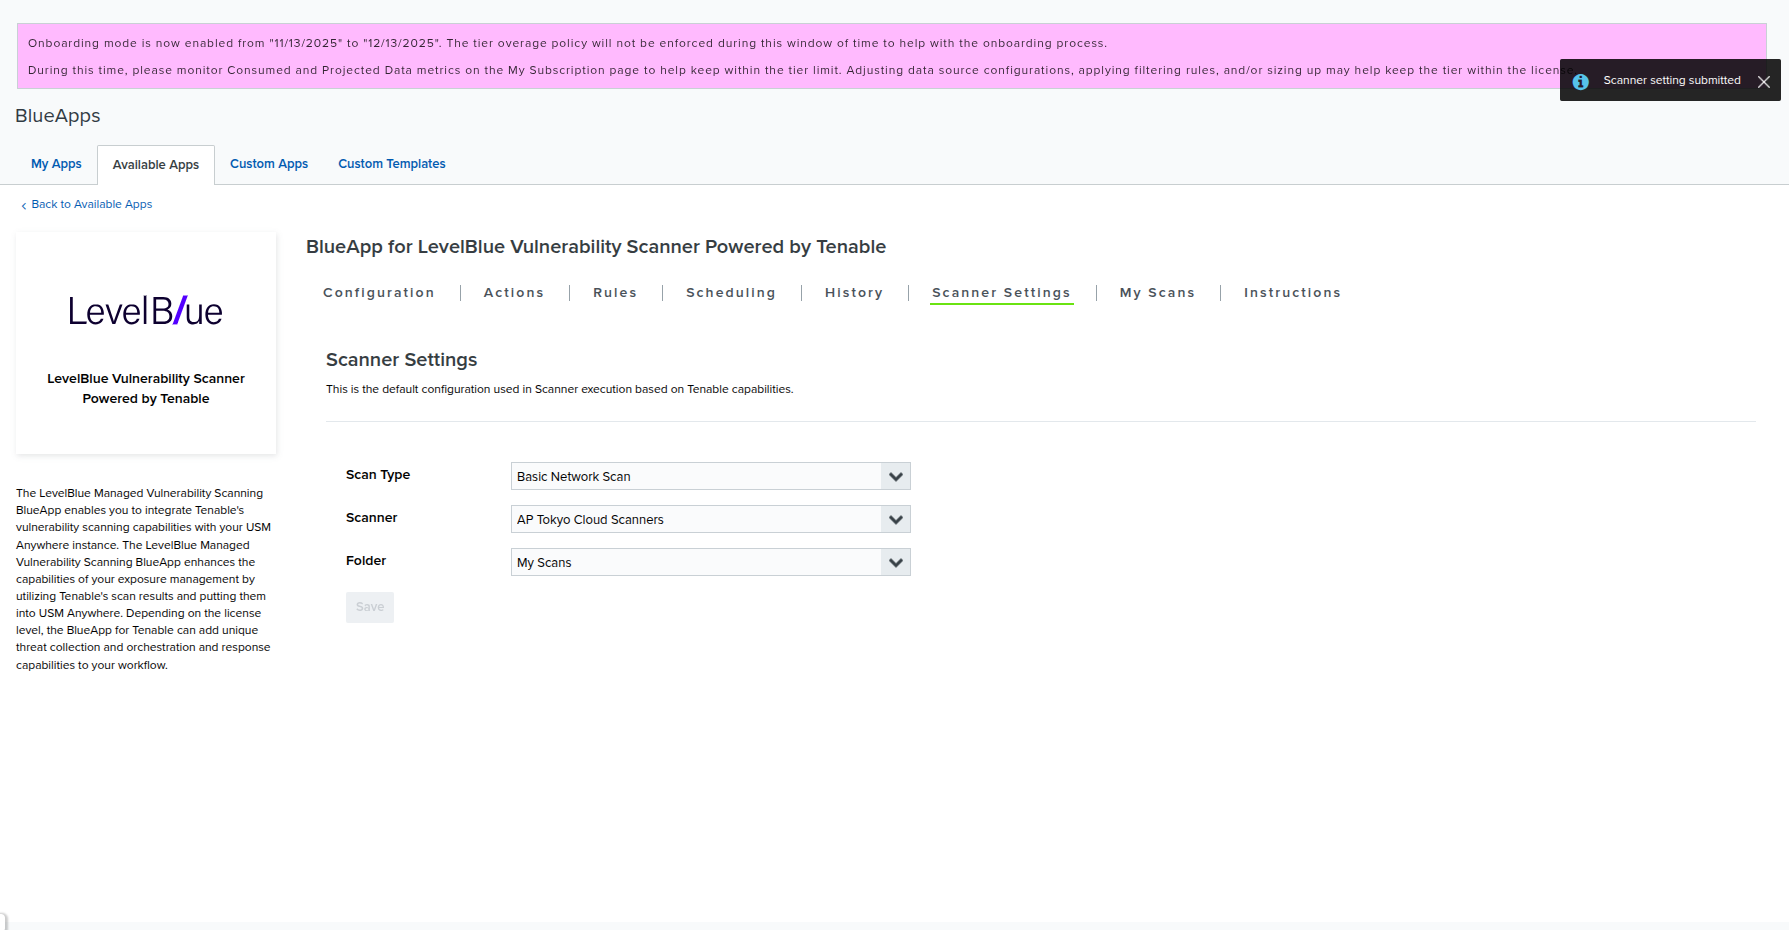 Only users with the **Manager** role can configure default scan templates.
10. Navigate to the **Assets** or **Asset Groups**, and then run scans as usual.
11. Go to the **Scheduling** tab to configure periodic scans.
Before running authenticated scans, verify the following:
* That assets are visible to Tenable Cloud, or they have a Nessus scanner installed
* That credentials are valid and assigned to the correct assets
### **Manage Asset Credentials**
Existing LevelBlue USM credentials are fully supported. If credentials have been previously configured, then no reconfiguration is required.
You can:
* Add new credentials
Only users with the **Manager** role can configure default scan templates.
10. Navigate to the **Assets** or **Asset Groups**, and then run scans as usual.
11. Go to the **Scheduling** tab to configure periodic scans.
Before running authenticated scans, verify the following:
* That assets are visible to Tenable Cloud, or they have a Nessus scanner installed
* That credentials are valid and assigned to the correct assets
### **Manage Asset Credentials**
Existing LevelBlue USM credentials are fully supported. If credentials have been previously configured, then no reconfiguration is required.
You can:
* Add new credentials
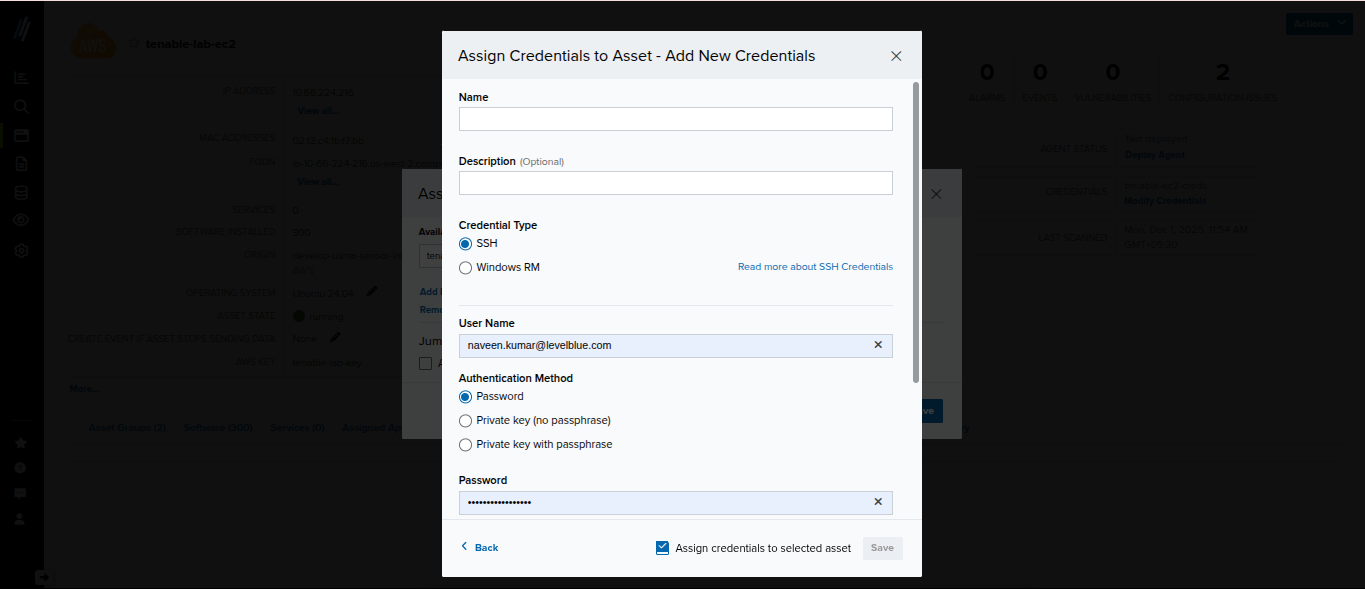 * Assign credentials to assets
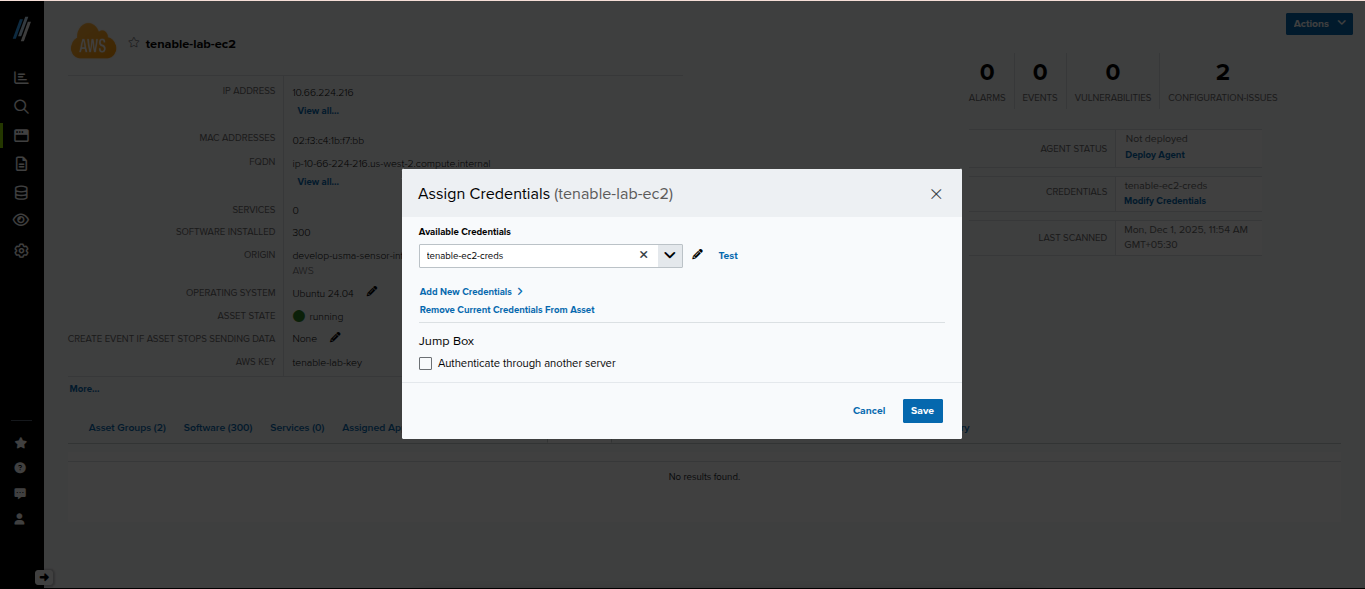 ### **Run an Authenticated Scan**
1. Open the **Assets** page.
2. Confirm that credentials have been assigned.
3. Click **Actions**.
4. Select **Authenticated Scan**.
### **Run an Authenticated Scan**
1. Open the **Assets** page.
2. Confirm that credentials have been assigned.
3. Click **Actions**.
4. Select **Authenticated Scan**.
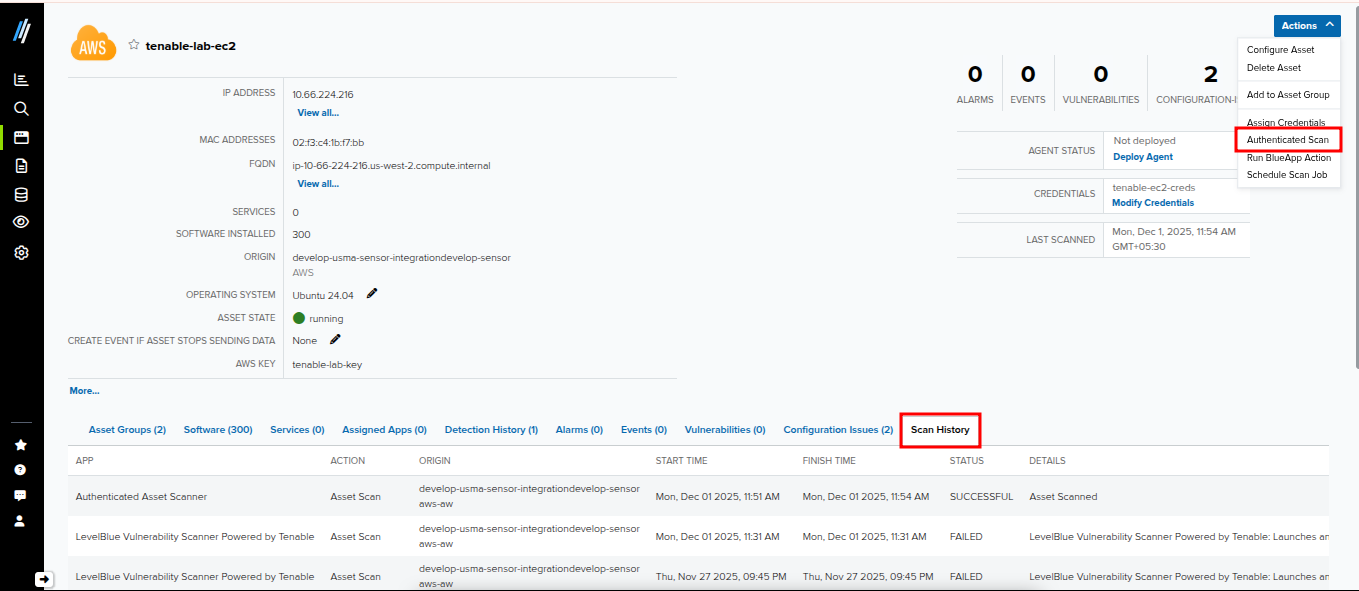 ### **Run an Asset Group Authenticated Scan**
1. Open the **Asset Group** page.
2. Confirm all assets in the group have been assigned credentials.
3. Click **Actions**.
4. Select **Authenticated Scan**.
### **Run an Asset Group Authenticated Scan**
1. Open the **Asset Group** page.
2. Confirm all assets in the group have been assigned credentials.
3. Click **Actions**.
4. Select **Authenticated Scan**.
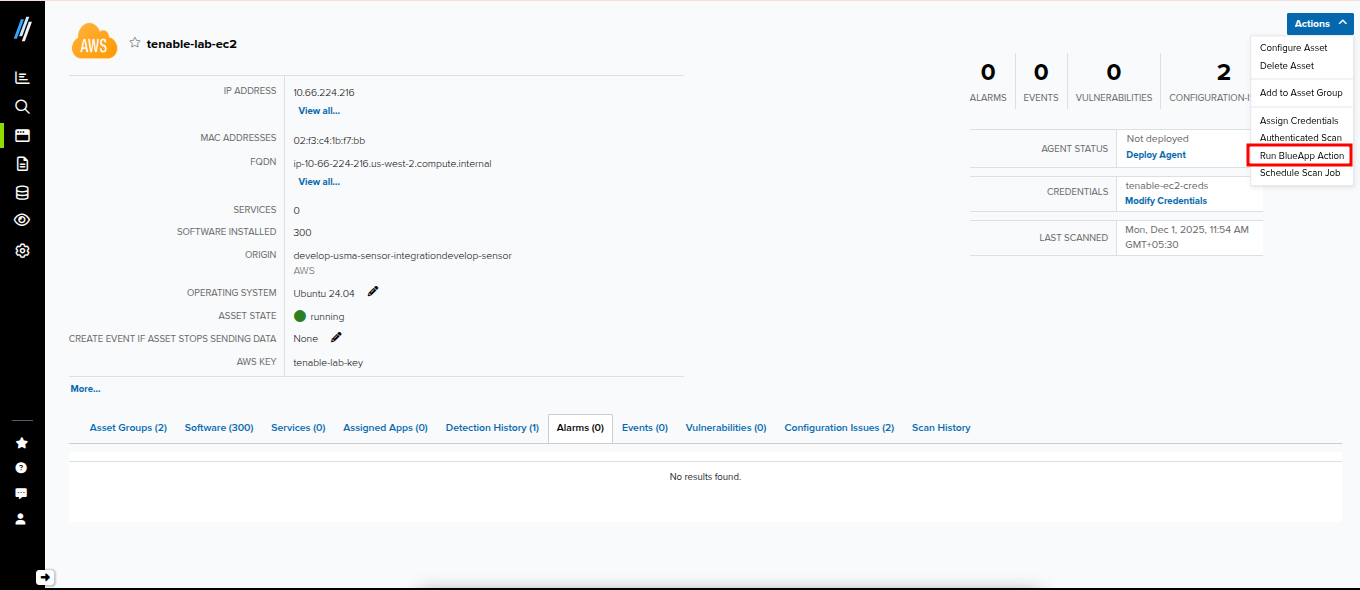
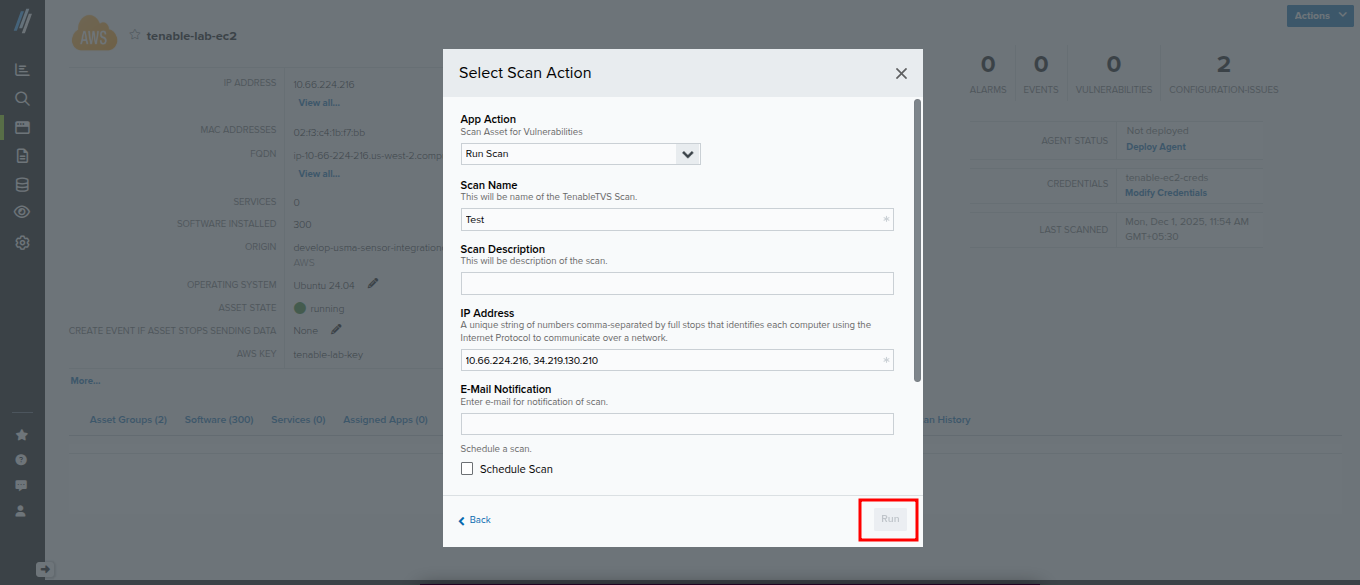
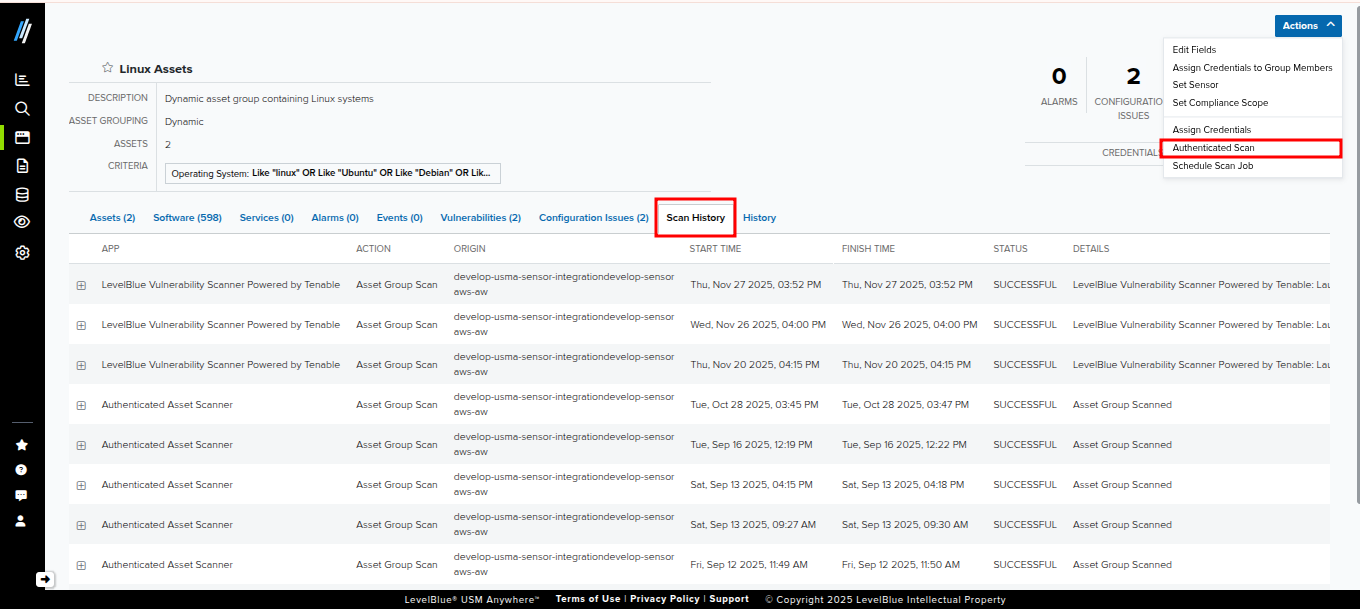 ### **Run an Asset Scan Action**
1. From the **Actions** menu, select **Run BlueApp Action**.
### **Run an Asset Scan Action**
1. From the **Actions** menu, select **Run BlueApp Action**.
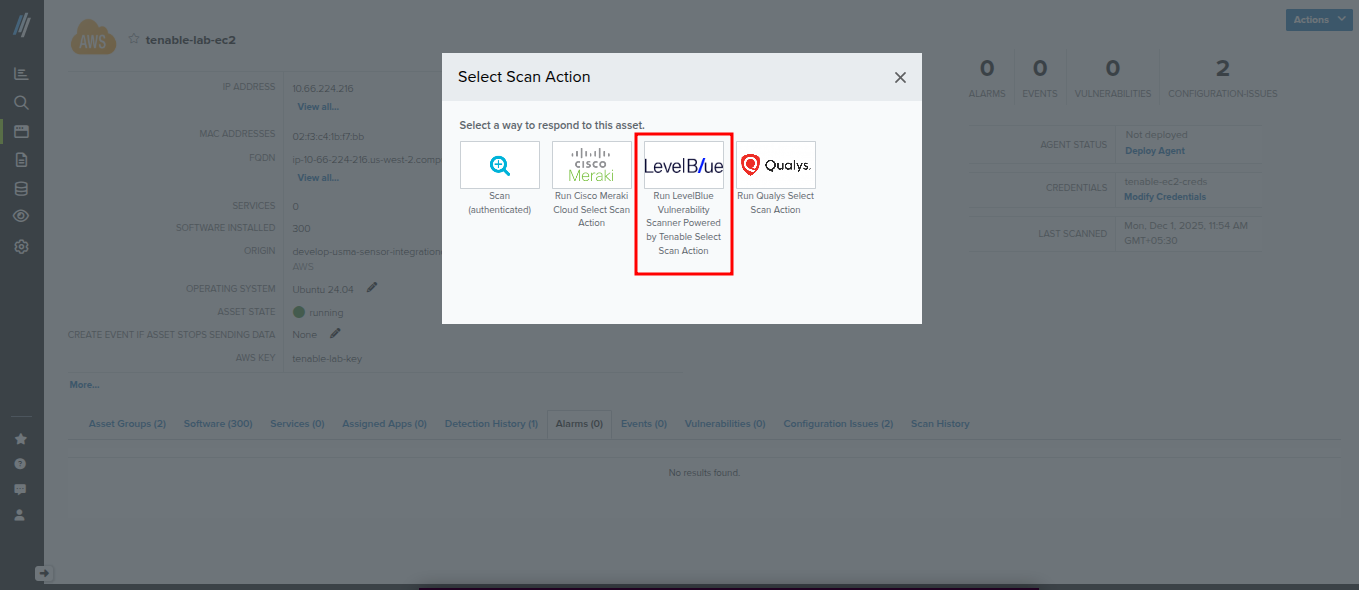
 2. Select **Run LevelBlue Vulnerability Scanner powered by Tenable**.
 3. Select **Run Scan**.
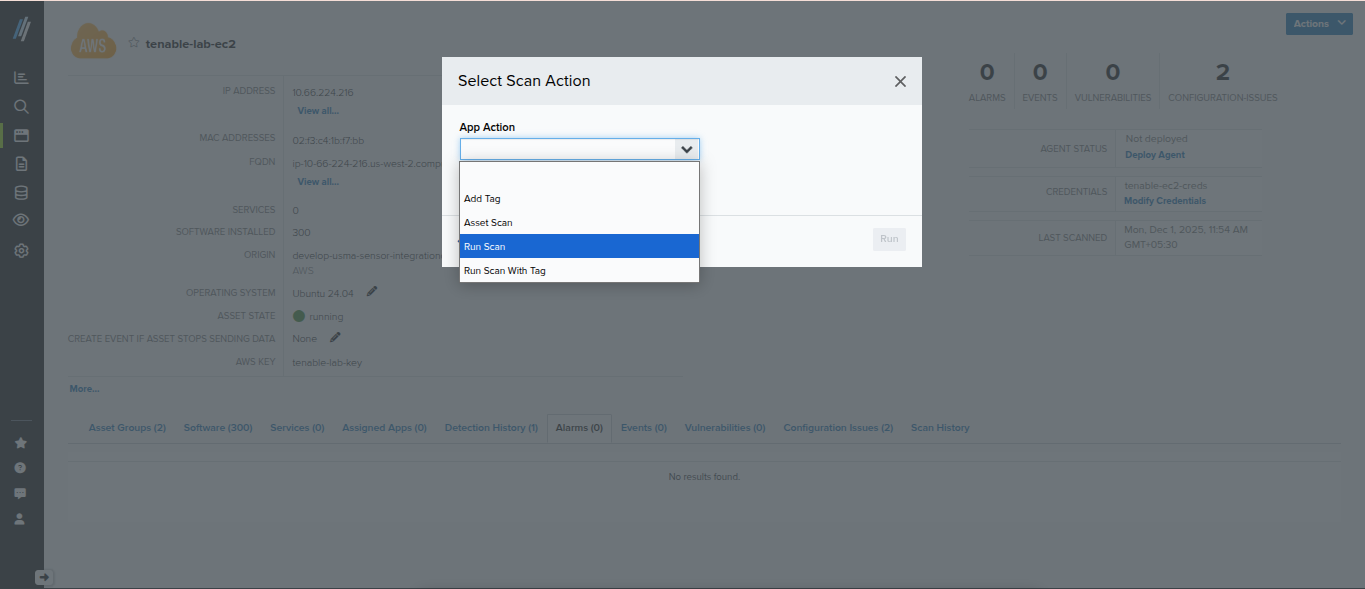 4. Click **Run**.
 ### **Run a Scheduled Scan Periodically**
The user experience does not change. Refer to [Managing Credentials in USM Anywhere](https://docs.levelblue.com/documentation/usm-anywhere/user-guide/vulnerability-assessment/credentials) for more information
### **Download a Scan Result File**
1. Open the \*\*\*\*Assets \*\*\*\*or ****Asset Group**** page.
2. Go to the **Scan History** tab.
3. Locate the **Scan File** column.
4. Click the scan entry to download the file.
### **Test Credentials for an Asset**
The user experience does not change. Refer to [Managing Credentials in USM Anywhere](https://docs.levelblue.com/documentation/usm-anywhere/user-guide/vulnerability-assessment/credentials) for more information.
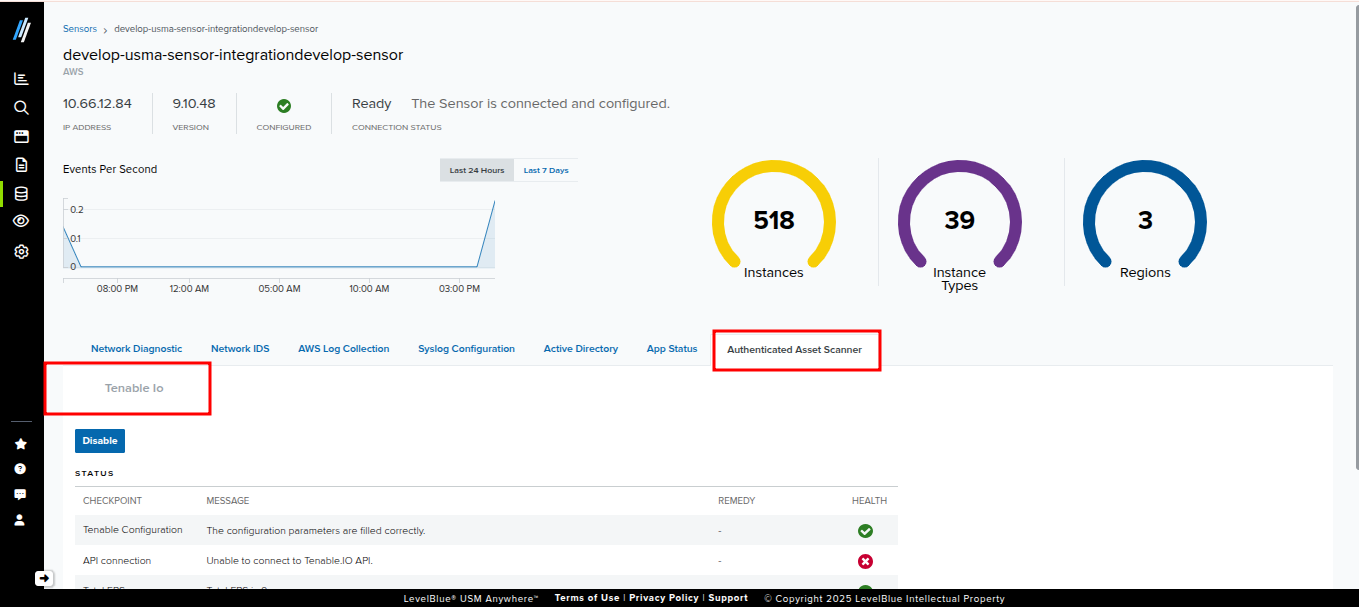
### **Review Authenticated Scanner Status in a Sensor**
1. Navigate to **Sensors**.
2. Select the sensor to review.
3. Open the **Authenticated Scanner** tab.
### **Run a Scheduled Scan Periodically**
The user experience does not change. Refer to [Managing Credentials in USM Anywhere](https://docs.levelblue.com/documentation/usm-anywhere/user-guide/vulnerability-assessment/credentials) for more information
### **Download a Scan Result File**
1. Open the \*\*\*\*Assets \*\*\*\*or ****Asset Group**** page.
2. Go to the **Scan History** tab.
3. Locate the **Scan File** column.
4. Click the scan entry to download the file.
### **Test Credentials for an Asset**
The user experience does not change. Refer to [Managing Credentials in USM Anywhere](https://docs.levelblue.com/documentation/usm-anywhere/user-guide/vulnerability-assessment/credentials) for more information.
### **Review Authenticated Scanner Status in a Sensor**
1. Navigate to **Sensors**.
2. Select the sensor to review.
3. Open the **Authenticated Scanner** tab.
 ### **Install the Nessus Scanner on Assets**
1. Open the Nessus download page, and then download the Nessus scanner: [https://www.tenable.com/downloads/nessus](https://www.tenable.com/downloads/nessus).
2. Follow the installation guide: [https://docs.tenable.com/nessus/Content/InstallNessus.htm](https://docs.tenable.com/nessus/Content/InstallNessus.htm)
3. When prompted, select **Link to another Tenable product**.
4. Link the scanner to your Tenable portal using these instructions: [https://docs.tenable.com/vulnerability-management/Content/Settings/Sensors/LinkaSensor.htm](https://docs.tenable.com/vulnerability-management/Content/Settings/Sensors/LinkaSensor.htm).
### **Helpful links**
* [Vulnerability Management Scanning Best Practices](https://docs.tenable.com/vulnerability-management/Content/Scans/ScanBestPractices.htm)
* [Credentials in Tenable Vulnerability Management Scans](https://docs.tenable.com/vulnerability-management/Content/Scans/Credentials.htm)
* [Deployment Guides for Tenable Scanners](/documentation/usm-anywhere/user-guide/vulnerability-assessment/deployment-guides-for-tenable-scanners)
* [Frequently Asked Questions](/documentation/usm-anywhere/user-guide/vulnerability-assessment/level-blue-vulnerability-scanner-faqs)
**Limits and Restrictions**
1. Do not configure the LevelBlue Vulnerability Scanner on more than one sensor within the same LevelBlue USM domain. Doing so can cause scan and result errors.
2. The Tenable license supports unlimited endpoints, but API is limited to 8192 endpoints per scan only. If you will be scanning more than the indicated endpoints, multiple scans are required.
### **Install the Nessus Scanner on Assets**
1. Open the Nessus download page, and then download the Nessus scanner: [https://www.tenable.com/downloads/nessus](https://www.tenable.com/downloads/nessus).
2. Follow the installation guide: [https://docs.tenable.com/nessus/Content/InstallNessus.htm](https://docs.tenable.com/nessus/Content/InstallNessus.htm)
3. When prompted, select **Link to another Tenable product**.
4. Link the scanner to your Tenable portal using these instructions: [https://docs.tenable.com/vulnerability-management/Content/Settings/Sensors/LinkaSensor.htm](https://docs.tenable.com/vulnerability-management/Content/Settings/Sensors/LinkaSensor.htm).
### **Helpful links**
* [Vulnerability Management Scanning Best Practices](https://docs.tenable.com/vulnerability-management/Content/Scans/ScanBestPractices.htm)
* [Credentials in Tenable Vulnerability Management Scans](https://docs.tenable.com/vulnerability-management/Content/Scans/Credentials.htm)
* [Deployment Guides for Tenable Scanners](/documentation/usm-anywhere/user-guide/vulnerability-assessment/deployment-guides-for-tenable-scanners)
* [Frequently Asked Questions](/documentation/usm-anywhere/user-guide/vulnerability-assessment/level-blue-vulnerability-scanner-faqs)
**Limits and Restrictions**
1. Do not configure the LevelBlue Vulnerability Scanner on more than one sensor within the same LevelBlue USM domain. Doing so can cause scan and result errors.
2. The Tenable license supports unlimited endpoints, but API is limited to 8192 endpoints per scan only. If you will be scanning more than the indicated endpoints, multiple scans are required.