> ## Documentation Index
> Fetch the complete documentation index at: https://docs.levelblue.com/llms.txt
> Use this file to discover all available pages before exploring further.
# USM Appliance Initial Setup
Before performing the setup tasks, you must have successfully deployed USM Appliance and [Set Up the Management Interface](/documentation/usm-appliance/initial-setup/set-up-management-interface). You also need to have access to the LevelBlue Setup menu.
You can access the LevelBlue Setup menu in one of the following ways:
* **Local Management** — By using a monitor, keyboard, and mouse connected directly to the USM Appliance hardware.
* **Virtual Management** — Virtual Appliance users access the console as a vSphere client or through an SSH client such as PuTTY.
* **Remote Management** — After IPMI or HPE iLO configuration, you can access the console by any computer connected to the same subnet in which the appliance runs, through the remote connection.
For procedural simplicity, the following task steps reference the user interface (UI) of the SSH client PuTTY as means to explain how to access the LevelBlue console.
**To access the LevelBlue console**
1. Launch PuTTY or any other `SSH` client, and in the **Host Name (or IP address)** field, type the IP address of the appliance.
2. Make sure that `SSH` is selected.
This is usually the default setting.
3. Click **Open**.
4. Enter the user credentials you use to log into the `SSH` client.
The LevelBlue splash screen for USM Appliance appears. If this is the first time, it displays the root username and a randomly generated password for you to enter.
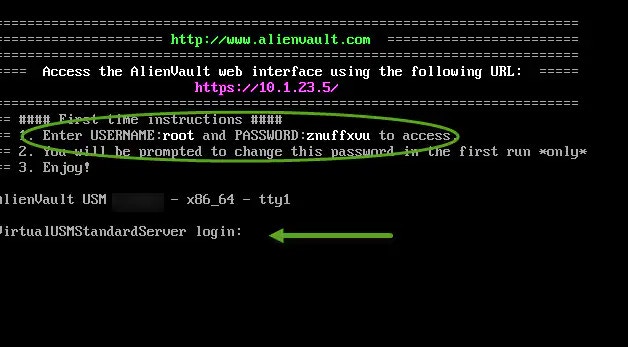 5. In the **login**: field, enter `root`.
6. In the **password** field, enter the displayed randomly generated password, then press **Enter**.
7. When prompted whether you would like to change your password, click **Yes**.
After initial login using the default username and randomly generated password, USM Appliance prompts you to change the password.
**Important**: If you want to configure high availability (HA) for a USM Appliance Standard or Enterprise component, you must give both the primary and secondary node the same root password. See [High Availability Configuration](/documentation/usm-appliance/configuring-ha/cfg-ha-usm-deployment).
**To change the root password**
1. On the first **Change Root Password** panel, type your new password in the **New root password** field and press **Enter**.
**Note:** The cursor is not visible on the field. To verify that your cursor is in the right location, look for a black left border at the start of the field. This tells you that your cursor is where it should be.
2. On the second **Change Root Password** panel, type the password you entered previously and press **Enter**.
3. On the third, and final, **Change Root Password** panel, a confirmation message appears, showing that you have successfully updated the password.
The application now prompts you to log in again, using the newly created password.
5. In the **login**: field, enter `root`.
6. In the **password** field, enter the displayed randomly generated password, then press **Enter**.
7. When prompted whether you would like to change your password, click **Yes**.
After initial login using the default username and randomly generated password, USM Appliance prompts you to change the password.
**Important**: If you want to configure high availability (HA) for a USM Appliance Standard or Enterprise component, you must give both the primary and secondary node the same root password. See [High Availability Configuration](/documentation/usm-appliance/configuring-ha/cfg-ha-usm-deployment).
**To change the root password**
1. On the first **Change Root Password** panel, type your new password in the **New root password** field and press **Enter**.
**Note:** The cursor is not visible on the field. To verify that your cursor is in the right location, look for a black left border at the start of the field. This tells you that your cursor is where it should be.
2. On the second **Change Root Password** panel, type the password you entered previously and press **Enter**.
3. On the third, and final, **Change Root Password** panel, a confirmation message appears, showing that you have successfully updated the password.
The application now prompts you to log in again, using the newly created password.