> ## Documentation Index
> Fetch the complete documentation index at: https://docs.levelblue.com/llms.txt
> Use this file to discover all available pages before exploring further.
# Alarms List Columns
Role Availability | ✔️ Read-Only ✔️ Analyst ✔️ Manager
For each alarm in the alarm in the List view, USM Central displays useful information to help you determine the best response.
The following table lists the fields you see on the page.
**List of the Default Columns in Alarms**
| Column / Field Name | Description |
| ------------------- | -------------------------------------------------------------------------------------------------------------------------------------------------------------------------------------------------------------------------------------------------------------------------------------------------- |
| Intent | Describes the attack pattern of indicators intruding on your system. |
| Strategy | Type of attack. |
| Method | If known, the method of attack or infiltration associated with the indicator that generated the alarm. |
| Deployment | Name of the deployment on which the alarm has been triggered. |
| Time Created | The date and time of the creation of the alarm. The displayed date depends on your computer's time zone. |
| OTX | Indicates whether it is an LevelBlue Labs™ Open Threat Exchange® (OTX™) alarm. If the icon is active, click it to go the [OTX site](https://otx.alienvault.com/). |
| Sources | Hostname or IP address of the source (including a national flag icon if the country is known) for an event creating the alarm. |
| Destinations | Hostname or IP address of the destination (including a national flag icon if the country is known) that received the events generating the alarm. |
| Alarm Status | Status applied to the alarm. By default, it can be Open, In Review, and Closed. See [Alarm Status](/documentation/usm-central/alarms/alarm-status) for more information. The alarms that have the status "Closed" are not displayed in the list. |
| Labels | Labels applied to the alarm. By default, it can be In Progress, False Positive, Open, and Closed. You can create and manage labels. See [Labeling the Alarms](/documentation/usm-central/alarms/labeling-alarms) for more information. |
| Sensors | The sensor name associated with the alarm. |
| Priority | Impact of the detected attack. It can be Low, Medium, or High. See [Priority Field for Alarms](/documentation/usm-central/alarms/alarms-list-priority-field) for more information. |
From the list of alarms, you can click any individual alarm row to display more information on the selected alarm, including individual events that triggered the alarm. See [View Alarm Details](/documentation/usm-central/alarms/view-alarms-details) for more information.
To select an alarm, select the checkbox to the left of the alarm. You can select all alarms at the same time by selecting the first checkbox in the column. These buttons display when you select an alarm:
* **Remove Alarm Labels**: This button displays if there are labels associated to any alarm. Use this button to remove a label or labels from an alarm. See [Labeling the Alarms](/documentation/usm-central/alarms/labeling-alarms) for more information.
* **Apply Labels**: You can add a label to an alarm, which enables you to have classified alarms. See [Labeling the Alarms](/documentation/usm-central/alarms/labeling-alarms) for more information.
* **Alarm Status**: You can add a status to an alarm. See [Alarm Status](/documentation/usm-central/alarms/alarm-status) for more information.
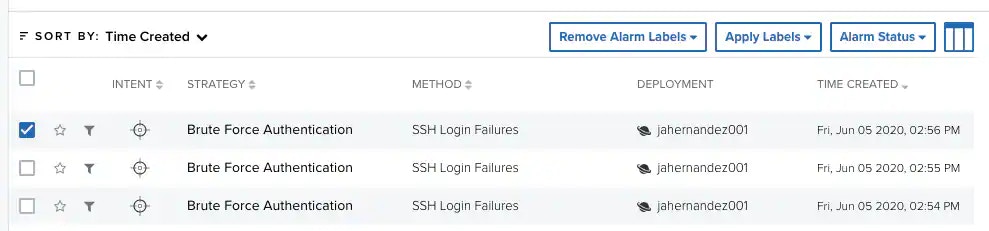 To distinguish between label and status, see [Differences between Statuses and Labels](/documentation/usm-central/alarms/alarm-status#diffStatusLabel).
The asset name includes a chevron icon that can be gray (
To distinguish between label and status, see [Differences between Statuses and Labels](/documentation/usm-central/alarms/alarm-status#diffStatusLabel).
The asset name includes a chevron icon that can be gray ( ) if the asset is not in the system, or blue (
 ) if the asset has been added to the system.
Click the gray chevron icon () to access these options:
* Add to current filter: Use this option to add the asset name as a search filter. See [Searching Events](/documentation/usm-anywhere/user-guide/events/searching-events) for more information.
* Look up in OTX: This option searches the IP address of the source asset in the LevelBlue LevelBlue Labs Open Threat Exchange® (OTX™) page. See [Using OTX in USM Anywhere](/documentation/usm-anywhere/user-guide/otx/using-otx-in-anywhere) for more information.
Click the blue chevron icon () to access these options:
* Add to current filter: Use this option to add the asset name as a search filter.
* Look up in OTX: This option searches the IP address of the asset in the LevelBlue LevelBlue Labs Open Threat Exchange® (OTX™) page. See [Using OTX in USM Anywhere](/documentation/usm-anywhere/user-guide/otx/using-otx-in-anywhere) for more information.
* Full Details: See [Viewing Assets Details](/documentation/usm-anywhere/user-guide/asset-management/asset-administration/viewing-asset-details) for more information.
You can configure the view you want for the list of alarms. See [Alarms Views](/documentation/usm-central/alarms/views) for more information.
Click Generate Report to open the Configure Report dialog box. See [Create an Alarms Report](/documentation/usm-central/alarms/exporting-alarms) for more details.
Click the
) if the asset has been added to the system.
Click the gray chevron icon () to access these options:
* Add to current filter: Use this option to add the asset name as a search filter. See [Searching Events](/documentation/usm-anywhere/user-guide/events/searching-events) for more information.
* Look up in OTX: This option searches the IP address of the source asset in the LevelBlue LevelBlue Labs Open Threat Exchange® (OTX™) page. See [Using OTX in USM Anywhere](/documentation/usm-anywhere/user-guide/otx/using-otx-in-anywhere) for more information.
Click the blue chevron icon () to access these options:
* Add to current filter: Use this option to add the asset name as a search filter.
* Look up in OTX: This option searches the IP address of the asset in the LevelBlue LevelBlue Labs Open Threat Exchange® (OTX™) page. See [Using OTX in USM Anywhere](/documentation/usm-anywhere/user-guide/otx/using-otx-in-anywhere) for more information.
* Full Details: See [Viewing Assets Details](/documentation/usm-anywhere/user-guide/asset-management/asset-administration/viewing-asset-details) for more information.
You can configure the view you want for the list of alarms. See [Alarms Views](/documentation/usm-central/alarms/views) for more information.
Click Generate Report to open the Configure Report dialog box. See [Create an Alarms Report](/documentation/usm-central/alarms/exporting-alarms) for more details.
Click the  icon to change the graph to a Count/Time or Alarms by Intent view. See [Alarms List View](/documentation/usm-central/alarms/alarms-list-view) for more information.
Click the
icon to change the graph to a Count/Time or Alarms by Intent view. See [Alarms List View](/documentation/usm-central/alarms/alarms-list-view) for more information.
Click the  icon to bookmark an item for quick access.
You can view your bookmarked items by going to the secondary menu and clicking the icon. This will display all of your bookmarked items and provide direct links to each of them.
Click the
icon to bookmark an item for quick access.
You can view your bookmarked items by going to the secondary menu and clicking the icon. This will display all of your bookmarked items and provide direct links to each of them.
Click the  icon to filter your search by row fields. See [Searching Alarms](/documentation/usm-central/alarms/searching-alarms) for more information.
You can choose the number of items to display by selecting **20**, **50**, or **100** below the table. You can classify some columns by clicking the icons to the right side of the heading. You can sort the item information in ascending or descending order.
icon to filter your search by row fields. See [Searching Alarms](/documentation/usm-central/alarms/searching-alarms) for more information.
You can choose the number of items to display by selecting **20**, **50**, or **100** below the table. You can classify some columns by clicking the icons to the right side of the heading. You can sort the item information in ascending or descending order.