> ## Documentation Index
> Fetch the complete documentation index at: https://docs.levelblue.com/llms.txt
> Use this file to discover all available pages before exploring further.
# Labeling the Alarms
Role Availability | ❌ Read-Only ✔️ Analyst ✔️ Manager
Labels can be applied to alarms in USM Central to streamline the alarm management process by enabling you to create and distribute labels across all other connected deployments from your instance of USM Central.
## Label Management with Connected Deployments
Because of the way that USM Central handles its own labels and the inherited labels of the connected deployments, there are a few things that are important to understand and consider:
* USM Central automatically collects and displays all labels from connected deployments. You can only edit these inherited labels and apply them to alarms in their individual deployment of USM Anywhere.
* You can apply the labels you've created in USM Central to alarms in both USM Anywhere and USM Central. You can only edit these labels in USM Central, but not in USM Anywhere.
* In cases where an identically named label exists in both USM Anywhere and USM Central, USM Central will assume control of the label's management.
* Similarly, if you would like to have USM Central assume ownership of an active label in USM Anywhere, you can recreate the label in USM Central using the same naming conventions. This will make the distribution and editing of the labels exclusive to USM Central.
You can see the label management in USM Central and USM Anywhere in the following table.
**Label Management in USM Central and USM Anywhere**
| | Apply Labels to Alarms in Anywhere | Edit/Delete Labels in Anywhere | Apply Labels to Alarms in Central | Edit/Delete Labels in Central |
| ------------------------- | ---------------------------------- | ------------------------------ | --------------------------------- | ----------------------------- |
| Label Created in Anywhere | Yes | Yes | No | No |
| Label Created in Central | Yes | No | Yes | Yes |
## Best Practices for Label Management
Because of the way that labels are managed across USM Central and the connected deployments, it is important to have a manageable plan for label implementation. For example, given that labels created in USM Central can be applied in all connected deployments, their application will be more broadly used than deployment-specific labels. It would be useful to have an easily identifiable naming convention for the USM Central labels that is applicable to all deployments.
It is important to keep in mind that labels created in USM Central that share a name with a label in a connected deployment, will take control of the inherited label as well. So if a label needs to be able to be edited in USM Anywhere, you'll want to avoid using the same name for a label in USM Central. Alternately, if you have similar types of labels across your USM Anywhere deployments that you would prefer to manage at a more “global” level in USM Central, it would be best to make them all share the same name before creating a label of that name in USM Central. That way they can all be rolled up at once into USM Central.
You can't edit or delete the set of default labels:
* Closed
* False Positive
* In Progress
* Open
## Alarm Label Usage
USM Central enables you to create, edit, and delete your own labels. You can apply a label to one or more alarms. You can also apply multiple labels to the same alarm. To distinguish between labels and statuses, see [Differences between Statuses and Labels](/documentation/usm-central/alarms/alarm-status#diffStatusLabel).
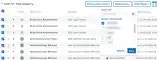
**To label an alarm from the Alarms main page**
1. Go to **Alarms**.
2. Search for the alarm or alarms to which you want to apply a label.
3. Complete one of these options:
* Click the  icon in the labels column of the alarm you want to label, select the label, and click Save.
 Select the checkbox to the left of an alarm, click **Apply Labels**, select the label, and click **Save**.
 **To label an alarm from the Alarms Details page**
1. Go to **Alarms**.
2. Search for the alarm to which you want to apply a label.
See [Searching Alarms](/documentation/usm-central/alarms/searching-alarms) for more information.
3. Click the alarm.
4. Click **Apply Labels** and select a label.
5. Click **Save**.
**To create a new label**
1.Go to Alarms.
2\. Select the checkbox to the left of an alarm.
You can also select several alarms or select all alarms at the same time by selecting the first checkbox in the column.
3. Click **Apply Labels**.
4. Click **Manage Custom Labels**.
5. Click **Create New Label**.
**To label an alarm from the Alarms Details page**
1. Go to **Alarms**.
2. Search for the alarm to which you want to apply a label.
See [Searching Alarms](/documentation/usm-central/alarms/searching-alarms) for more information.
3. Click the alarm.
4. Click **Apply Labels** and select a label.
5. Click **Save**.
**To create a new label**
1.Go to Alarms.
2\. Select the checkbox to the left of an alarm.
You can also select several alarms or select all alarms at the same time by selecting the first checkbox in the column.
3. Click **Apply Labels**.
4. Click **Manage Custom Labels**.
5. Click **Create New Label**.
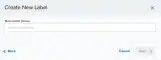 6. Enter a name for the label.
7. Click **Save**.
**To edit a label**
1. Go to **Alarms**.
2. Select the checkbox to the left of an alarm.
You can also select several alarms or select all alarms at the same time by selecting the first checkbox in the column.
3. Click **Apply Labels**.
4. Click **Manage Custom Labels**.
5. Click the
6. Enter a name for the label.
7. Click **Save**.
**To edit a label**
1. Go to **Alarms**.
2. Select the checkbox to the left of an alarm.
You can also select several alarms or select all alarms at the same time by selecting the first checkbox in the column.
3. Click **Apply Labels**.
4. Click **Manage Custom Labels**.
5. Click the  icon next to the label you want to edit.
6. Modify the name of the label.
7. Click the
icon next to the label you want to edit.
6. Modify the name of the label.
7. Click the  icon to apply the changes.
**To delete a label**
1. Go to Alarms.
2. Select the checkbox to the left of an alarm.
You can also select several alarms or select all alarms at the same time by selecting the first checkbox in the column.
3. Click **Apply Labels**.
4. Click **Manage Custom Labels**.
5. Click the
icon to apply the changes.
**To delete a label**
1. Go to Alarms.
2. Select the checkbox to the left of an alarm.
You can also select several alarms or select all alarms at the same time by selecting the first checkbox in the column.
3. Click **Apply Labels**.
4. Click **Manage Custom Labels**.
5. Click the  icon next to the label you want to delete.
 6. Click **Delete** to confirm the deletion.