> ## Documentation Index
> Fetch the complete documentation index at: https://docs.levelblue.com/llms.txt
> Use this file to discover all available pages before exploring further.
# Creating Suppression Rules from the Alarms Page
Role Availability | ❌ Read-Only ✔️ Analyst ✔️ Manager
There are cases where the alarms in USM Central are false positives, and you may want to suppress these kinds of alarms to prevent the false positives from flooding your system. To suppress an alarm, you need to create a suppression rule. USM Central applies the suppression rule to similar alarms from the current day (up to 10 K alarms) and to future alarms. Existing alarms are suppressed but kept open, while future alarms are suppressed and closed.
**To create a suppression rule from the Alarms page**
1. Go to **Alarms**.
2. Locate the alarms that you want to include in the suppression rule.
See [Searching Alarms](/documentation/usm-central/alarms/searching-alarms) for more information.
3. Click the alarm that you want to suppress.
4. Click **Create Rule > Create Alarm Suppression Rule**.
 5. Enter a name for the rule.
6. Select a deployment.
7. You have already suggested property values to create a matching condition, but if you want to add new property values, click **Add Condition**.
If the field is related to the name of a country, you should use the country code defined by the [ISO 3166](https://www.iso.org/iso-3166-country-codes.html).
The Sources or Destinations field needs to match the universally unique identifier (UUID) of the event or alarm. You can use the Source Name or Destination Name field instead.
8. (Optional.) Click **Add Group** to group your conditions.
See [Operators in the Orchestration Rules](/documentation/usm-anywhere/user-guide/rules-management/orchestration-rules-operators) for more information.
9. In the **Occurrences** text box, enter the number of event occurrences that you want to produce a match on the conditional expression to trigger the rule.
You can enter the number of occurrences or use the arrows to scroll the value up or down. You can enter a number between 1 and 100.
10. (Optional.) Click the **More** link to include a multiple occurrence parameter.
11. In the **Length** text box, specify the timespan that you want to use to identify a match for multiple occurrences. Enter the number in the text box, and then use the drop-down menu to select a value of seconds, minutes, or hours.
This duration identifies the amount of time that transpires from the beginning to the end of the occurrence. If the number of occurrences is not met within this period, the rule is not a match.
Your defined length and occurrences function together to specify the number of occurrences within a time period that will produce a match for the rule. For example, you can define a rule to trigger an alarm for an unauthorized access attempt when a failed SSH login occurs three times within a five-minute window.
12. Click **Save Rule**.
The suppression rule has been created. You can see it from **Settings > Rules > Suppression Rules**. See [Suppression Rules from the Orchestration Rules Page](/documentation/usm-central/rules-management/suppression-rule) for more information.
It takes a few minutes for an orchestration rule to become active.
Suppressed alarms remain in the system but are hidden in the web user interface (UI) by default. If you want to see these alarms, click **Suppressed** in the Search & Filters area. The suppressed alarms will be displayed in the table along with the other alarms. Use the following instructions if you want to display just the suppressed alarms.
**To only display the suppressed alarms**
1. Go to **Alarms**.
2. In the Search & Filters area, click **Not Suppressed** to remove the Suppressed: False filter, and then click **Suppressed** to add the *Suppressed: True* filter.
5. Enter a name for the rule.
6. Select a deployment.
7. You have already suggested property values to create a matching condition, but if you want to add new property values, click **Add Condition**.
If the field is related to the name of a country, you should use the country code defined by the [ISO 3166](https://www.iso.org/iso-3166-country-codes.html).
The Sources or Destinations field needs to match the universally unique identifier (UUID) of the event or alarm. You can use the Source Name or Destination Name field instead.
8. (Optional.) Click **Add Group** to group your conditions.
See [Operators in the Orchestration Rules](/documentation/usm-anywhere/user-guide/rules-management/orchestration-rules-operators) for more information.
9. In the **Occurrences** text box, enter the number of event occurrences that you want to produce a match on the conditional expression to trigger the rule.
You can enter the number of occurrences or use the arrows to scroll the value up or down. You can enter a number between 1 and 100.
10. (Optional.) Click the **More** link to include a multiple occurrence parameter.
11. In the **Length** text box, specify the timespan that you want to use to identify a match for multiple occurrences. Enter the number in the text box, and then use the drop-down menu to select a value of seconds, minutes, or hours.
This duration identifies the amount of time that transpires from the beginning to the end of the occurrence. If the number of occurrences is not met within this period, the rule is not a match.
Your defined length and occurrences function together to specify the number of occurrences within a time period that will produce a match for the rule. For example, you can define a rule to trigger an alarm for an unauthorized access attempt when a failed SSH login occurs three times within a five-minute window.
12. Click **Save Rule**.
The suppression rule has been created. You can see it from **Settings > Rules > Suppression Rules**. See [Suppression Rules from the Orchestration Rules Page](/documentation/usm-central/rules-management/suppression-rule) for more information.
It takes a few minutes for an orchestration rule to become active.
Suppressed alarms remain in the system but are hidden in the web user interface (UI) by default. If you want to see these alarms, click **Suppressed** in the Search & Filters area. The suppressed alarms will be displayed in the table along with the other alarms. Use the following instructions if you want to display just the suppressed alarms.
**To only display the suppressed alarms**
1. Go to **Alarms**.
2. In the Search & Filters area, click **Not Suppressed** to remove the Suppressed: False filter, and then click **Suppressed** to add the *Suppressed: True* filter.
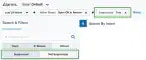 3. Click **Closed** to include the closed alarms.
4. To see alarms suppressed by a certain rule, in the upper-left corner of the page, click the **Configure Filters** link.
5. In the Search filters field, enter **Suppress**.
6. Select the **Suppress Rule Name** filter.
7. Click the
3. Click **Closed** to include the closed alarms.
4. To see alarms suppressed by a certain rule, in the upper-left corner of the page, click the **Configure Filters** link.
5. In the Search filters field, enter **Suppress**.
6. Select the **Suppress Rule Name** filter.
7. Click the  icon to pass the selected filter from the available filters to the selected ones.
8. Click **Apply**.
The page reloads and the Suppress Rule Name filter is added in the lower left corner.
9. Search the Suppress Rule Name filter and click the rule. If no rule name displays, it is because of these reasons:
* There are no alarms suppressed by the rule.
* The Suppressed filter is not enabled.
See [Searching Alarms](/documentation/usm-central/alarms/searching-alarms) for more information about the icons below the filters.
You can save the view for later use. See [Alarms Views](/documentation/usm-central/alarms/views) for more information about how to create a configuration view.
**To show triggered alarms rules**
1. Go to **Settings > Rules** to open the All Orchestration Rules page.
2. In the Create an Alarm row, click the
icon to pass the selected filter from the available filters to the selected ones.
8. Click **Apply**.
The page reloads and the Suppress Rule Name filter is added in the lower left corner.
9. Search the Suppress Rule Name filter and click the rule. If no rule name displays, it is because of these reasons:
* There are no alarms suppressed by the rule.
* The Suppressed filter is not enabled.
See [Searching Alarms](/documentation/usm-central/alarms/searching-alarms) for more information about the icons below the filters.
You can save the view for later use. See [Alarms Views](/documentation/usm-central/alarms/views) for more information about how to create a configuration view.
**To show triggered alarms rules**
1. Go to **Settings > Rules** to open the All Orchestration Rules page.
2. In the Create an Alarm row, click the  icon.
The Alarms List View page opens. The page includes Rules Name as a filter so that you can see how many alarms match the selected rule.
icon.
The Alarms List View page opens. The page includes Rules Name as a filter so that you can see how many alarms match the selected rule.