

User management
The User Management functions allow you to import and organize user account information. This information is used to control and record browsing access.Connectors, previously covered in detail here, are now covered under Global Settings. See Configuring connectors. You can choose to create a new connector any time you import a User Group.
User groups
All users
Select this element to view a complete list of user names in all groups that have been imported into WebMarshal. This list is empty until at least one group has been imported (or, in the case of IP range entries, a computer in the range has browsed through WebMarshal).By default WebMarshal retains all previously imported user names on this list, even if they are not currently members of any user group visible within WebMarshal. To purge unused names, right-click All Users and select Purge Unreferenced Users. This action does not affect logging records.
User properties
To view additional details about a user, double-click to open the User Properties window.- The General tab shows the name, description, source, and full distinguished name information for a user. You can edit the description.
- The Rules tab shows all rules that apply to this user. Highlight a rule and click Jump to Rule to view the details of that rule.
- The User Groups tab shows all user groups that this user belongs to. Highlight a group and click Jump to User Group to view the details of that group.
- The Quotas tab shows a list of quotas that apply to the user. To extend a quota for the user, click Extend Quotas. For more information about extending quotas, see Editing a quota.
User group types
WebMarshal supports five types of User Groups. Each displays in the Console with a unique icon.- WebMarshal groups (user folder).
-
Windows NT user groups (green shirts) .
WebMarshal supports both Global and Local NT user groups.
- Global user groups are created on a Windows Domain Controller or Active Directory server.
- Local user groups are created on domain controllers or standard workstations, and can contain users from any domain. They can also contain global user groups. Local user groups cannot contain other local groups.
- Active Directory user groups (blue shirts).
- Novell NDS user groups (red shirts).
- IP address range groups (users with workstation).
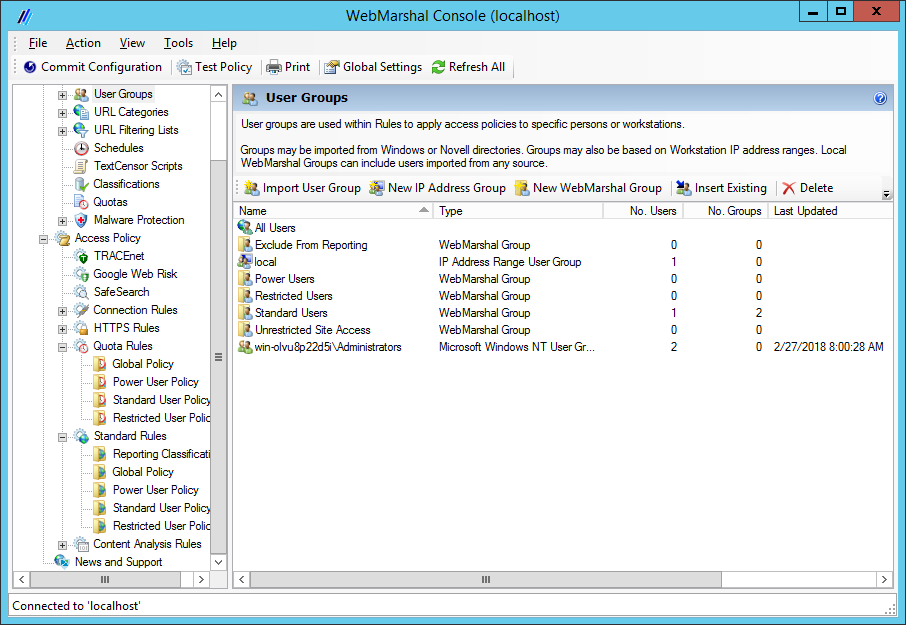
WebMarshal Console, User Groups window
Adding a user group
- In the WebMarshal Console, expand User Groups or a specific group.
-
From the Action menu or the right pane menu bar, choose one of the following actions:
- Import User Group
- New IP Address Group
- New WebMarshal Group
-
Import User Group(s) from a Connector: On the Import User Groups window, find and select the names of the groups you want to import into WebMarshal. You can use imported groups, and individual users, in WebMarshal user groups or rules.
You can explore or search for groups. You can also enter group names manually.
For NT groups, names you type must be in
domain\usergroupformat. Enter multiple names separated by semi-colons. For Active Directory and NDS, names you type must be fully distinguished names.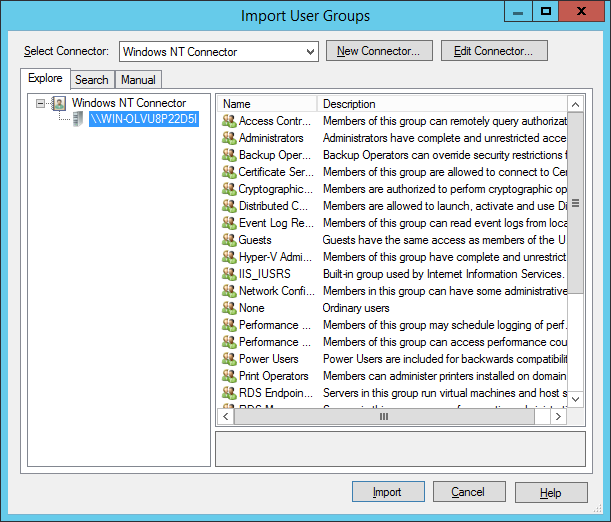
Import User Groups window
- Click Import to add the User Group.
-
New IP Address Range Group: Enter a name and optionally a description.
Enter an IP address, a range (starting and ending addresses separated by -) or a CIDR specification. Any user or process on a computer with an IP address in the specified range can browse through WebMarshal, subject to any Rules applied to the group.
IP authentication works much better if DNS is configured to support reverse DNS lookups. Reverse DNS allows WebMarshal to get a name for an IP address. If that returned name matches the NetBIOS name, WebMarshal can query the computer for its description. (As a consequence, you cannot specify different permissions for the IPv4 and IPv6 interfaces of the same computer.)A range can be in the IPv4 or IPv6 address space.WebMarshal adds the name or IP address of each computer in this range to the All Users list the first time that computer connects to WebMarshal. Once the computer names are included in the list, you can use them individually within Rules in the same way as any other User.If you want to add a specific computer to a WebMarshal User Group explicitly (when it is not included in All Users), see Adding computers or IP addresses to a group.
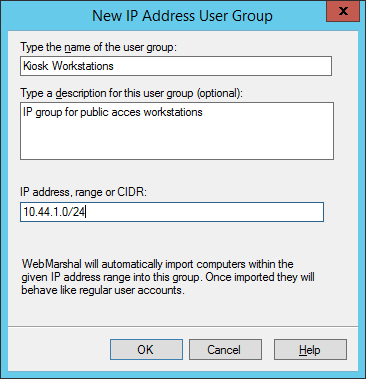
New IP Address User Group window
- New WebMarshal Group: Enter a name and optionally a description. This type of group is internal to WebMarshal. You can use WebMarshal groups to quickly apply policy to multiple groups and users.
Inserting existing groups to a WebMarshal group
- In the WebMarshal Console, expand a specific group within User Groups.
- Click the Insert Existing icon in the tool bar. If no users or imported groups are present, you have the option to import or create User Groups (see the procedure above)
- Within the Insert Users or Groups window, select Existing Imported Users or WebMarshal Groups. Select one or more users or groups with the mouse, or type the beginning of a name to select it.
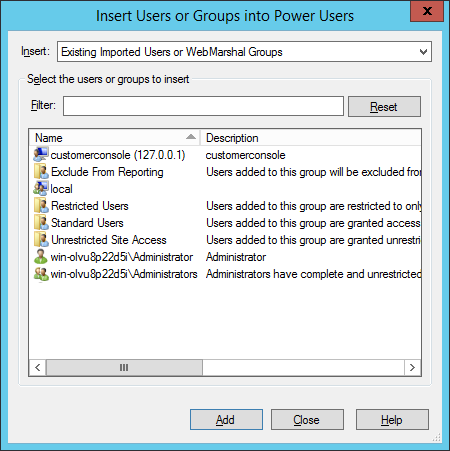
Insert Users or Groups window
- Use the Enter key or click Add to add the selected items into the Group.
Adding computers or IP addresses to a group
- In the WebMarshal Console, expand a specific group within User Groups.
- Click the Insert Existing icon in the tool bar.
- Select New Computer Accounts by IP Address or New Computer Accounts by Computer Name. In the text box, enter computer names, or IP addresses, one per line. You can only add valid computer names from the local network. IP addresses are resolved to computer names if possible. You can add any well-formed IPv4 or IPv6 address.
WebMarshal attempts to resolve IP addresses to NetBIOS names. NetBIOS names are used to allow for dynamic allocation of IP addresses. You can enter fully-qualified domain names, but they might be rejected due to IP address duplication.
Changing user group properties
The User Group Properties window shows the source and reload status of a User Group. Use this window to:- Edit the group description for WebMarshal and IP groups.
- Change the range of IP addresses included in an IP address group.
Reloading membership does not delete any users previously imported, even if they are no longer members of the group. To remove unused users, select User Groups > All Users > Purge Unreferenced Users.
Understanding URL categories
URL categories are collections of related Web or FTP sites. You can use these lists in Rules to determine an action to take (such as permitting or blocking access, or warning the user).Types of URL categories
WebMarshal supports two types of URL Categories.- WebMarshal URL Categories are user-modifiable lists of URLs. This type of category may contain other WebMarshal Categories and may also contain imported Categories.
- Imported categories are populated with URL information supplied by an externally maintained Filtering List (for instance the LevelBlue Web Filter Database or WebMarshal’s FileFilter). You cannot edit the contents of an imported category within WebMarshal.
WebMarshal URL categories
Several categories are provided by default. Some examples of WebMarshal URL Categories are:- Offensive Content
- Business Partners
- News Sources
- Web-based Mail Servers
- Search Engines
* wildcard character can be placed at the beginning or the end of the site name part of the URL to match multiple similar sites.
Matching of URLs is not case sensitive.The path, file, and query string parts of a HTTPS URL (for instance
https://example.com/folder/) can only be evaluated if HTTPS content inspection is enabled. WebMarshal does not have access to the path information for uninspected HTTPS connections.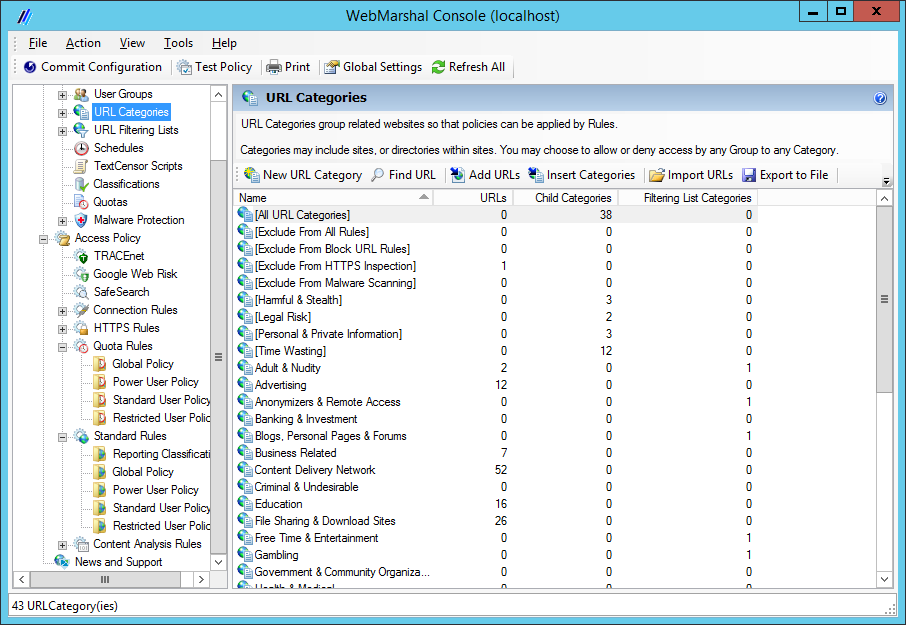
WebMarshal Console, URL Categories window
Adding a URL category
- Select URL Categories in the left pane.
- Click the New Category icon in the tool bar.
- Enter the name for the new category. Optionally enter a description.
- On the final page of the Wizard, click Finish to create the Category.
Adding URLs to a URL category
- Select URL Categories in the left pane.
- Select the name of a URL category in the left pane to view its members in the right pane.
- Click the Add URLs icon in the tool bar to open the Insert URLs window.
- To add a new URL to this category, enter the URL. You can enter any of the following:
- A full site name or IP address literal, and optionally a port, such as:
http://www.levelblue.com/http://198.51.100.25/http://[2001:db8:8:4::6]:81
- A specific sub-directory, such as
http://support.levelblue.com/webmarshal/ - A specific full path including file name, such as
http://support.levelblue.com/webmarshal/documentation.asp - A string with an asterisk as a wildcard at the beginning and/or the end of the site part of the URL, such as
http://*.wave*(not available with IPv6 literals) - Any of the above, with a query string. For details of query string matching rules, see URL query string matching.
- A full site name or IP address literal, and optionally a port, such as:
- To clarify that the entry includes a file name, check the box URL includes a file name. This box is disabled when the last character of the URL entered is / (slash). (URLs with a file name do not have a slash at the end of the resulting URL.)
- Optionally select the variations of the URL that you want to add (such as the www. prefix or HTTPS and HTTP protocols).
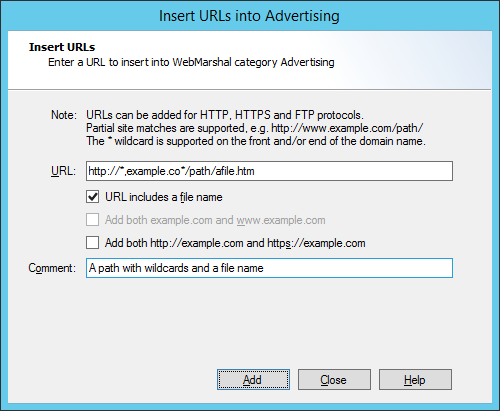
Insert URLs window
- Click Add (or press Enter) to add the URL to this category.
- The window remains open so you can add additional URLs.
- Click Close when done.
URL query string matching
When you manually add a URL to a URL Category, you can include a query string part. WebMarshal will match URLs that contain the query string text you enter. Like all URL matching, query string matching is not case sensitive. You cannot use wildcards in the query string part.- Begin the query string part of the URL with
?- For example,
http://example.com/?query=1
- For example,
- The query string can contain one or two strings to match exactly. Separate the strings using
&- For example,
http://example.com/path/file.htm?this=1&that=text
- For example,
- If you include two strings, both must be present for the URL to be matched.
http://example.com/?this&thatdoes not matchhttp://example.com/?this
- The strings will be matched in any order, and will match a URL with additional query parts.
http://example.co*/?this&thatmatcheshttp://example.com/?that&more&this
- If you add query strings to an entry, they match on any deeper path.
http://*.com/?this&thatmatcheshttp://example.com/path/file.htm?that&this&more
- Strings must match exactly.
http://example.com/?attachdoes not matchhttp://example.com/?attached
- To match a key-value pair you must enter the exact key=value string.
http://example.com/?truedoes not matchhttp://example.com/?this=true
Adding categories to a URL category
- Select URL Categories in the left pane.
- Select the name of a URL category in the left pane to view its members in the right pane.
- Click the Insert Categories icon in the tool bar to open the Insert Categories window. The Insert Categories window shows all available categories in a tree view, organized by the source (including WebMarshal categories and filtering list categories).
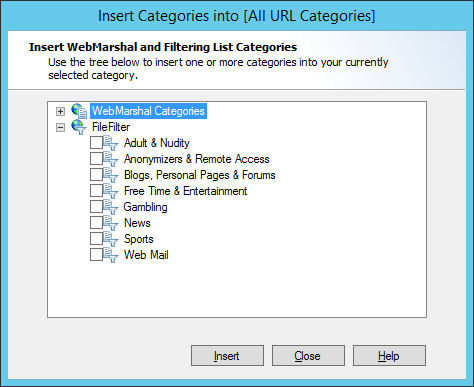
Insert Categories window
- To include one or more URL categories in this category, expand the tree and select the desired categories.
- Click OK to add the selected categories and return to the parent window.
Importing a URL category
You can import URLs from a file created by another application or WebMarshal installation. The imported URLs can replace or add to the existing content of the category. The file must be a simple text file with one URL per line.You can also import categories from files using the WebMarshal FileFilter filtering list. With FileFilter, you can maintain the category files outside WebMarshal, and import them daily. FileFilter is also a better choice for categories containing large numbers of URLs. See FileFilter.
- In the Console menu tree, expand URL Categories and select the category you want to use.
- Click the Import URLs icon in the toolbar.
Exporting a URL category
You can save the members of a URL category to a file that you can export to another application or WebMarshal installation. To export a URL category:- In the Console menu tree, expand URL Categories and select the category you want to use.
- Click the Export to File icon in the toolbar
- Select the location where you want to save the category file. Click Save.
Searching a category for a URL
To search a Category for a specific URL:- Select a WebMarshal category in the tree, then click the Find URL icon in the toolbar.
- Enter the name of the URL to search for.
- If you want to search all categories, select Search all URL categories.
- Click Find.
- The result indicates whether the URL is in the currently selected category. If you selected Search all URL categories, the result indicates which categories if any the URL is in.
Configuring URL filtering lists
Lists are categorized lists of websites, maintained externally to WebMarshal. You can use the categories provided by these lists in WebMarshal URL Categories. The Filtering Lists pane displays information about the lists currently configured in WebMarshal. You can enable or disable an existing list. You can add or delete lists. WebMarshal currently supports the following lists:- FileFilter: A simple implementation that reads category lists from text files. For more details about FileFilter please see FileFilter.
- URLCensor: A real-time facility that categorizes IP addresses through DNS Blacklist lookup. For more details about URLCensor please see URLCensor.
- LevelBlue Web Filter Database: A URL list provided by LevelBlue and licensed separately. The list consists of 116 categories. For more information on the LevelBlue Web Filter Database including trial license information, please see LevelBlue Web Filter Database.
Reviewing filtering list status
You can check the available categories, enabled or disabled status, and update status for any configured list, and update the list or license if required. To check the list:- In the left pane tree, expand URL Filtering Lists.
- Select a list. The top right pane shows the status of the list on each server. The bottom right pane shows the name and description of each category available through the list.
- To view general details of a list, or to initiate an update for all servers, right-click a list name in the left pane. Click Update All Servers to force an immediate check for Filtering List updates (where internet updates are provided).
Updating can cause disruption for users browsing. This action should be performed at a time when it will have minimum effect.
- To view details of list and license status on each server, double-click a server name in the right pane. The Node Update Status tab shows the update status and results for the server.
Adding filtering lists
You can add one or more filtering lists to the WebMarshal configuration. For additional details, see Help. To add a filtering list:- In the left pane tree, expand URL Filtering Lists.
- In the right pane, click Add URL Filtering List to start the Add URL Filtering List wizard.
- Select a single list to add. Click Next.
- For the LevelBlue Web Filter Database, to allow WebMarshal to validate the license (one time requirement), select an Internet connection method that is valid from the WebMarshal Array Manager server, and then click Next.
- Click Finish to validate the license (if required) and add the list.
- To add another list, repeat the above steps.
- Commit configuration changes to propagate the new list to the WebMarshal servers.
WebMarshal will use the categories for filtering as soon as the list is available on processing servers. For the LevelBlue Web Filter Database, the initial population of categories can take half an hour or longer, depending on Web connection speed.
Deleting a filtering list
You can delete a filtering list from the WebMarshal configuration. Deleting a list removes any categories imported from the list from the WebMarshal URL Categories. Deleting a list does not remove database log records of categorized sites. To delete a filtering list:- In the left pane tree, expand URL Filtering Lists.
- Right-click the list you want to delete, and select Delete.
- Commit configuration changes.
Enabling or disabling a filtering list
You can enable or disable use of a Filtering List. When a list is disabled, the list and imported categories will display in the Console, but the list will not be updated and it will not be used in rules. To enable or disable a filtering list:- In the left pane tree, expand URL Filtering Lists.
- Right-click the list you want to change, and select Enable or Disable.
- Commit configuration changes.
Configuring access using schedules
The scheduling facility allows you to apply Rules at particular times. You can set different Quotas or Web access permissions by time of day or day of the week. For instance, an organization might block access to games sites during working hours, but allow access after hours.Schedule times are calculated in local time on the processing server that handles a request.
Adding a schedule
- Select Schedules in the left pane.
- Click the New Schedule icon in the tool bar to start the New Schedule wizard.
- On the Time Schedule page of the wizard, drag with the left mouse button to add to the blue “inside” area. Drag with the right mouse button to erase from the blue “inside” area.
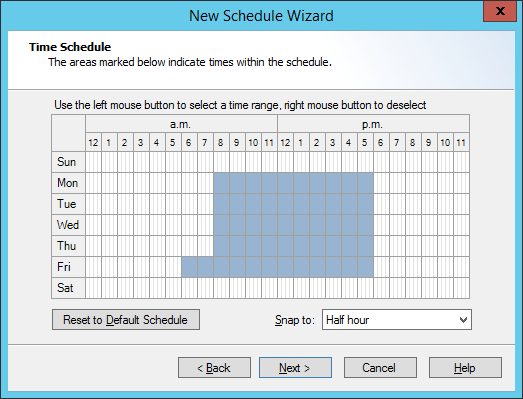
New Schedule Wizard, Time Schedule window
- Click Set Default Schedule to reset the schedule to the default time block.
- Choose to “snap” the schedule times to the nearest whole, half or quarter hour using the menu.
- Click Next.
- On the Schedule Name page of the wizard, give the schedule a name.
- Optionally enter a description of the schedule.
- Click Next.
- On the Completing page of the wizard, click Finish to save the schedule, or Cancel to exit without saving.
Editing a schedule
- Select Schedules in the left pane.
- Double-click an existing Schedule name in the right pane to edit it.
- Drag with the left mouse button to add to the blue “inside” area. Drag with the right mouse button to erase from the blue “inside” area.
- Click Set Default Schedule to reset the schedule to the default time block.
- Choose to “snap” the schedule times to the nearest whole, half or quarter hour using the menu.
- On the General tab, edit the name and optional description of the schedule.
- Click OK to save the changes to the schedule, or Cancel to lose any changes.
Duplicating a schedule
To duplicate a schedule:- Right-click the Schedule name in the right pane.
- Select Duplicate.
Deleting a schedule
To delete a Schedule:- Right-click the Schedule name in the right pane.
- Select Delete.
Configuring access using quotas
Quotas allow you to limit users’ browsing activity by time or by volume (total bandwidth). You can set different Quotas for different user groups. More than one Quota can apply to a user. Different limits can apply at different times. For instance, the organization may wish to limit access to news sites during working hours but allow unlimited access after hours. Quotas are applied as Rule conditions. To list the rules that use a quota, and the quota usage for each user, view the properties of the quota.Adding a quota
- Select Quotas in the left pane.
- Click the New Quota icon in the tool bar to start the New Quota wizard.
- On the Quota Interval page of the wizard, select the allocation interval. Click Next to continue.
Quotas are reset at midnight (local time at the WebMarshal processing server) at the beginning of the first day of the quota period.
- On the Quota Type page of the wizard, choose whether this will be a time or volume (bandwidth) quota.
- For a time quota, choose the amount and period (minutes or hours).
- For a volume quota, choose the number and unit (Kilobytes, Megabytes, or Gigabytes). Choose whether to apply the quota to pages served from the WebMarshal Proxy Cache.
- Click Next to continue.
- On the Quota Exceeded page of the wizard, select the actions WebMarshal will take when a user (or workstation) has exceeded the allowed quota.
- Select a web page to display from the list. (To learn how to add items to this list, see Notifying users with notification pages.)
- To allow users to extend the quota, check the box and enter the required information:
- Amount of time or volume to be added per extension.
- Number of extensions allowed.
- Web page to display.
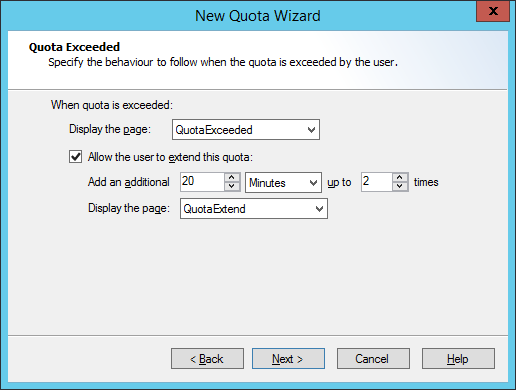
New Quota Wizard, Quota Exceeded window
- Click Next to continue.
- On the Quota Name page, enter identifying information.
- Enter a name for this Quota (required).
- Optionally enter a description indicating the intended use of the Quota.
- Click Next to continue.
- On the Completing page of the wizard, click Finish to save the Quota, or Cancel to exit without saving.
Editing a quota
You can change the global properties of a quota. You can also extend a user’s allocation for the current quota period.- Select Quotas in the left pane.
- Double-click an existing Quota name in the right pane to edit it.
- On the General tab, edit the name and optional description of the Quota.
- On the Quota tab, edit the properties of the Quota.
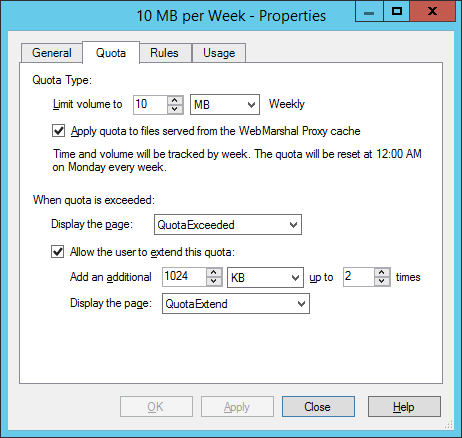
Quota Properties window, Quota tab
- On the Rules tab, you can see a list of rules that apply to this quota. Highlight a rule and click Jump to Rule to view the details of that rule.
- On the Usage tab, you can see the quota usage for a selectable period for each user affected by the quota.
This display does not reflect Quota amounts used in current Active Sessions. The usage information is updated at the end of a browsing session.
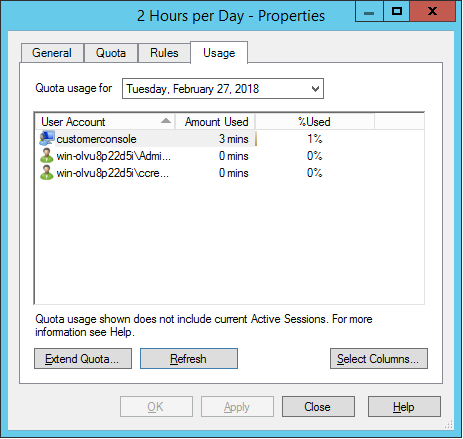
Quota Properties window, Usage tab
- To extend the quota for a specific user, select that user from the list then click Extend Quota to open the Extend Quota window.
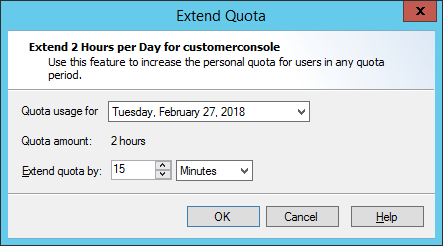
Extend Quota window
- The window shows the user’s default allocation. Enter the desired extension as a number of minutes, hours, KB, MB, or GB. Click OK to apply the change and return to the Quota Properties window.
Changes made here only affect the selected quota period (day or week). Changes made here do not affect the user’s ability to extend the quota (as set in the Quota properties).
- To refresh the display, click Refresh.
You can allow a user to extend their own quota when they reach the limit. See Quota extensions. - The window shows the user’s default allocation. Enter the desired extension as a number of minutes, hours, KB, MB, or GB. Click OK to apply the change and return to the Quota Properties window.
- Click OK to save the changes to the Quota, or Cancel to lose any changes.
Duplicating a quota
To duplicate a Quota:- Right-click its name in the right pane.
- Select Duplicate.
Deleting a quota
To delete a Quota:- Right-click its name in the right pane.
- Select Delete.
Quota levels
If WebMarshal Quotas are in use, users can check their quota allocation and usage from the WebMarshal website. The URL of the quota page ishttp://webmarshal.home/Quotas
This URL can only be accessed from inside the local network for which WebMarshal is the gateway. The browser must be configured to use WebMarshal as a proxy server.
This page shows the user name of the authenticated session.
Each quota for that user is displayed. The quota limit (including extensions used if any), amount remaining, and percentage remaining are shown.
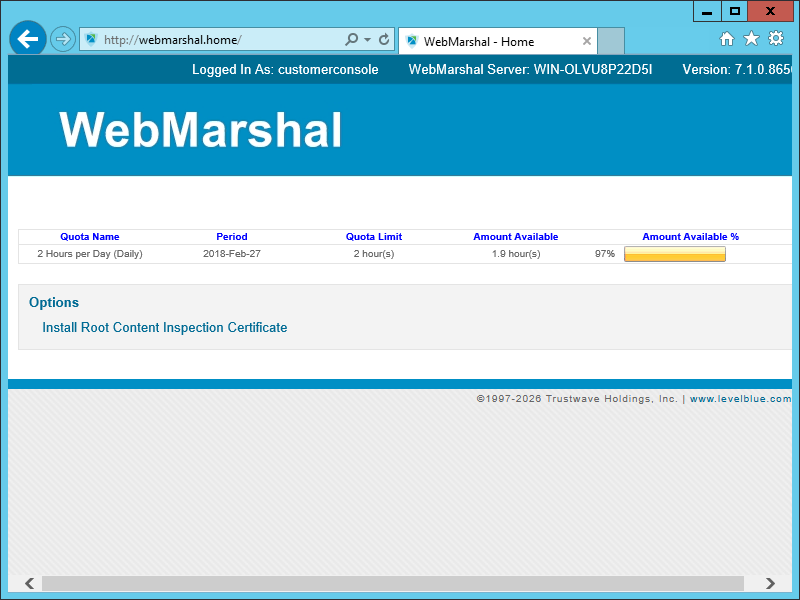
WebMarshal home page, quota levels
Quota extensions
If a user makes a Web request (page view, upload, or download) which would exceed their remaining quota, they will be notified by a web page. If the quota is configured to allow user extensions, and the user has not yet used all allowed extensions, the notification web page will include a button to extend the quota. When the user clicks the button Request a quota extension, the extension is recorded and the request is processed. The WebMarshal Administrator can monitor and extend quotas for all users from the Usage tab of the Quota Properties window (see Editing a quota).Quota and browsing time calculation
WebMarshal calculates user browsing time for Quotas and to log usage for reporting, based on a session timeout value and a padding time. For information about how to set these values, see Viewing product information. For additional details see LevelBlue Knowledge Base article Q11755.- Each time a page is requested, WebMarshal checks for a previous request from the same user.
- If the previous request from the user was within the session timeout value, the WebMarshal logs show a continuous period of browsing.
- If the previous request was longer ago than the session timeout value, the WebMarshal logs show that browsing activity stopped after the previous request plus padding time, and started again with the new request.
Identifying web content using TextCensor scripts
TextCensor scripts allow you to check for the presence of particular content in a file or text. You can apply TextCensor to any text, including web pages, plain text files, and text extracted from PDF or Office documents. TextCensor supports Unicode and wide characters, and is designed to work intuitively with a wide variety of languages. A script can include many conditions based on text combined using logical and positional operators. Triggering of the script is based on the weighted result of all conditions. TextCensor scripts are used in Content Analysis rules. The rule can block a request, classify a site, or add a site to a URL Category. To see a list of rules that use a script, view the properties of the script.TextCensor elements
TextCensor scripts contain one or more expressions, each consisting of a word or phrase. You can use two wildcard characters, anywhere in a word or phrase.*matches zero or more letter or digit characters.?matches one letter or digit.
Positional operators
TextCensor works with the positions of words or phrases within a file. For example, in the sentence “The quick brown fox jumps over the lazy dog” the word “quick” starts and ends at position 2, and the phrase “jumps over” starts at position 5 and ends at position 6. A positional operator works with expressions that evaluate to sets of positions. It takes two sets of positions as parameters, and returns a new set of positions. You can specify a distance for many positional operators. The default distance (if you do not specify a value) is 4. Table 5: TextCensor positional operatorsLogical (Boolean) and special operators
A logical operator takes Boolean (true/false) values as input, and returns a Boolean result. These results cannot be used as parameters of a positional operator. When one of the parameters to a logical operator is an expression that returns a position set, the parameter is treated as a logical value. A set with at least one position match is treated as true. A set that has no matches is treated as false. TextCensor also supports the special operator INSTANCES. Table 6: TextCensor logical and special operatorsAnchored regular expressions
TextCensor supports use of Regular Expressions through the ARX operator. An anchored regular expression is a regular expression (regex) which must be preceded by a word on the left hand side of the ARX operator. Matching of the regex begins at the next character following the word. Regex patterns must always begin by matching one or more non-word characters. In most cases you can start the regex pattern with\W to match non-word characters.
- ARX is based on Google RE2. The syntax generally follows well known Regular Expression syntax.
- Distance parameters for ARX operators are specified in characters.
- Regular expressions are case insensitive by default. You can force case sensitive matching with the operator
?-i - ARX does not support lookahead or lookbehind.
- ARX does not support capture groups. Capture groups will be ignored or converted to non-capturing sequences.
- ARX does not support
\Q...\Eliteral text. - For further details of the ARX syntax, see the RE2 wiki.
Multiple anchored regular expressions can be combined with other expressions and operators to create complex statements. For example,
TextCensor concepts
The following concepts clarify how TextCensor expressions are evaluated.This section does not apply to Regular Expression patterns.
Words
A word is made up of one or more letters and digits, and sometimes symbols.- In alphabetic languages, a word is a group of letters or digits separated by other characters (such as punctuation, other symbols, and white space).
- In Chinese, or Japanese kanji, a word or “token” may be composed of one or more characters (ideographs).
Phrases
A phrase is made up of a series of words separated by word break characters.Symbols and punctuation
Symbols other than letters and digits are not treated as part of a word unless they appear in the specific statement being evaluated. A group of symbols is not treated as a word.Word breaks
The sets of characters that are treated as word and number break characters generally follow Unicode standards. A word break character can also be matched exactly or by a wildcard.Accented letters
TextCensor treats each accented character as a single letter. A letter with additional composed accent characters is normalized to a single character before the text is evaluated.Escape characters
Some characters have special meanings in TextCensor. These characters are parentheses, square braces, the asterisk, the equal sign, the double quote character, and the question mark. You can place a backslash character (\) before any of these characters in order to use the character’s normal meaning. To use a normal backslash character, place two of them together (\\).
Within ARX expressions, the Regular Expression reserved characters apply (in particular the forward slash /) which marks the start and end of the regex pattern).
Case sensitivity
TextCensor evaluation is NOT case sensitive by default. To perform a case sensitive match, quote the content using double quote characters. All special characters and escape characters retain their meaning within double quotes.Classes
You can use TextCensor Classes to match specific types of characters inside a word, or special types of words. Table 8: TextCensor classesNamed statements
You can give a TextCensor statement a name. When a named statement is executed, the result is stored. You can reference it in later statements within the same script. If a statement contains only words or only uses positional operators, the stored result is the set of word positions found by that statement. If the statement uses any other operators then the result is logical. You can reference the result of a statement by using[@name] inside a statement. This can be used anywhere that you would otherwise use the bracketed result of an operator.
Naming a statement does not affect the statement’s score. To use a named statement as a macro expression, in most cases you should set the statement’s score to zero.When using named statements within other expressions, remember that the result must match the required parameter type. If a statement returns a logical result you cannot use it as a parameter to a positional operator. Test your scripts before applying them in production.
Scoring a TextCensor script
Each script is given a trigger threshold, expressed as a number. Each expression in a script is given a positive or negative score. If the total score of the content being checked reaches or exceeds the trigger threshold, the script is triggered. The total score is determined by summing the scores resulting from evaluation of the individual expressions in the script. For each expression, if the result is a true logical value, the expression score is the base score. If the expression result is a position set (the word or phrase was found one or more times in the text), by default the final score of the expression is the base score. You can choose how to add the score when the expression is matched more than once. The options are: Table 9: Cumulative scoring options
Negative scores and trigger levels allow you to compensate for the number of times a word could be used in text that you do not want to match. For instance: if
breast is given a positive score in an “offensive words” script, cancer could be assigned a negative score (since the presence of this word suggests the use of breast is medical/descriptive).
Script evaluation always checks all expressions to obtain the final score. The order of expressions in a script is not significant. This is a change from earlier versions.
Adding a TextCensor script
- Select Policy Elements > TextCensor Scripts.
- Click the New TextCensor Script icon in the tool bar to open the New TextCensor Script wizard. If necessary click Next to continue to the TextCensor Expressions window.
- Click New to open the Add TextCensor expression window.
- Enter the expression, optionally using the operators described earlier. For example:
In this example the expression score is added to the script total if the document contains the words
dog house(ordog houses, and so forth) in order, and does not contain the wordcat.TextCensor expressions are not case sensitive by default. However, quoted content is case sensitive. Sotextcensorwould match TextCensor, but"textcensor"would not.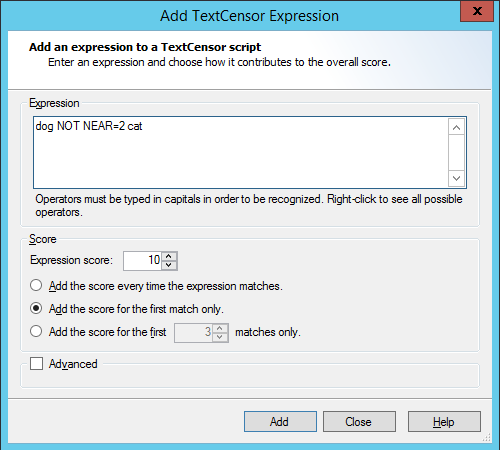
Add TextCensor Expression window
- Select a score and contribution method for this expression (see Scoring a TextCensor script for more information).
- Click Add (or press Enter) to add the expression to this script. The window remains open so you can create additional expressions.
- When all expressions have been entered, click Close to return to the New TextCensor Script window.
- Select a trigger threshold. If the total score of the script reaches or exceeds this level, the script is triggered. The total score is determined by evaluation of all expressions in the script.
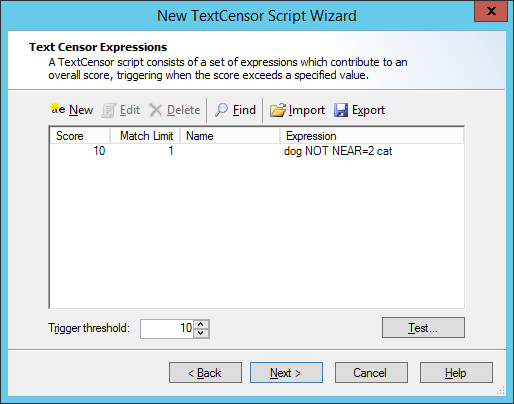
New TextCensor Script Wizard, Text Censor Expressions window
- Click Next
- On the TextCensor Script Information page, enter a name and optional description for the script.
- Click Next, then Finish, to add the script.
Editing a TextCensor script
- Select TextCensor Scripts in the left pane.
- Double-click the script name in the right pane to open the script properties window.
- Double-click an expression to edit it.
- To delete a line, select it and click Delete.
- Change the script name and trigger level as necessary.
- Click OK to accept changes or Cancel to revert to the stored script.
Importing a TextCensor script
You can import TextCensor scripts from files.You can import scripts in the format used by WebMarshal 6.9.5 and above, as well as scripts in the format used by earlier versions. The earlier version scripts will be upgraded to the new format automatically. Any problems with upgrading will be reported.
- Select TextCensor Scripts in the left pane.
- Click the New TextCensor Script icon in the tool bar to open the New TextCensor Script wizard.
- On the TextCensor Expressions window, click Import.
- Select the file you wish to import, and click Open.
- Complete the Wizard to add the script.
Exporting a TextCensor script
You can export TextCensor scripts to XML or text files. To export a Script:- Select TextCensor Scripts in the left pane.
- Double-click the name of the script you want to export in the right pane to open the script properties window.
- Click Export.
- Enter the name of the file you want to create, and click Save.
- In the script properties window, click OK.
Using TextCensor effectively
The effective use of TextCensor scripts depends on understanding how the Text Censor facility works and what it does. TextCensor evaluates rules against plain text or HTML documents. The rules can be used to block a request, classify a site or add it to a URL Category. If a Content Analysis rule includes a “block” action, TextCensor scripts are evaluated before the material is returned to the user. Blocking does not apply to content cached on the local computer.Constructing TextCensor scripts
The key to creating good TextCensor scripts is to enter words and phrases that are not ambiguous. They must match the content you want to block. Also, if certain words and phrases are more relevant to the match than others, those words and phrases should be given a higher score to reflect the greater relevance. In creating TextCensor scripts, you should strike a balance between overly-general and overly-specific. For instance, suppose a script is required to check for sports-related sites. To enter the wordsscore and college alone would be ineffective because those words are likely to be used on non-sports sites. Hence, the script would trigger too often, potentially stopping access to acceptable sites such as general news sites.
The same script (to find sports-related sites) would be better constructed using the phrases extreme sports, college sports and sports scores as these phrases are sport specific. However, using only a few very specific terms may mean that the script does not trigger often enough.
Again using the sports example used above, the initials NBA and NFL, which are very sports specific, should be given a suitably higher score (that is, promoting earlier triggering) than, for example, college sports.
Decreasing unwanted triggering
TextCensor scripts might trigger on pages that are not obviously related to the content types they are intended to match. To troubleshoot this problem:- Use the problem script in a TextCensor Rule that classifies sites and adds them to a URL Category, such as “suspected sports sites.”
- After using this rule for a while, check the sites that have triggered the script and determine which ones are triggering it falsely.
- In the URL Categories display of the console, double-click a URL to view the reasons it was added (for example, TextCensor details).
- Revise the script by changing the score or key words, so as to decrease false triggering.
- When satisfied, create a Standard Rule which denies access to sites in the URL Category generated by the script, and/or add a Block action to the original TextCensor rule.
Testing TextCensor scripts
To test the operation of a TextCensor script:- Click Test on the New TextCensor Script or script properties window to open the Test TextCensor window.
- In the Test TextCensor window, enter the sample text you want to test using one of two methods.
- Select Test script against file. Enter the name of a file containing the test text (or browse using the button provided).
- Select Test script against text. Type or paste the text in the field.
- Click Test. The result of the test (including details of the expressions which triggered and their scores) displays in the Test Results pane.
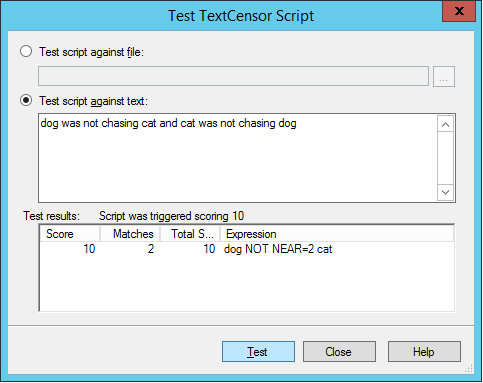
Test TextCensor Script window
Using malware scanning
WebMarshal can invoke third-party scanners to check file uploads and downloads for malware, including viruses and other malware. Before you enable scanning Rules, you must install at least one supported scanner on each processing server, and configure the scanners within WebMarshal.Scanning overview
WebMarshal currently supports only specific malware scanners that have licensed DLL interfaces. Supported scanners include Bitdefender for Marshal, McAfee for Marshal, and Sophos for Marshal.The Sophos (SAVI interface) and Symantec scanners that were previously supported are not supported in this release for technical reasons. Kaspersky for Marshal is no longer sold.
WebMarshal uses a temporary directory during scanning. This directory must be excluded from on-access or resident virus scanning. If it is not excluded, the WebMarshal Engine and/or the WebMarshal Controller service may be unable to start. By default, WebMarshal uses the
\temp subdirectory of your install directory. You can change this location by editing XML configuration files on each processing server and restarting the WebMarshal services. If you change the location of the temporary directory for either or both services, be sure that you also update virus scanner exclusions.Adding a scanner
To add a malware scanner to the list of configured scanners:- Select Malware Protection from the left pane of the WebMarshal Console.
- Click the New Malware Scanner icon in the tool bar to start the New Virus Scanner Wizard.
-
The Select Scanner page of this Wizard shows a list of scanners WebMarshal can use.
To obtain more information about any scanner, select it and then click Visit Web Site.
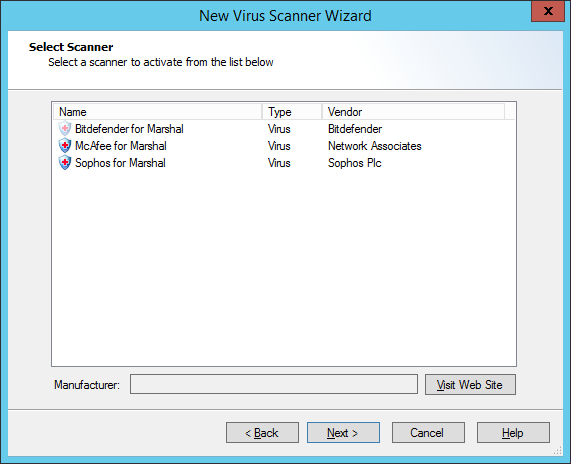
New Virus Scanner Wizard, Select Scanner window
- Select a scanner to add. All scanners that you add will be available for use by WebMarshal. When you create a malware scanning rule, you can choose the scanners that rule will use. You can use multiple scanners in a single rule or separate rules. Because different products have differing coverage, some sites choose to use more than one scanner.
- Click Next to continue to the next page.
- If any additional parameters are required, the additional parameters pages of the wizard is shown. Enter any required parameters (such as the location of a scanner if it is installed remotely). Click Next to continue to the next page.
- Click Finish to install the scanner and exit the Wizard.
Bitdefender for Marshal, McAfee for Marshal, and Sophos for Marshal each require installation of a configuration Console, available in separate downloads from LevelBlue (and licensed separately).You must install this software on the WebMarshal server. If you have configured an array of servers, you must install the scanning software on each processing server.WebMarshal trial keys enable all of these products for the 30 day trial period. To obtain a permanent key, contact your LevelBlue supplier. If you are a customer with a permanent WebMarshal key and you want to try one of these scanner products, contact your LevelBlue supplier for a special time-limited key.
Deleting a scanner
To delete a configured scanner from the list of scanners WebMarshal can use:- Select it in the right pane of the Console
- Click the Delete icon in the taskpad tool bar.
If any malware scanning rule is enabled, you cannot delete all scanners of the type(s) used by that rule.
- If any malware scanning rule (including disabled rules) references a specific scanner, you cannot delete that scanner.
- Deleting a scanner from the list does not uninstall the scanning software.
Testing scanners
To test the operation of an installed malware scanner:- Select it in the right pane of the Console
- Click the Properties icon in the taskpad toolbar.
- Select the Installation Status tab. WebMarshal queries each processing server and returns the status of the scanner on each server.
Logging activity with classifications
WebMarshal logging classifications allow you to record more detailed information about user requests (both allowed and denied), and content downloaded or uploaded. Logging classifications are only recorded in database logging.Types of logging classification
WebMarshal allows you to use Classifications in two ways.- Domain Classification actions are available within Standard rules and TextCensor rules. Logging a classification for a domain shows that a user browsed to a URL which is in a specific category, or to a page which triggered a rule. A domain can receive multiple classifications within a single browsing session. A domain could also receive different classifications in different sessions, depending on the actual content requested, such as sports or entertainment sections of a news site.
- File Classification actions are available within all Content Analysis rules as well as download file type/size rules and malware scanning rules. A file classification applies to a specific upload or download request.
Adding a logging classification
To add a classification:- Select Classifications in the left pane of the console.
-
Click the New Classification icon in the tool bar to open the New Classification wizard.
In the New Classification window, enter a name and optionally a description for the classification.
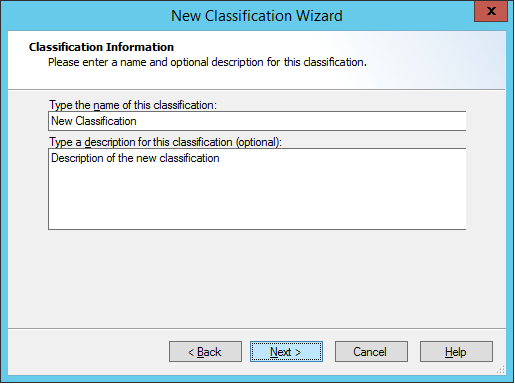
New Classification Wizard, Classification Information window
- Complete the wizard to add the classification.
Editing a logging classification
To edit a classification:- Double-click the classification name in the Console to open the Edit Classification window.
- Make any required changes.
- Click OK.
Deleting a logging classification
To delete a Classification:- Right-click the classification name in the Console.
- Select Delete.
Notifying users with notification pages
WebMarshal uses web pages to provide pre-configured notification messages to users. The notifications can also be customized.Notification web pages
When a user requests a Web resource that triggers a rule, they may receive a notification web page. The notification could simply state that a request was denied, or it could request acknowledgement of a warning before processing the request. The choice of notification pages is made on the Action page of each rule wizard. Choices vary according to the type of rule.Default notification pages
WebMarshal is supplied with a number of default notification pages. The files are standard HTML pages, located in the\ArrayManager\Policy\Templates sub-directory of the WebMarshal installation directory on the Array Manager server.
When you commit WebMarshal Configuration, any changes to items in this folder are copied to each processing node server, and stored in the folder
Node\Policy\Templates. New files and subfolders are also copied.You should only make changes to the Array Manager folder. The Node folders will be overwritten.You can store small helper files in this location, but any large content should be served from another location.- Page Blocked: for denied web pages and other items where no part of the file was returned to the browser.
- Standard
- AdvertisingSmall (used in default rules for advertising sites)
- Blank (used for images)
- Offensive (for offensive content)
- Small
- With Sound (audible warning)
- File Aborted: for denied file type or size, where a portion of the file was returned to the browser.
- Standard
- Malicious (Malware content)
- Virus (virus content)
- File Blocked: for denied file type or size.
- Standard
- Malicious (Malware content)
- TextCensor (lexical scan found denied content)
- TextCensor Offensive (lexical scan found offensive content)
- Virus (virus content)
- GoogleWebRisk: used by the Google Web Risk policy. Any custom versions of these pages must include the Google disclaimer.
- GoogleWebRiskBlocked
- GoogleWebRiskWarning
- Quota: for quota rules.
- Quotas (displays the user’s quota)
- Quota Exceeded
- Quota Extend (allows the user to request an extension)
- TRACEnet: used by the TRACEnet policy.
- TRACEnet Blocked
- ReclassifyThanks (acknowledges the user’s request to reclassify a blocked item)
- Upload Blocked: for upload rules.
- Standard
- Malicious (Malware content)
- TextCensor (lexical scan found denied content)
- Virus (virus content)
- Warning: before access to “permitted with warning” sites.
- Standard
- Malicious (Malware content)
- Offensive (lexical scan found offensive content)
- Policy (for policy display rules)
- Previous Scan (site was placed in a URL category by a previous scan)
- Quotas (states that access is subject to quota)
- TextCensor (lexical scan found questionable content)
Editing notification pages
You can create new versions of the warning/blocking pages, or modify the existing pages. Use HTML editing software to create or modify warning/blocking pages. There are several types of warning/blocking pages, each identified by a filename prefix. New page names must start with one of the defined prefixes. The page types are as follows:- Aborted: used when blocking websites where a portion of the file has been returned to the browser.
- Blocked: used when blocking websites.
- Warning: used to prompt the user before permitting access to a site.
- FileBlocked: used when a file is blocked by a file type or malware rule.
- UploadBlocked: used when a file upload is blocked.
- QuotaExceeded: used when a WebMarshal quota has been exceeded by the user.
- QuotaExtend: used to allow the user to extend a quota.
Blocked.htm to a new file BlockedPorn.htm. From then on, BlockedPorn.htm is available in the list of blocking pages when editing a site rule.
Please note the following important recommendations before editing the warning/blocking pages.
- Do not change the original page; instead, copy the file and make any changes to the copy.
- After changing pages, test them to make sure that they are still functioning correctly. Several pages include special forms that process user input; amending such a page may affect the prompting functionality.
- If you want to refer to the
\Templatessub-directory, use the virtual domain name “webmarshal.home.” For example, a link to a file placed in the\Templatessub-directory could be: - Files over 32KB in size (such as a company policy document) should not be served from the Templates sub-directory, to avoid deadlock problems with configuration updates. Host large files on another server/site.
- If you make links to other sites, ensure that these links are full URLs, not relative paths. WebMarshal replaces the content returned from websites with the warning/blocking pages. If you use a relative path, the link will refer back to the original blocked site.
You can also customize error pages for proxy authentication and other system functions. Please see LevelBlue Knowledge Base article Q10318 for more details.