You can manage your own user account, which enables you to do the following:
- Change your email address, name, and password
- Enable multifactor authentication (MFA) for the account
- Select your default landing page after you have logged in
- Configure an interval for auto-refreshing the dashboards and alarms pages
- Activate for
-
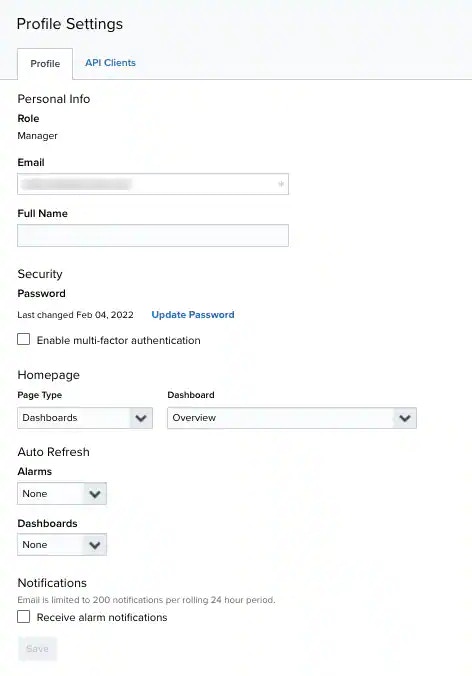
At the bottom of the expanded pane of the USM Anywhere web user interface (UI), hover over the profile settings options, and select Profile Settings.
-
Modify the data of the items that can be modified.
Change Your Email Address, Name, and Password
USM Anywhere helps you meet the Payment Card Industry (PCI) standard by enforcing password complexity, password expiration, and forbidding password reuse. See the USM Anywhere Password Policy for details.To set a new password- Open the Profile Settings page.
-
You have two options to choose from based on your role:
- General user: At the bottom of the expanded pane of the USM Anywhere web user interface (UI), hover over the profile settings options, and select Profile Settings.
- Manager: Go to Settings > Users and click the
 icon of your user.
Both actions open the profile page.
icon of your user.
Both actions open the profile page.
-
Click Update Password to display the password fields.
Note: The date of the last update displays in front of the Update Password button.
- Enter your current password and the new password.
- Click Save.
Enable MFA
If you want to protect your account, enable MFA for your user account. When this feature is activated, USM Anywhere displays the multifactor authentication page for you to complete your MFA configuration. The displayed page provides a unique QR code that is used by the Authenticator app to retrieve a verification code. See Using Multifactor Authentication for more information about this security configuration.To enable MFANote: LevelBlue recommends that users enable MFA for their account. MFA adds extra security because it requires multiple factors to a user, making it more difficult for an unauthorized person to gain access to the account.- Open the Profile Settings page.
-
You have two options to choose from based on your role:
- General user: At the bottom of the expanded pane of the USM Anywhere web user interface (UI), hover over the profile settings options, and select Profile Settings.
- Manager: Go to Settings > Users and click the icon of your user.
Both actions open the profile page.
- Select Enable Multi-Factor Authentication.
- Click Save.
Select Your Default Landing Page After You Have Logged In
USM Anywhere gives you the option of selecting your default landing page after you have logged in.To select your default landing page after you have logged in- Open the Profile Settings page.
-
You have two options to choose from based on your role:
- General user: At the bottom of the expanded pane of the USM Anywhere web user interface (UI), hover over the profile settings options, and select Profile Settings.
- Manager: Go to Settings > Users and click the icon of your user.
Both actions open the profile page.
-
Select the default home page you want to display after you have logged in. You have these options:
- Dashboards: You can select a specific dashboard to use it as a landing page. The list of dashboards is alphabetically ordered and also includes the custom dashboards you can create.
Note: Keep in mind that dashboard names that begin with a lowercase letter are located at the end of the list.- Activity: Select alarms or events.
- Environment: Select assets, asset groups, vulnerabilities, or configuration issues.
- Investigations: You can select the investigations page to use it as a landing page.
- Click Save.
Select the Time for Auto-Refreshing the Alarms and Dashboard Pages
If you want to configure the time that the alarms and dashboard pages refresh their information, you can set an interval. These are the options:- None: The page works as usual and displays the
 icon for manually updating the page.
 - Every 5 min: The page is reloaded every 5 minutes.
- Every 10 min: The page is reloaded every 10 minutes.
- Every 15 min: The page is reloaded every 15 minutes.
Activate Alarm Notifications
If you want notification on alarms generated by USM Anywhere, activate the notification option for your user account. When this feature is activated, USM Anywhere sends an email to provide real-time notification of critical security incidents.To activate alarm notificationsNote: These notifications send emails using Simple Mail Transfer Protocol (SMTP). There is a quota of 200 emails per day.- Open the Profile Settings page.
-
You have two options to choose from based on your role:
- General user: At the bottom of the expanded pane of the USM Anywhere web user interface (UI), hover over the profile settings options, and select Profile Settings.
- Manager: Go to Settings > Users and click the icon of your user.
Both actions open the profile page.
-
Select Receive Alarm Notifications.
Note: It can take up to one hour for the notifications to take effect.
- Click Save.
- At the bottom of the expanded pane of the USM Anywhere web user interface (UI), hover over the profile settings options.
- Select Logout.